Создание шаблона
Руководство по созданию макета (болванки) для шаблона
рейтинг: 9.5/10, голосов: 51
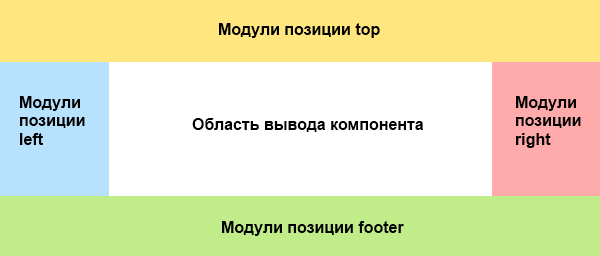
Для начала необходима обычная XHTML страничка. Можно воспользоваться каким-нибудь сервисом для генератора HTML шаблонов. Или создать шаблон самостоятельно. Рассмотрим, в качестве примера, часто используемый шаблон с шапкой, футером и двумя колонками по бокам.

Разметка HTML будет выглядеть так:
<!DOCTYPE html PUBLIC "-//W3C//DTD XHTML 1.0 Strict//EN" "http://www.w3.org/TR/xhtml1/DTD/xhtml1-strict.dtd">
<html xmlns="http://www.w3.org/1999/xhtml">
<head>
    <meta http-equiv="content-type" content="text/html; charset=utf-8" />
    <title></title>
    <meta name="title" content="" />
    <meta name="keywords" content="" />
    <meta name="description" content="" />
    <link rel="stylesheet" href="/style.css" type="text/css" media="screen, projection" />
    <!--[if lte IE 6]><link rel="stylesheet" href="/style_ie.css" type="text/css" media="screen, projection" /><![endif]-->
</head>
<body>
<div id="wrapper">
    <!-- #header-->
    <div id="header">
    </div>
    <div id="middle">
        <div id="container">
            <div id="content">
            </div><!-- #content-->
        </div><!-- #container-->
        <div class="sidebar" id="sideLeft">
        </div><!-- .sidebar#sideLeft -->
        <div class="sidebar" id="sideRight">
        </div><!-- .sidebar#sideRight -->
    </div><!-- #middle-->
    <div id="footer">
    </div><!-- #footer -->
</div><!-- #wrapper -->
</body>
</html>
И файл стилей style.css, для данной разметки:
* {
    margin: 0;
    padding: 0;
}
body {
    font: 12px/18px Arial, Tahoma, Verdana, sans-serif;
}
a {
    color: blue;
    outline: none;
    text-decoration: underline;
}
a:hover {
    text-decoration: none;
}
/* Begin of styles for the demonstration (you can remove them) */
a.expand {
    width: 150px;
    display: block;
    margin: 10px 0 0;
}
a.expand:hover {
    height: 500px;
}
/* End of of styles for the demonstration */
p {
    margin: 0 0 18px
}
img {
    border: none;
}
input {
    vertical-align: middle;
}
#wrapper {
    width: 100%;
    min-width: 1000px;
}
/* Header
---------------------------------------*/
#header {
    height: 150px;
    background: #FFE680;
}
/* Middle
---------------------------------------*/
#middle {
    border-left: 250px solid #B5E3FF;
    border-right: 250px solid #FFACAA;
    height: 1%;
    position: relative;
}
#middle:after {
    content: '.';
    display: block;
    clear: both;
    visibility: hidden;
    height: 0;
}
#container {
    width: 100%;
    float: left;
    overflow: hidden;
    margin-right: -100%;
}
#content {
    padding: 0 20px;
}
/* Sidebar Left
---------------------------------------*/
#sideLeft {
    float: left;
    width: 250px;
    position: relative;
    background: #B5E3FF;
    left: -250px;
}
/* Sidebar Right
---------------------------------------*/
#sideRight {
    float: right;
    margin-right: -250px;
    width: 250px;
    position: relative;
    background: #FFACAA;
}
/* Footer
---------------------------------------*/
#footer {
    height: 100px;
    background: #BFF08E;
}
Обзор макета для Joomla
С точки зрения Joomla этот макет разбивается на области, где будет выводиться основное содержимое (компонент) и дополнительное (модули).
При создании шаблонов Joomla используются следующие конструкции для вывода содержимого:
Содержимое HEAD
Здесь выводятся содержимое между тегами <head>…</head>, мета описание, заголовок страницы, подключаемые JavaScript и т. д. Для этого используется конструкция:
<jdoc:include type="head" />
Основное содержимое (компонент)
Для вывода основного содержимого, как правило это является содержимое компонента, используется следующая конструкция:
<jdoc:include type="component" />
Содержимое сообщения
Для вывода системных сообщений, например, сообщение при неудачной авторизации, используется конструкция:
<jdoc:include type="message" />
Содержимое модулей
Для вывода содержимого модулей используется конструкция:
<jdoc:include type="modules" name="position" style="xhtml" />
Для контроля и подсчета модулей в позициях предусмотрен метод countModules.
Содержимое модуля
Можно также вывести содержимое одного модуля, для этого используется конструкция:
<jdoc:include type="module" name="custom" title="Title for module" />
- name — это название модуля, в данном примере это будет mod_custom
- title — заголовок модуля, должен совпадать с настройками модуля
В эту конструкцию можно добавлять дополнительные атрибуты, для контроля вывода содержимого модуля, например style=«xhtml».
При добавлении позиций или модуля в шаблон, не забывайте проверять настройки модулей — публикацию модуля и доступность модуля для текущего пользователя.
Использование параметров в шаблоне
Параметры для шаблона устанавливаются в XML файле описания шаблона. Их можно устанавливать в административной панели Joomla для нужного шаблона («Расширения» -> «Менеджер шаблонов»). С помощью этих параметров можно контролировать поведение шаблона, например, задать какой-то цвет для фона, вывести в качестве логотипа нужную картинку и т. п. Для получения значения параметра в шаблоне используется:
<?php $this->params->get('Имя параметра'); ?>
Соответственно для вывода значение параметра используется:
<?php echo $this->params->get('Имя параметра'); ?>
Стандартно в Joomla используется несколько типов для параметров, которые описываются в XML файле.
Шаблон для Joomla
С учетом этих данных нужно переписать HTML шаблон, сделать его шаблоном для Joomla. Расставить позиции модулей по своим местам, создать и подключить нужные CSS стили, задать область для вывода компонента и сообщений.
<?php
// защита от прямого доступа к файлу
defined('_JEXEC') or die;
?>
<!DOCTYPE html PUBLIC "-//W3C//DTD XHTML 1.0 Strict//EN" "http://www.w3.org/TR/xhtml1/DTD/xhtml1-strict.dtd">
<html xmlns="http://www.w3.org/1999/xhtml" xml:lang="<?php echo $this->language; ?>" lang="<?php echo $this->language; ?>" dir="<?php echo $this->direction; ?>" >
<head>
    <jdoc:include type="head" />
    <link rel="stylesheet" href="/<?php echo $this->baseurl; ?>/templates/<?php echo $this->template; ?>/css/style.css" type="text/css"  />
    <!--[if lte IE 6]>
    <link rel="stylesheet" href="/<?php echo $this->baseurl; ?>/templates/<?php echo $this->template; ?>/css/style_ie.css" type="text/css"  />
    <![endif]-->
</head>
<body>
<div id="wrapper">
    <!-- #header-->
    <div id="header">
        <?php if ($this->params->get('logo')) : ?>
        <img src="/<?php echo $this->baseurl ?>/<?php echo htmlspecialchars($this->params->get('logo')); ?>"  alt="MyLogo" />
        <?php endif;?>
        <jdoc:include type="modules" name="top" style="xhtml" />
    </div>
    <div id="middle">
        <div id="container">
            <div id="content">
                <jdoc:include type="message" />
                <jdoc:include type="component" />
            </div><!-- #content-->
        </div><!-- #container-->
        <div class="sidebar" id="sideLeft">
            <jdoc:include type="modules" name="left" style="xhtml" />
        </div><!-- .sidebar#sideLeft -->
        <div class="sidebar" id="sideRight">
            <jdoc:include type="modules" name="right" style="xhtml" />
        </div><!-- .sidebar#sideRight -->
    </div><!-- #middle-->
    <div id="footer">
        <jdoc:include type="modules" name="footer" style="xhtml" />
    </div><!-- #footer -->
</div><!-- #wrapper -->
</body>
</html>
Нужно сохранить этот файл как index.php, это будет основной файл шаблона. В этом примере используется один параметр с именем «logo», в зависимости от которого будет выводиться соответствующая картинка в шапке шаблона. Хотя этих параметров может быть сколько угодно много и разного типа. Свойства типа $this->baseurl и т. п., это стандартные свойства Joomla, которые берутся из классов JDocumentHTML и JDocument соответственно.
XML файл инструкций для шаблона
Теперь нужно создать XML файл инструкций для шаблона templateDetails.xml
<?xml version="1.0" encoding="utf-8"?>
<extension version="1.6" type="template" client="site">
    <!-- Название шаблона -->
    <name>Mytemplate</name>
    <!-- Это не обязательные элементы, отображают информацию о авторе, лицензии и прочее -->
    <creationDate>21 May 2010</creationDate>
    <author>SmokerMan</author>
    <authorEmail>j-wiki@bk.ru</authorEmail>
    <authorUrl>http://www.j-wiki.ru</authorUrl>
    <copyright>Copyright (C) 2005 - 2011 Open Source Matters, Inc. All rights reserved.</copyright>
    <license>GNU General Public License version 2 or later</license>
    <!-- Версия шаблона -->
    <version>1.6.0</version>
    <!-- Описание шаблона -->
    <description>TPL_MYTEMPLATE_XML_DESCRIPTION</description>

    <!-- Файлы из которых состоит шаблон -->
    <files>
        <!-- Можно указывать директории -->
        <folder>css</folder>
        <folder>language</folder>
        <filename>index.html</filename>
        <filename>index.php</filename>
        <filename>templateDetails.xml</filename>
    </files>
    <!-- Позиции модулей, используемые в шаблоне -->
    <positions>
        <position>top</position>
        <position>left</position>
        <position>right</position>
        <position>footer</position>
    </positions>
    <!-- Установка/Удаление файлов локализации -->
    <languages folder="language">
        <language tag="ru-RU">ru-RU/ru-RU.tpl_mytemplate.ini</language>
        <language tag="ru-RU">ru-RU/ru-RU.tpl_mytemplate.sys.ini</language>
    </languages>
    <!-- Параметры для шаблона -->
    <config>
        <fields name="params">
            <fieldset name="advanced">
                <field name="logo" type="media"
                       label="TPL_MYTEMPLATE_LOGO_LABEL"
                       description="TPL_MYTEMPLATE_FIELD_LOGO_DESC" />
            </fieldset>
        </fields>
    </config>
</extension>
Локализация шаблона
Для перевода значений используются файлы локализации. Нужно создать их в директории language. Например, файл для перевода описаний и позиций для русской локализации будет следующий:
language/ru-RU/ru-RU.tpl_mytemplate.sys.ini.
TPL_MYTEMPLATE_XML_DESCRIPTION="Это мой первый шаблон"
TPL_MYTEMPLATE_POSITION_TOP="Модули вверху"
TPL_MYTEMPLATE_POSITION_LEFT="Модули слева"
TPL_MYTEMPLATE_POSITION_RIGHT="Модули справа"
TPL_MYTEMPLATE_POSITION_FOOTER="Модули внизу"
В этой директории нужно создать второй файл, для перевода значений параметров, ru-RU.tpl_mytemplate.ini.
TPL_MYTEMPLATE_LOGO_LABEL="Логотип"
TPL_MYTEMPLATE_FIELD_LOGO_DESC="Выберите желаемый логотип"
Конечная структура шаблона
Также в каждой директории желательно создать пустые файлы index.html, для запрета листинга директорий.
<html><body bgcolor="#FFFFFF"></body></html>
Структура файлов обычного шаблона для Joomla будет следующей:

Теперь можно архивировать файлы в ZIP архив и устанавливать в Joomla через «Менеджер расширений».
Внизу можете загрузить готовый архив с созданным шаблоном.
Не знаю, насколько это важно для Вас.
Вот ошибка в ссылке в шаблоне:
<link rel="stylesheet" href="/
Правый слеш надо убрать!
С Уважением!
Не думаю что слэш убирать нужно. Если файл ищется от корня сайта то слэш необходим....
Именно так! Первый слеш лишний!
Ошибка! Не найден XML-файл установки Joomla!
Файл XML есть!
Роман, возможно вы сохранили файл не в той кодировке, например в блокноте кодировка по умолчанию ANSI, а нужно в Юникоде, у меня такое было.
Роман, проверьте сам файл, может скобки не закрыты
Совершенно ничего толком и по делу, бред для дураков
Еще одна ошибка в файле шаблона.
Вот строки кода (ОБРАТИТЕ ВНИМАНИЕ на href="/s<?php и потерянную букву в tyle_ie.css):
<!--[if lte IE 6]>
<link rel="stylesheet" href="/s<?php echo $this->baseurl; ?>/templates/<?php echo $this->template; ?>/css/tyle_ie.css" type="text/css" />
<![endif]-->
Правильный вариант:
<!--[if lte IE 6]>
<link rel="stylesheet href="/<?php echo $this->baseurl; ?>/templates/<?php echo $this->template; ?>/css/style_ie.css" type="text/css" />
<![endif]-->
А по-моему, нормальное описание, мне пригодилось.
Сайту респект!
Спасибо, по вашей статье сделал наш сайт стоматологии без помощи программистов.
На счет того, что не хочет устанавливатся шаблон то причина в том, что вместо тега в templateDetails.xml
<extension version="1.6" type="template" client="site">
используйте
<install version="1.6" type="template">
по крайней мере мне помогло)
И еще такой вопрос:
У меню с всего шаблона отображается только header. Тоесть видно желтый фон. В чем причина?
Что то мне подсказывает что причина в етом куске кода:
<?php if ($this->params->get('logo')) : ?>
<img src="/<?php echo $this->baseurl ?>/<?php echo htmlspecialchars($this->params->get('logo')); ?>" alt="MyLogo" />
<?php endif;?>
<jdoc:include type="modules" name="top" style="xhtml" />
У меня получилось только после того, как я добавила доктайп из стандартного файла и удалила комментарии
справка ип на визу словакия
My spouse and I absolutely love your blog and find the majority of your
post's to be just what I'm looking for. Does one offer guest writers to write
content available for you? I wouldn't mind creating a post or elaborating on a few of the subjects you write about here.
Again, awesome web log!
оформление швейцарской визы в екатеринбурге
Greetings from Florida! I'm bored to tears at work so
I decided to browse your blog on my iphone during lunch break.
I really like the information you provide here and can't wait to take
a look wwhen I get home. I'm surprised at how quick your blog loaded on my phone ..
I'm not even using WIFI, just 3G .. Anyways, great site!
You'll additionally desire to be sure that anyone retain your money well-hidden on oneself.
Pretty nice post. I just stumbled upon your weblog
and wished to mention that I've truly loved surfing around your weblog posts.
After all I'll be subscribing on your rss feed and I am hoping
you write once more soon!
Ahaa, its fastidious dialogue about this piece of writing here
at this weblog, I have read all that, so at this time me also commenting here.
Good post. I learn something new and challenging on websites
I stumbleupon everyday. It will always be useful to read through articles from
other authors and use something from their websites.
What's up colleagues, its enormous piece of writing regarding teachingand fully explained,
keep it up all the time.
Hi there colleagues, how is the whole thing, and what you
would like to say regarding this article, in my view its actually awesome designed for
me.
At this time it looks like BlogEngine is the best blogging
platform available right now. (from what I've read) Is that what you are using on your blog?
Great article, totally what I needed.
Wow! After all I got a web site from where I can actually get valuable information concerning my study and knowledge.
Do you mind if I quote a few of your posts as long as I provide credit and sources back to your website?
My blog is in the very same area of interest as yours and my visitors would
truly benefit from some of the information you provide here.
Please let me know if this ok with you. Many thanks!
If you want to improve your familiarity simply keep visiting this
web page and be updated with the hottest news posted here.
Hello to all, since I am actually eager of reading this website's post to be updated on a
regular basis. It carries pleasant material.
Hey there! I simply wish to offer you a big thumbs up for your excellent info you've
got right here on this post. I am returning to your website for more soon.
Great work! This is the kind of information that should be shared around the internet.
Shame on the seek engines for not positioning this put up higher!
Come on over and visit my web site . Thank you =)
bunadisisj nsjjsjsisjsmizjzjjzjzz zumzsert
bunadisisj nsjjsjsisjsmizjzjjzjzz zumzsert
After i originally commented I appear to get clicked the -Notify me when new feedback are extra- checkbox and Any further every time a remark is additional I recieve four emails with the exact same remark. Is there a means you can easily take out me from that services? Quite a few thanks!
This great site was… how do you say it? Related!! Eventually I’ve identified something which helped me. Numerous many thanks!
Place on with this produce-up, I absolutely believe this site desires a terrific deal more focus. I’ll probably be returning to examine extra, many thanks for the data!
Spot on with this particular publish-up, I actually believe that this website needs far more attention. I?ll possibly be again once more to browse a lot more, many thanks for the information!
Hi joomla-book.ru admin, Thanks for the well-written and informative post!
%%
%%
%%
%%
%%
Thanks for your marvelous posting! I quite enjoyed reading it, you happen to be a
great author.I will be sure to bookmark your blog and will come back later in life.
I want to encourage you to definitely continue
your great job, have a nice day!
hey there and thank you for your information – I have definitely picked up anything new from right here.
I did however expertise a few technical points using this site, as I experienced to
reload the site a lot of times previous to I could get it to load
properly. I had been wondering if your web hosting is OK?
Not that I'm complaining, but slow loading instances times
will sometimes affect your placement in google and could damage
your quality score if ads and marketing with Adwords.
Well I'm adding this RSS to my e-mail and can look out for a lot
more of your respective intriguing content. Ensure that
you update this again soon.
I blog often and I genuinely thank you for your information. This great article has
really peaked my interest. I will book mark your blog and keep checking for new details about once per week.
I opted in for your Feed as well.
Hi there! I'm at work surfing around your blog from my new iphone!
Just wanted to say I love reading your blog and look forward to all your
posts! Carry on the superb work!
Hi there to every one, the contents existing at this
web site are actually awesome for people experience, well,
keep up the nice work fellows.
The other day, while I was at work, my cousin stole my iphone and tested to see if it
can survive a forty foot drop, just so she can be a youtube sensation. My iPad is now destroyed and she has 83 views.
I know this is entirely off topic but I had to share it with
someone!
Thank you for the auspicious writeup. It in fact was a leisure
account it. Look complicated to more added agreeable from you!
By the way, how can we keep up a correspondence?
It's really a great and useful piece of information. I'm happy that you simply shared this useful information with
us. Please keep us informed like this. Thanks for sharing.
Pretty nice post. I simply stumbled upon your blog and wanted to
mention that I have really loved surfing around your weblog posts.
In any case I'll be subscribing to your feed and I hope you write once
more very soon!
I am really happy to glance at this website posts which consists of plenty of helpful information, thanks for providing these information.
Thanks for finally writing about >Создание шаблона
Joomla, как изменить шаблон, основные настройки и параметры / Разработка шаблонов Joomla .:.
Документация Joomla! CMS <Liked it!
Outstanding story there. What happened after? Good luck!
Its such as you read my thoughts! You appear to understand so much approximately this, such as you wrote the book
in it or something. I believe that you simply can do with some percent to pressure the message home a bit, however other
than that, that is excellent blog. A fantastic read. I will
certainly be back.
I take pleasure in, lead to I found exactly what I used to be having a look for.
You have ended my 4 day long hunt! God Bless
you man. Have a nice day. Bye
Hey I know this is off topic but I was wondering if you knew of any widgets I could add
to my blog that automatically tweet my newest twitter updates.
I've been looking for a plug-in like this for quite some time and
was hoping maybe you would have some experience with something like this.
Please let me know if you run into anything. I truly enjoy reading your blog
and I look forward to your new updates.
Having read this I believed it was extremely enlightening.
I appreciate you taking the time and effort to
put this information together. I once again find myself personally spending way
too much time both reading and leaving comments. But so what, it was still worth it!
Fantastic blog! Do you have any tips and hints for aspiring writers?
I'm hoping to start my own website soon but I'm a little lost on everything.
Would you recommend starting with a free platform like Wordpress or go for a
paid option? There are so many choices out there that I'm
completely overwhelmed .. Any suggestions? Bless you!
%%
Do you have any video of that? I'd want to find out more details.
Greetings from Idaho! I'm bored to tears at work so I
decided to browse your site on my iphone during lunch break.
I enjoy the knowledge you provide here and can't wait
to take a look when I get home. I'm shocked at how fast your blog
loaded on my phone .. I'm not even using WIFI, just 3G ..
Anyways, superb blog!
Great blog you have got here.. It's hard to find
good quality writing like yours nowadays. I honestly appreciate
people like you! Take care!!
%%
%%
Hello, Neat post. There's a problem with your site in web explorer, might
check this? IE nonetheless is the market leader and a huge part of
folks will pass over your wonderful writing because of this problem.
Pretty element of content. I just stumbled upon your web site and
in accession capital to claim that I acquire actually enjoyed account your weblog posts.
Anyway I will be subscribing for your augment or even I success you access constantly
quickly.
Hey I know this is off topic but I was wondering if you knew of any widgets I could add to my blog that automatically tweet my newest twitter updates.
I've been looking for a plug-in like this for quite some time and was hoping maybe you would have some experience with something
like this. Please let me know if you run into anything.
I truly enjoy reading your blog and I look forward to your new updates.
This is my first time visit at here and i am really happy to read everthing
at one place.
Thanks to my father who stated to me concerning this web site, this weblog is in fact awesome.
Useful information. Lucky me I found your website unintentionally, and I am stunned why this accident didn't took
place earlier! I bookmarked it.
I blog frequently and I truly appreciate your content.
Your article has truly peaked my interest. I'm going to take a note of your website and keep checking
for new details about once a week. I subscribed to your RSS feed as well.
If you would like to grow your know-how simply keep
visiting this site and be updated with the newest news posted here.
It's amazing designed for me to have a site, which
is good in support of my know-how. thanks admin
Peculiar article, totally what I wanted to find.
I simply couldn't go away your website prior to suggesting that I extremely enjoyed the standard info
an individual provide to your guests? Is gonna be back continuously to check
out new posts
Hi, Neat post. There's an issue along with your web site in web
explorer, could check this? IE nonetheless is the market leader and a large portion of people will
leave out your excellent writing due to this problem.
I read this paragraph fully regarding the resemblance of hottest and preceding technologies,
it's awesome article.
I pay a quick visit each day some web sites and information sites to read
content, but this webpage presents feature based posts.
Good way of telling, and nice piece of writing to obtain information about my presentation subject, which i am going to present
in college.
Ahaa, its good dialogue about this post here at this webpage, I have
read all that, so now me also commenting here.
new88 new88 new88 new88 new88 new88 new88 new88 new88 new88 new88 new88 new88 new88 new88 new88 new88 new88 new88 new88 new88 new88 new88 new88 new88 new88 new88
new88 new88 new88 new88 new88 new88 new88 new88 new88 new88
new88 new88 new88 new88 new88 new88 new88
new88 new88 new88 new88 new88 new88 new88 new88
new88 new88 new88 new88 new88 new88 new88 new88 new88 new88 new88 new88 new88 new88
new88 new88 new88 new88 new88 new88 new88 new88 new88 new88 new88 new88 new88 new88 new88 new88 new88 new88 new88 new88
new88 new88 new88 new88 new88 new88 new88 new88 new88 new88 new88 new88 new88 new88 new88
new88 new88 new88 new88 new88 new88 new88 new88 new88 new88 new88 new88 new88 new88 new88 new88 new88 new88 new88 new88 new88 new88 new88 new88
new88 new88 new88 new88 new88 new88 new88 new88 new88 new88 new88 new88 new88 new88 new88 new88 new88 new88 new88 new88
new88 new88 new88 new88 new88 new88 new88 new88 new88
new88 new88 new88 new88 new88 new88 new88 new88 new88 new88 new88 new88 new88 new88 new88 new88 new88 new88 new88 new88
new88 new88 new88 new88 new88 new88 new88 new88 new88 new88 new88 new88 new88 new88 new88 new88 new88 new88 new88 new88 new88 new88 new88 new88 new88
new88 new88 new88 new88 new88 new88 new88 new88 new88 new88 new88
new88 new88 new88 new88 new88 new88 new88 new88
new88 new88 new88 new88 new88 new88 new88 new88 new88 new88 new88 new88 new88 new88 new88 new88 new88 new88 new88 new88 new88 new88 new88 new88 new88 new88 new88 new88 new88 new88 new88 new88 new88 new88 new88 new88 new88 new88
new88 new88 new88 new88 new88 new88 new88 new88 new88 new88 new88 new88
new88 new88 new88 new88 new88 new88 new88 new88 new88 new88 new88 new88 new88 new88 new88 new88 new88
new88 new88 new88 new88 new88 new88 new88 new88 new88 new88 new88
new88 new88 new88 new88 new88 new88 new88 new88 new88 new88 new88 new88 new88
new88 new88 new88 new88 new88 new88 new88 new88 new88 new88 new88 new88 new88 new88 new88 new88 new88 new88
new88 new88 new88 new88 new88 new88 new88 new88 new88 new88
new88 new88 new88 new88 new88 new88 new88 new88 new88 new88 new88 new88 new88 new88 new88 new88 new88
new88 new88 new88 new88 new88 new88 new88 new88 new88 new88 new88 new88 new88 new88 new88 new88 new88 new88 new88 new88 new88
new88 new88 new88 new88 new88 new88 new88 new88 new88 new88 new88 new88 new88 new88 new88 new88 new88 new88 new88 new88 new88 new88 new88 new88 new88 new88 new88 new88
new88 new88 new88 new88 new88 new88 new88 new88 new88 new88 new88 new88 new88 new88
new88 new88 new88 new88 new88 new88 new88 new88 new88 new88 new88 new88 new88 new88 new88 new88 new88
new88 new88 new88 new88 new88 new88 new88 new88 new88 new88 new88 new88 new88 new88 new88 new88 new88 new88 new88 new88 new88 new88 new88 new88 new88 new88 new88 new88
new88 new88 new88 new88 new88 new88 new88 new88 new88 new88 new88 new88 new88 new88 new88 new88 new88 new88 new88 new88 new88 new88
new88 new88 new88 new88 new88 new88 new88 new88 new88 new88 new88 new88 new88 new88 new88 new88 new88 new88 new88
new88 new88 new88 new88 new88 new88 new88 new88 new88 new88
new88 new88 new88 new88 new88 new88 new88 new88 new88 new88 new88 new88 new88 new88
new88 new88 new88 new88 new88 new88 new88 new88 new88 new88 new88
new88 new88 new88 new88 new88 new88 new88 new88 new88 new88 new88 new88
new88 new88 new88 new88 new88 new88 new88 new88 new88 new88 new88 new88 new88 new88
new88 new88 new88 new88 new88 new88 new88 new88 new88 new88
new88 new88 new88 new88 new88 new88 new88 new88
new88 new88 new88 new88 new88 new88 new88 new88 new88
new88 new88 new88 new88 new88 new88 new88 new88 new88 new88 new88 new88 new88 new88 new88 new88 new88 new88 new88
new88 new88 new88 new88 new88 new88 new88 new88 new88 new88 new88 new88 new88 new88 new88 new88 new88 new88 new88 new88 new88 new88 new88 new88 new88 new88 new88 new88 new88 new88 new88
new88 new88 new88 new88 new88 new88 new88 new88 new88 new88 new88 new88 new88 new88 new88 new88 new88 new88 new88 new88 new88 new88 new88 new88 new88 new88 new88 new88 new88 new88 new88 new88 new88 new88 new88 new88 new88 new88
new88 new88 new88 new88 new88 new88 new88 new88 new88 new88 new88 new88 new88 new88 new88 new88 new88 new88 new88 new88 new88 new88 new88 new88 new88 new88 new88 new88 new88 new88 new88 new88 new88 new88 new88 new88 new88 new88 new88 new88 new88 new88 new88 new88 new88 new88 new88 new88 new88 new88 new88 new88 new88 new88 new88 new88
new88 new88 new88 new88 new88 new88 new88 new88 new88 new88
new88 new88 new88 new88 new88 new88 new88 new88 new88 new88
new88 new88 new88 new88 new88 new88 new88 new88 new88 new88 new88 new88 new88 new88 new88 new88 new88 new88 new88 new88 new88 new88 new88 new88 new88 new88
new88 new88 new88 new88 new88 new88 new88 new88 new88 new88 new88 new88 new88 new88 new88
new88 new88 new88 new88 new88 new88 new88 new88
new88 new88 new88 new88 new88 new88 new88 new88 new88 new88 new88 new88 new88 new88
new88 new88 new88 new88 new88 new88 new88 new88 new88 new88 new88 new88 new88 new88 new88 new88 new88 new88 new88 new88 new88 new88 new88 new88 new88 new88 new88 new88 new88 new88 new88 new88 new88
new88 new88 new88 new88 new88 new88 new88 new88 new88 new88 new88 new88 new88 new88 new88 new88 new88 new88 new88 new88
new88 new88 new88 new88 new88 new88 new88 new88 new88 new88 new88 new88 new88 new88 new88
new88 new88 new88 new88 new88 new88 new88 new88 new88 new88 new88 new88 new88 new88 new88 new88 new88
new88 new88 new88 new88 new88 new88 new88 new88 new88 new88 new88 new88 new88 new88
new88 new88 new88 new88 new88 new88 new88 new88
new88 new88 new88 new88 new88 new88 new88 new88 new88 new88
new88 new88 new88 new88 new88 new88 new88 new88 new88 new88 new88 new88 new88 new88 new88 new88 new88 new88 new88 new88 new88 new88 new88 new88 new88 new88 new88 new88 new88 new88 new88
new88 new88 new88 new88 new88 new88 new88 new88 new88 new88 new88 new88 new88 new88 new88 new88 new88
new88 new88 new88 new88 new88 new88 new88 new88 new88 new88 new88 new88
new88 new88 new88 new88 new88 new88 new88 new88 new88
new88 new88 new88 new88 new88 new88 new88 new88 new88
new88 new88 new88 new88 new88 new88 new88 new88 new88
new88 new88 new88 new88 new88 new88 new88 new88 new88 new88 new88 new88 new88 new88
new88 new88 new88 new88 new88 new88 new88 new88 new88
new88 new88 new88 new88 new88 new88 new88 new88 new88 new88 new88 new88
new88 new88 new88 new88 new88 new88 new88 new88 new88 new88 new88 new88 new88 new88 new88 new88 new88 new88 new88 new88 new88 new88 new88 new88 new88
new88 new88 new88 new88 new88 new88 new88 new88 new88 new88
new88 new88 new88 new88 new88 new88 new88 new88 new88 new88 new88
new88 new88 new88 new88 new88 new88 new88 new88 new88 new88 new88 new88 new88 new88 new88 new88 new88 new88 new88
new88 new88 new88 new88 new88 new88 new88 new88 new88 new88 new88 new88 new88 new88 new88 new88 new88
new88 new88 new88 new88 new88 new88 new88 new88 new88 new88 new88 new88 new88 new88 new88 new88
new88 new88 new88 new88 new88 new88 new88 new88 new88 new88 new88 new88 new88 new88
new88 new88 new88 new88 new88 new88 new88 new88 new88 new88 new88 new88
new88 new88 new88 new88 new88 new88 new88 new88 new88 new88 new88 new88 new88 new88
new88 new88 new88 new88 new88 new88 new88 new88 new88 new88 new88 new88 new88 new88 new88 new88 new88
new88 new88 new88 new88 new88 new88 new88 new88
new88 new88 new88 new88 new88 new88 new88
new88 new88 new88 new88 new88 new88 new88 new88 new88
new88 new88 new88 new88 new88 new88 new88 new88
new88 new88 new88 new88 new88 new88 new88 new88 new88 new88
new88 new88 new88 new88 new88 new88 new88 new88 new88 new88 new88
new88 new88 new88 new88 new88 new88 new88 new88 new88 new88 new88
new88 new88 new88 new88 new88 new88 new88 new88 new88 new88 new88 new88 new88 new88 new88 new88
new88 new88 new88 new88 new88 new88 new88 new88 new88 new88 new88 new88
new88 new88 new88 new88 new88 new88 new88 new88 new88 new88 new88 new88 new88
new88 new88 new88 new88 new88 new88 new88 new88
new88 new88 new88 new88 new88 new88 new88 new88
new88 new88 new88 new88 new88 new88 new88 new88 new88 new88 new88
new88 new88 new88 new88 new88 new88 new88 new88 new88 new88 new88 new88 new88 new88 new88 new88 new88 new88 new88 new88 new88 new88 new88 new88 new88 new88 new88 new88 new88 new88
new88 new88 new88 new88 new88 new88 new88 new88 new88
new88 new88 new88 new88 new88 new88 new88 new88
new88 new88 new88 new88 new88 new88 new88 new88 new88 new88 new88 new88
new88 new88 new88 new88 new88 new88 new88 new88 new88 new88
new88 new88 new88 new88 new88 new88 new88 new88 new88
new88 new88 new88 new88 new88 new88 new88 new88 new88 new88 new88 new88 new88 new88 new88 new88
new88 new88 new88 new88 new88 new88 new88 new88 new88 new88 new88 new88 new88 new88 new88 new88 new88 new88 new88 new88 new88 new88 new88
new88 new88 new88 new88 new88 new88 new88 new88 new88 new88 new88 new88 new88 new88 new88 new88 new88 new88 new88 new88 new88 new88
new88 new88 new88 new88 new88 new88 new88 new88 new88 new88 new88 new88 new88 new88 new88 new88 new88 new88 new88 new88 new88 new88 new88 new88 new88 new88 new88
new88 new88 new88 new88 new88 new88 new88 new88 new88 new88 new88 new88 new88
new88 new88 new88 new88 new88 new88 new88 new88 new88 new88 new88 new88 new88 new88
new88 new88 new88 new88 new88 new88 new88 new88 new88 new88 new88 new88 new88 new88 new88 new88 new88 new88 new88 new88 new88 new88 new88 new88 new88 new88 new88 new88 new88 new88 new88 new88 new88 new88 new88 new88 new88
new88 new88 new88 new88 new88 new88 new88 new88 new88 new88 new88 new88 new88 new88 new88 new88 new88 new88 new88 new88 new88 new88
new88 new88 new88 new88 new88 new88 new88 new88
new88 new88 new88 new88 new88 new88 new88 new88 new88
new88 new88 new88 new88 new88 new88 new88 new88 new88 new88 new88 new88
new88 new88 new88 new88 new88 new88 new88 new88 new88 new88 new88 new88 new88 new88 new88 new88 new88
new88 new88 new88 new88 new88 new88 new88 new88
new88 new88 new88 new88 new88 new88 new88 new88 new88 new88 new88 new88 new88 new88 new88 new88 new88 new88 new88 new88
new88 new88 new88 new88 new88 new88 new88 new88 new88 new88 new88 new88 new88 new88 new88 new88 new88 new88 new88 new88 new88 new88 new88 new88 new88 new88 new88
new88 new88 new88 new88 new88 new88 new88 new88 new88 new88
new88 new88 new88 new88 new88 new88 new88 new88
new88 new88 new88 new88 new88 new88 new88 new88 new88 new88 new88 new88
new88 new88 new88 new88 new88 new88 new88 new88 new88 new88 new88 new88 new88 new88 new88 new88 new88 new88 new88 new88 new88 new88 new88 new88 new88 new88 new88 new88 new88 new88 new88 new88 new88 new88 new88
new88 new88 new88 new88 new88 new88 new88 new88 new88
new88 new88 new88 new88 new88 new88 new88 new88 new88 new88 new88 new88 new88 new88 new88 new88 new88 new88 new88 new88 new88
new88 new88 new88 new88 new88 new88 new88 new88 new88 new88 new88 new88 new88 new88 new88 new88 new88
new88 new88 new88 new88 new88 new88 new88 new88 new88 new88 new88 new88 new88 new88
new88 new88 new88 new88 new88 new88 new88 new88 new88 new88
new88 new88 new88 new88 new88 new88 new88 new88 new88 new88 new88 new88
new88 new88 new88 new88 new88 new88 new88 new88 new88 new88 new88
new88 new88 new88 new88 new88 new88 new88 new88 new88
new88 new88 new88 new88 new88 new88 new88 new88 new88 new88 new88 new88 new88
new88 new88 new88 new88 new88 new88 new88 new88 new88 new88 new88 new88
new88 new88 new88 new88 new88 new88 new88 new88 new88
new88 new88 new88 new88 new88 new88 new88 new88 new88 new88 new88 new88
new88 new88 new88 new88 new88 new88 new88 new88 new88 new88 new88 new88 new88 new88
new88 new88 new88 new88 new88 new88 new88 new88 new88 new88 new88 new88 new88 new88 new88 new88
new88 new88 new88 new88 new88 new88 new88 new88 new88 new88
new88 new88 new88 new88 new88 new88 new88 new88 new88 new88 new88 new88
new88 new88 new88 new88 new88 new88 new88 new88 new88 new88
new88 new88 new88 new88 new88 new88 new88 new88 new88 new88 new88 new88 new88 new88 new88 new88
new88 new88 new88 new88 new88 new88 new88 new88 new88 new88
new88 new88 new88 new88 new88 new88 new88 new88 new88 new88 new88 new88 new88 new88 new88 new88
new88 new88 new88 new88 new88 new88 new88 new88 new88 new88 new88 new88 new88 new88 new88 new88
new88 new88 new88 new88 new88 new88 new88
new88 new88 new88 new88 new88 new88 new88 new88 new88 new88 new88 new88
new88 new88 new88 new88 new88 new88 new88 new88 new88 new88 new88 new88 new88
new88 new88 new88 new88 new88 new88 new88 new88 new88 new88 new88 new88
new88 new88 new88 new88 new88 new88 new88 new88 new88 new88 new88
new88 new88 new88 new88 new88 new88 new88 new88 new88 new88 new88 new88 new88 new88 new88 new88 new88 new88 new88 new88
new88 new88 new88 new88 new88 new88 new88 new88 new88 new88
new88 new88 new88 new88 new88 new88 new88 new88 new88 new88 new88 new88 new88 new88 new88 new88 new88 new88 new88 new88
new88 new88 new88 new88 new88 new88 new88 new88 new88 new88 new88 new88 new88 new88 new88 new88 new88 new88 new88 new88 new88 new88 new88 new88
new88 new88 new88 new88 new88 new88 new88 new88 new88
new88 new88 new88 new88 new88 new88 new88 new88 new88 new88 new88 new88 new88 new88 new88
new88 new88 new88 new88 new88 new88 new88 new88 new88 new88 new88 new88 new88 new88 new88 new88 new88 new88 new88 new88 new88 new88
new88 new88 new88 new88 new88 new88 new88 new88 new88 new88 new88 new88 new88 new88
new88 new88 new88 new88 new88 new88 new88 new88 new88
new88 new88 new88 new88 new88 new88 new88 new88 new88
new88 new88 new88 new88 new88 new88 new88 new88 new88 new88 new88 new88
new88 new88 new88 new88 new88 new88 new88 new88 new88 new88 new88 new88
new88 new88 new88 new88 new88 new88 new88 new88
new88 new88 new88 new88 new88 new88 new88 new88 new88 new88
new88 new88 new88 new88 new88 new88 new88 new88 new88 new88 new88 new88 new88 new88
new88 new88 new88 new88 new88 new88 new88 new88 new88 new88 new88 new88
new88 new88 new88 new88 new88 new88 new88 new88 new88 new88 new88 new88 new88 new88 new88 new88
new88 new88 new88 new88 new88 new88 new88 new88 new88 new88 new88 new88 new88 new88 new88 new88 new88 new88 new88 new88 new88 new88 new88 new88 new88 new88 new88 new88 new88 new88 new88 new88 new88 new88
new88 new88 new88 new88 new88 new88 new88 new88 new88 new88 new88
new88 new88 new88 new88 new88 new88 new88 new88 new88 new88 new88 new88 new88 new88 new88 new88 new88
new88 new88 new88 new88 new88 new88 new88 new88 new88 new88 new88
new88 new88 new88 new88 new88 new88 new88 new88 new88 new88
new88 new88 new88 new88 new88 new88 new88 new88 new88 new88 new88 new88 new88 new88 new88 new88 new88 new88 new88 new88 new88 new88 new88
new88 new88 new88 new88 new88 new88 new88 new88 new88 new88 new88 new88 new88 new88
new88 new88 new88 new88 new88 new88 new88 new88 new88 new88 new88 new88 new88 new88 new88
new88 new88 new88 new88 new88 new88 new88 new88 new88 new88 new88
new88 new88 new88 new88 new88 new88 new88 new88 new88 new88 new88 new88
new88 new88 new88 new88 new88 new88 new88 new88 new88 new88 new88 new88 new88 new88 new88 new88 new88
new88 new88 new88 new88 new88 new88 new88 new88 new88 new88 new88 new88 new88 new88 new88 new88 new88 new88
new88 new88 new88 new88 new88 new88 new88 new88 new88 new88 new88 new88
new88 new88 new88 new88 new88 new88 new88 new88 new88
new88 new88 new88 new88 new88 new88 new88 new88 new88 new88 new88
new88 new88 new88 new88 new88 new88 new88 new88 new88 new88 new88 new88 new88 new88 new88 new88 new88 new88 new88 new88
new88 new88 new88 new88 new88 new88 new88 new88 new88
new88 new88 new88 new88 new88 new88 new88 new88 new88
new88 new88 new88 new88 new88 new88 new88 new88 new88 new88 new88 new88 new88 new88 new88 new88 new88
new88 new88 new88 new88 new88 new88 new88 new88 new88 new88 new88 new88 new88 new88 new88 new88 new88 new88 new88 new88 new88
new88 new88 new88 new88 new88 new88 new88 new88 new88 new88
new88 new88 new88 new88 new88 new88 new88 new88 new88
new88 new88 new88 new88 new88 new88 new88 new88 new88 new88 new88 new88 new88 new88 new88 new88 new88 new88 new88
new88 new88 new88 new88 new88 new88 new88 new88 new88 new88
new88 new88 new88 new88 new88 new88 new88 new88 new88 new88 new88 new88
new88 new88 new88 new88 new88 new88 new88 new88 new88 new88
new88 new88 new88 new88 new88 new88 new88 new88 new88 new88 new88 new88 new88 new88 new88 new88 new88 new88 new88 new88 new88 new88
new88 new88 new88 new88 new88 new88 new88 new88 new88 new88 new88 new88 new88 new88 new88
new88 new88 new88 new88 new88 new88 new88 new88 new88 new88 new88 new88 new88 new88 new88 new88 new88 new88 new88
new88 new88 new88 new88 new88 new88 new88
new88 new88 new88 new88 new88 new88 new88 new88 new88
new88 new88 new88 new88 new88 new88 new88 new88 new88 new88 new88 new88 new88 new88 new88 new88 new88 new88 new88 new88 new88 new88 new88 new88 new88 new88 new88 new88 new88 new88 new88 new88 new88 new88 new88 new88 new88 new88 new88 new88 new88 new88 new88 new88 new88 new88 new88 new88 new88 new88 new88 new88 new88 new88 new88 new88 new88 new88 new88 new88 new88 new88 new88
new88 new88 new88 new88 new88 new88 new88 new88 new88 new88 new88 new88 new88 new88 new88 new88 new88 new88 new88 new88 new88 new88 new88 new88 new88 new88 new88
new88 new88 new88 new88 new88 new88 new88 new88 new88 new88 new88 new88 new88
new88 new88 new88 new88 new88 new88 new88 new88 new88 new88 new88 new88 new88 new88 new88 new88 new88 new88 new88 new88 new88
new88 new88 new88 new88 new88 new88 new88 new88 new88 new88 new88 new88 new88
new88 new88 new88 new88 new88 new88 new88 new88
new88 new88 new88 new88 new88 new88 new88 new88 new88 new88 new88 new88 new88 new88 new88 new88 new88 new88 new88 new88
new88 new88 new88 new88 new88 new88 new88 new88
new88 new88 new88 new88 new88 new88 new88 new88 new88 new88 new88 new88 new88 new88 new88 new88 new88 new88 new88 new88 new88 new88 new88 new88 new88 new88 new88 new88 new88
new88 new88 new88 new88 new88 new88 new88 new88 new88 new88 new88 new88 new88 new88 new88 new88 new88 new88 new88 new88 new88 new88 new88 new88 new88 new88 new88 new88 new88 new88 new88 new88 new88
new88 new88 new88 new88 new88 new88 new88 new88 new88 new88 new88 new88
new88 new88 new88 new88 new88 new88 new88 new88 new88 new88 new88 new88 new88 new88 new88 new88 new88 new88 new88
new88 new88 new88 new88 new88 new88 new88 new88 new88 new88 new88 new88 new88 new88 new88 new88 new88 new88
new88 new88 new88 new88 new88 new88 new88 new88 new88 new88 new88 new88 new88 new88
new88 new88 new88 new88 new88 new88 new88 new88 new88 new88 new88 new88 new88 new88
new88 new88 new88 new88 new88 new88 new88 new88 new88 new88 new88 new88 new88 new88 new88
new88 new88 new88 new88 new88 new88 new88 new88 new88 new88 new88 new88
new88 new88 new88 new88 new88 new88 new88 new88
new88 new88 new88 new88 new88 new88 new88 new88 new88 new88 new88 new88 new88 new88 new88 new88 new88 new88
new88 new88 new88 new88 new88 new88 new88 new88 new88 new88
new88 new88 new88 new88 new88 new88 new88 new88 new88 new88 new88 new88 new88 new88 new88 new88 new88 new88 new88 new88
new88 new88 new88 new88 new88 new88 new88 new88 new88 new88 new88 new88 new88 new88
new88 new88 new88 new88 new88 new88 new88 new88 new88 new88
new88 new88 new88 new88 new88 new88 new88 new88 new88 new88
new88 new88 new88 new88 new88 new88 new88 new88 new88 new88 new88 new88 new88 new88 new88 new88 new88 new88 new88 new88
new88 new88 new88 new88 new88 new88 new88 new88
new88 new88 new88 new88 new88 new88 new88 new88 new88 new88 new88 new88 new88 new88
new88 new88 new88 new88 new88 new88 new88 new88 new88
new88 new88 new88 new88 new88 new88 new88 new88 new88 new88 new88 new88 new88 new88 new88 new88 new88 new88 new88 new88 new88 new88 new88 new88 new88 new88 new88 new88 new88 new88 new88 new88 new88 new88 new88 new88 new88 new88 new88 new88 new88 new88 new88 new88 new88 new88 new88
new88 new88 new88 new88 new88 new88 new88 new88 new88 new88
new88 new88 new88 new88 new88 new88 new88 new88 new88 new88 new88 new88 new88 new88 new88 new88 new88 new88 new88 new88 new88 new88 new88 new88 new88 new88 new88
new88 new88 new88 new88 new88 new88 new88 new88 new88 new88 new88 new88
new88 new88 new88 new88 new88 new88 new88 new88 new88 new88 new88
new88 new88 new88 new88 new88 new88 new88 new88 new88 new88
new88 new88 new88 new88 new88 new88 new88 new88 new88 new88 new88 new88 new88 new88 new88 new88 new88 new88 new88 new88 new88 new88 new88 new88 new88 new88 new88 new88 new88 new88 new88 new88 new88 new88 new88
new88 new88 new88 new88 new88 new88 new88 new88 new88
new88 new88 new88 new88 new88 new88 new88 new88 new88 new88 new88 new88 new88
new88 new88 new88 new88 new88 new88 new88 new88 new88 new88 new88 new88 new88 new88 new88 new88 new88 new88 new88 new88 new88 new88 new88 new88 new88 new88 new88 new88 new88 new88 new88 new88 new88
new88 new88 new88 new88 new88 new88 new88 new88 new88 new88 new88 new88 new88 new88 new88 new88 new88
new88 new88 new88 new88 new88 new88 new88 new88 new88 new88 new88 new88 new88 new88 new88 new88 new88 new88 new88
new88 new88 new88 new88 new88 new88 new88 new88 new88 new88 new88 new88 new88 new88
new88 new88 new88 new88 new88 new88 new88 new88 new88 new88 new88 new88 new88 new88 new88
new88 new88 new88 new88 new88 new88 new88 new88 new88 new88 new88 new88 new88 new88 new88 new88 new88 new88 new88
new88 new88 new88 new88 new88 new88 new88 new88 new88 new88 new88 new88 new88 new88 new88 new88 new88
new88 new88 new88 new88 new88 new88 new88 new88 new88 new88 new88 new88
new88 new88 new88 new88 new88 new88 new88 new88 new88 new88 new88 new88 new88
new88 new88 new88 new88 new88 new88 new88 new88 new88 new88 new88 new88
new88 new88 new88 new88 new88 new88 new88 new88 new88 new88 new88 new88 new88 new88 new88 new88 new88 new88 new88 new88 new88 new88 new88 new88 new88
new88 new88 new88 new88 new88 new88 new88
new88 new88 new88 new88 new88 new88 new88 new88 new88 new88
new88 new88 new88 new88 new88 new88 new88 new88 new88 new88
new88 new88 new88 new88 new88 new88 new88 new88
new88 new88 new88 new88 new88 new88 new88 new88 new88 new88 new88 new88 new88 new88
new88 new88 new88 new88 new88 new88 new88 new88 new88 new88 new88 new88 new88 new88 new88 new88
new88 new88 new88 new88 new88 new88 new88 new88
new88 new88 new88 new88 new88 new88 new88 new88 new88
new88 new88 new88 new88 new88 new88 new88 new88 new88 new88 new88 new88 new88 new88 new88 new88 new88
new88 new88 new88 new88 new88 new88 new88 new88 new88 new88 new88 new88 new88 new88 new88 new88
new88 new88 new88 new88 new88 new88 new88 new88 new88 new88 new88 new88 new88 new88 new88 new88 new88 new88 new88 new88 new88 new88 new88 new88 new88 new88 new88 new88 new88 new88 new88 new88 new88 new88 new88 new88
new88 new88 new88 new88 new88 new88 new88 new88
new88 new88 new88 new88 new88 new88 new88 new88 new88 new88 new88 new88 new88 new88 new88 new88 new88 new88
new88 new88 new88 new88 new88 new88 new88 new88 new88
new88 new88 new88 new88 new88 new88 new88 new88 new88 new88 new88 new88
new88 new88 new88 new88 new88 new88 new88 new88 new88 new88 new88 new88 new88 new88 new88 new88 new88
new88 new88 new88 new88 new88 new88 new88 new88 new88 new88 new88 new88 new88
new88 new88 new88 new88 new88 new88 new88 new88 new88 new88 new88 new88 new88 new88 new88
new88 new88 new88 new88 new88 new88 new88 new88
new88 new88 new88 new88 new88 new88 new88 new88 new88 new88 new88 new88 new88 new88 new88 new88
new88 new88 new88 new88 new88 new88 new88 new88 new88 new88 new88 new88 new88 new88
new88 new88 new88 new88 new88 new88 new88 new88 new88 new88 new88 new88 new88 new88 new88 new88 new88 new88 new88
new88 new88 new88 new88 new88 new88 new88 new88 new88 new88 new88 new88 new88 new88 new88
new88 new88 new88 new88 new88 new88 new88 new88 new88 new88 new88 new88 new88 new88 new88
new88 new88 new88 new88 new88 new88 new88 new88 new88 new88 new88 new88 new88 new88
new88 new88 new88 new88 new88 new88 new88 new88 new88 new88 new88 new88 new88 new88 new88 new88 new88
new88 new88 new88 new88 new88 new88 new88 new88 new88 new88 new88 new88 new88 new88 new88 new88 new88 new88 new88 new88 new88 new88 new88 new88
new88 new88 new88 new88 new88 new88 new88 new88 new88 new88 new88 new88 new88 new88 new88
new88 new88 new88 new88 new88 new88 new88
new88 new88 new88 new88 new88 new88 new88 new88 new88 new88 new88 new88 new88 new88 new88 new88 new88 new88 new88 new88 new88 new88 new88 new88
new88 new88 new88 new88 new88 new88 new88 new88 new88 new88 new88 new88 new88 new88 new88 new88 new88 new88 new88 new88 new88 new88 new88
new88 new88 new88 new88 new88 new88 new88 new88
new88 new88 new88 new88 new88 new88 new88 new88 new88 new88 new88 new88 new88 new88
new88 new88 new88 new88 new88 new88 new88 new88 new88 new88 new88 new88 new88 new88 new88 new88 new88 new88 new88
new88 new88 new88 new88 new88 new88 new88 new88 new88 new88 new88 new88 new88 new88 new88
new88 new88 new88 new88 new88 new88 new88 new88 new88 new88 new88 new88 new88 new88 new88 new88 new88 new88 new88 new88 new88 new88 new88 new88 new88 new88 new88 new88 new88 new88 new88 new88
new88 new88 new88 new88 new88 new88 new88 new88 new88 new88 new88
new88 new88 new88 new88 new88 new88 new88 new88 new88 new88 new88
new88 new88 new88 new88 new88 new88 new88 new88 new88
new88 new88 new88 new88 new88 new88 new88 new88 new88 new88 new88
new88 new88 new88 new88 new88 new88 new88 new88 new88 new88 new88 new88 new88
new88 new88 new88 new88 new88 new88 new88 new88 new88 new88 new88 new88
new88 new88 new88 new88 new88 new88 new88 new88 new88 new88 new88 new88 new88 new88 new88 new88 new88 new88 new88 new88 new88 new88 new88 new88 new88 new88 new88 new88 new88 new88 new88
new88 new88 new88 new88 new88 new88 new88 new88 new88 new88 new88 new88 new88 new88 new88
new88 new88 new88 new88 new88 new88 new88 new88 new88 new88 new88 new88 new88 new88 new88 new88 new88 new88 new88
new88 new88 new88 new88 new88 new88 new88
new88 new88 new88 new88 new88 new88 new88 new88 new88 new88 new88 new88 new88 new88 new88 new88
new88 new88 new88 new88 new88 new88 new88 new88 new88 new88 new88 new88 new88
new88 new88 new88 new88 new88 new88 new88 new88 new88 new88
new88 new88 new88 new88 new88 new88 new88 new88 new88
new88 new88 new88 new88 new88 new88 new88 new88 new88 new88 new88
new88 new88 new88 new88 new88 new88 new88 new88 new88 new88 new88 new88 new88 new88 new88 new88 new88 new88 new88
new88 new88 new88 new88 new88 new88 new88 new88 new88 new88 new88 new88 new88 new88 new88 new88 new88 new88
new88 new88 new88 new88 new88 new88 new88
new88 new88 new88 new88 new88 new88 new88 new88 new88 new88 new88 new88 new88 new88 new88 new88 new88 new88 new88 new88
new88 new88 new88 new88 new88 new88 new88 new88 new88 new88 new88
new88 new88 new88 new88 new88 new88 new88 new88 new88 new88 new88 new88 new88 new88 new88 new88 new88 new88 new88 new88 new88 new88 new88 new88
new88 new88 new88 new88 new88 new88 new88 new88 new88 new88 new88 new88 new88 new88 new88 new88 new88 new88 new88 new88 new88 new88 new88 new88
new88 new88 new88 new88 new88 new88 new88 new88 new88 new88 new88 new88 new88 new88 new88 new88 new88 new88 new88 new88 new88 new88 new88 new88 new88 new88
new88 new88 new88 new88 new88 new88 new88 new88 new88 new88 new88 new88 new88 new88 new88 new88 new88
new88 new88 new88 new88 new88 new88 new88 new88 new88 new88 new88
new88 new88 new88 new88 new88 new88 new88 new88 new88 new88 new88 new88 new88 new88 new88 new88
new88 new88 new88 new88 new88 new88 new88 new88 new88 new88 new88 new88 new88 new88
new88 new88 new88 new88 new88 new88 new88 new88 new88 new88 new88 new88 new88 new88 new88 new88 new88
new88 new88 new88 new88 new88 new88 new88 new88 new88
new88 new88 new88 new88 new88 new88 new88 new88
new88 new88 new88 new88 new88 new88 new88 new88 new88 new88 new88 new88 new88 new88
new88 new88 new88 new88 new88 new88 new88 new88
new88 new88 new88 new88 new88 new88 new88 new88 new88 new88 new88 new88 new88
new88 new88 new88 new88 new88 new88 new88 new88 new88 new88
new88 new88 new88 new88 new88 new88 new88 new88 new88 new88
new88 new88 new88 new88 new88 new88 new88 new88 new88 new88 new88 new88 new88 new88 new88 new88 new88
new88 new88 new88 new88 new88 new88 new88 new88 new88 new88 new88 new88 new88 new88 new88 new88 new88
new88 new88 new88 new88 new88 new88 new88 new88 new88 new88 new88 new88 new88
new88 new88 new88 new88 new88 new88 new88 new88 new88 new88 new88 new88
new88 new88 new88 new88 new88 new88 new88 new88 new88 new88 new88 new88
new88 new88 new88 new88 new88 new88 new88 new88 new88
new88 new88 new88 new88 new88 new88 new88 new88 new88 new88 new88 new88 new88 new88 new88 new88 new88 new88
new88 new88 new88 new88 new88 new88 new88 new88 new88 new88
new88 new88 new88 new88 new88 new88 new88 new88 new88 new88 new88 new88 new88 new88 new88 new88
new88 new88 new88 new88 new88 new88 new88 new88 new88 new88 new88 new88 new88
new88 new88 new88 new88 new88 new88 new88 new88 new88 new88 new88 new88 new88 new88 new88 new88 new88 new88 new88 new88 new88 new88
new88 new88 new88 new88 new88 new88 new88 new88 new88 new88
new88 new88 new88 new88 new88 new88 new88 new88 new88 new88 new88 new88 new88 new88 new88 new88
new88 new88 new88 new88 new88 new88 new88 new88 new88 new88 new88 new88 new88 new88 new88 new88 new88 new88 new88 new88 new88 new88 new88 new88 new88
new88 new88 new88 new88 new88 new88 new88 new88 new88 new88 new88 new88 new88 new88 new88
new88 new88 new88 new88 new88 new88 new88 new88 new88 new88
new88 new88 new88 new88 new88 new88 new88 new88 new88 new88 new88 new88 new88 new88 new88 new88 new88 new88 new88
new88 new88 new88 new88 new88 new88 new88 new88 new88 new88 new88 new88 new88 new88 new88 new88 new88 new88 new88 new88
new88 new88 new88 new88 new88 new88 new88 new88 new88 new88 new88 new88 new88 new88 new88 new88
new88 new88 new88 new88 new88 new88 new88 new88 new88 new88
new88 new88 new88 new88 new88 new88 new88 new88 new88 new88
new88 new88 new88 new88 new88 new88 new88 new88 new88 new88 new88 new88 new88 new88 new88 new88 new88 new88 new88 new88 new88 new88 new88 new88 new88 new88 new88
new88 new88 new88 new88 new88 new88 new88 new88 new88 new88 new88 new88 new88 new88 new88 new88 new88 new88
new88 new88 new88 new88 new88 new88 new88 new88 new88 new88
new88 new88 new88 new88 new88 new88 new88 new88 new88 new88
new88 new88 new88 new88 new88 new88 new88 new88 new88 new88 new88 new88 new88
new88 new88 new88 new88 new88 new88 new88
new88 new88 new88 new88 new88 new88 new88 new88 new88 new88 new88 new88 new88 new88 new88 new88 new88 new88 new88 new88 new88 new88 new88 new88 new88 new88 new88 new88 new88
new88 new88 new88 new88 new88 new88 new88 new88 new88 new88 new88 new88 new88 new88
new88 new88 new88 new88 new88 new88 new88 new88 new88 new88 new88 new88 new88 new88 new88 new88
new88 new88 new88 new88 new88 new88 new88 new88 new88 new88 new88 new88 new88
new88 new88 new88 new88 new88 new88 new88 new88 new88 new88 new88 new88 new88 new88 new88 new88 new88 new88 new88 new88 new88 new88 new88 new88 new88 new88 new88
new88 new88 new88 new88 new88 new88 new88 new88 new88 new88 new88 new88 new88 new88 new88 new88 new88 new88 new88 new88
new88 new88 new88 new88 new88 new88 new88 new88 new88 new88 new88 new88 new88 new88 new88 new88 new88 new88 new88 new88 new88 new88
new88 new88 new88 new88 new88 new88 new88 new88 new88 new88 new88 new88 new88 new88 new88 new88 new88 new88 new88 new88 new88 new88
new88 new88 new88 new88 new88 new88 new88 new88 new88 new88 new88 new88 new88 new88 new88 new88 new88
new88 new88 new88 new88 new88 new88 new88 new88 new88 new88 new88 new88 new88 new88 new88 new88 new88 new88 new88 new88 new88 new88 new88 new88 new88 new88 new88 new88 new88 new88 new88 new88 new88 new88
new88 new88 new88 new88 new88 new88 new88 new88 new88 new88 new88
new88 new88 new88 new88 new88 new88 new88 new88 new88 new88
new88 new88 new88 new88 new88 new88 new88 new88 new88 new88 new88 new88 new88 new88 new88 new88 new88 new88 new88 new88 new88 new88 new88 new88 new88 new88 new88 new88 new88 new88 new88 new88 new88 new88 new88 new88 new88 new88 new88 new88 new88 new88 new88
new88 new88 new88 new88 new88 new88 new88 new88 new88 new88 new88 new88 new88 new88
new88 new88 new88 new88 new88 new88 new88 new88
new88 new88 new88 new88 new88 new88 new88 new88 new88 new88 new88 new88
new88 new88 new88 new88 new88 new88 new88 new88 new88 new88 new88 new88 new88 new88 new88 new88 new88
new88 new88 new88 new88 new88 new88 new88 new88 new88 new88
new88 new88 new88 new88 new88 new88 new88 new88 new88 new88 new88 new88 new88 new88 new88 new88 new88 new88 new88 new88 new88 new88 new88 new88 new88 new88 new88 new88 new88 new88 new88 new88 new88 new88 new88 new88 new88 new88 new88 new88
new88 new88 new88 new88 new88 new88 new88 new88 new88 new88 new88 new88 new88 new88
new88 new88 new88 new88 new88 new88 new88 new88 new88 new88 new88 new88 new88 new88 new88 new88 new88 new88 new88 new88 new88 new88 new88 new88 new88 new88 new88 new88 new88
new88 new88 new88 new88 new88 new88 new88 new88 new88 new88 new88 new88
new88 new88 new88 new88 new88 new88 new88 new88 new88 new88 new88 new88 new88 new88
new88 new88 new88 new88 new88 new88 new88 new88 new88 new88 new88 new88 new88 new88 new88
new88 new88 new88 new88 new88 new88 new88 new88 new88 new88 new88 new88 new88 new88 new88 new88 new88 new88 new88 new88 new88 new88 new88 new88 new88 new88 new88 new88 new88 new88 new88
new88 new88 new88 new88 new88 new88 new88 new88 new88 new88 new88 new88 new88 new88 new88 new88 new88 new88 new88
new88 new88 new88 new88 new88 new88 new88 new88 new88
new88 new88 new88 new88 new88 new88 new88 new88 new88 new88 new88
new88 new88 new88 new88 new88 new88 new88 new88 new88 new88 new88 new88 new88 new88 new88
new88 new88 new88 new88 new88 new88 new88 new88 new88 new88 new88 new88 new88 new88 new88 new88 new88 new88 new88 new88 new88 new88 new88 new88
new88 new88 new88 new88 new88 new88 new88 new88 new88 new88
new88 new88 new88 new88 new88 new88 new88 new88
new88 new88 new88 new88 new88 new88 new88 new88 new88 new88 new88 new88 new88 new88 new88
new88 new88 new88 new88 new88 new88 new88 new88 new88 new88 new88 new88 new88 new88 new88 new88
new88 new88 new88 new88 new88 new88 new88 new88 new88 new88 new88 new88 new88 new88 new88
new88 new88 new88 new88 new88 new88 new88 new88 new88 new88 new88 new88 new88 new88 new88 new88
new88 new88 new88 new88 new88 new88 new88 new88 new88 new88 new88 new88 new88 new88
new88 new88 new88 new88 new88 new88 new88 new88 new88 new88 new88 new88 new88 new88 new88 new88 new88
new88 new88 new88 new88 new88 new88 new88 new88 new88 new88 new88 new88 new88 new88 new88 new88
new88 new88 new88 new88 new88 new88 new88 new88 new88 new88 new88 new88 new88 new88 new88 new88 new88 new88 new88 new88 new88 new88 new88 new88 new88 new88 new88 new88 new88 new88 new88
new88 new88 new88 new88 new88 new88 new88 new88 new88 new88 new88 new88 new88 new88 new88 new88 new88 new88 new88 new88 new88 new88 new88 new88 new88 new88
new88 new88 new88 new88 new88 new88 new88 new88 new88 new88 new88 new88 new88
new88 new88 new88 new88 new88 new88 new88 new88 new88 new88 new88 new88 new88 new88 new88 new88
new88 new88 new88 new88 new88 new88 new88 new88 new88 new88 new88 new88 new88 new88 new88
new88 new88 new88 new88 new88 new88 new88 new88 new88 new88 new88 new88
new88 new88 new88 new88 new88 new88 new88 new88 new88 new88 new88 new88 new88 new88 new88 new88 new88 new88 new88 new88 new88
new88 new88 new88 new88 new88 new88 new88 new88 new88 new88 new88 new88 new88 new88 new88 new88 new88
new88 new88 new88 new88 new88 new88 new88 new88
new88 new88 new88 new88 new88 new88 new88 new88 new88 new88 new88 new88 new88 new88
new88 new88 new88 new88 new88 new88 new88 new88 new88 new88 new88 new88 new88 new88 new88
new88 new88 new88 new88 new88 new88 new88 new88 new88 new88 new88 new88 new88 new88 new88 new88 new88
new88 new88 new88 new88 new88 new88 new88 new88 new88 new88 new88 new88 new88 new88 new88 new88 new88 new88 new88 new88 new88 new88 new88 new88 new88 new88 new88 new88 new88 new88 new88 new88 new88
new88 new88 new88 new88 new88 new88 new88 new88 new88 new88 new88 new88 new88
new88 new88 new88 new88 new88 new88 new88 new88 new88 new88
new88 new88 new88 new88 new88 new88 new88 new88 new88 new88 new88 new88 new88 new88 new88 new88 new88 new88 new88 new88 new88 new88 new88 new88 new88 new88 new88 new88 new88 new88 new88 new88 new88 new88 new88 new88 new88 new88 new88 new88 new88 new88 new88 new88 new88 new88
new88 new88 new88 new88 new88 new88 new88 new88 new88 new88
new88 new88 new88 new88 new88 new88 new88 new88
new88 new88 new88 new88 new88 new88 new88 new88 new88 new88
new88 new88 new88 new88 new88 new88 new88 new88 new88 new88 new88 new88 new88 new88 new88 new88 new88 new88 new88
new88 new88 new88 new88 new88 new88 new88 new88 new88 new88 new88 new88 new88 new88 new88 new88 new88 new88 new88 new88 new88
new88 new88 new88 new88 new88 new88 new88 new88 new88 new88 new88 new88 new88 new88 new88 new88 new88
new88 new88 new88 new88 new88 new88 new88 new88 new88 new88 new88 new88
new88 new88 new88 new88 new88 new88 new88 new88 new88 new88 new88 new88 new88 new88 new88 new88 new88
new88 new88 new88 new88 new88 new88 new88 new88 new88 new88 new88 new88
new88 new88 new88 new88 new88 new88 new88 new88 new88 new88 new88
new88 new88 new88 new88 new88 new88 new88 new88 new88 new88 new88 new88 new88 new88 new88 new88 new88 new88
new88 new88 new88 new88 new88 new88 new88 new88 new88 new88 new88 new88 new88 new88
new88 new88 new88 new88 new88 new88 new88 new88 new88 new88 new88 new88 new88 new88 new88 new88 new88 new88 new88
new88 new88 new88 new88 new88 new88 new88 new88 new88 new88 new88
new88 new88 new88 new88 new88 new88 new88 new88 new88 new88 new88 new88 new88 new88 new88 new88 new88 new88
new88 new88 new88 new88 new88 new88 new88 new88 new88 new88 new88 new88 new88 new88 new88 new88 new88 new88 new88 new88 new88 new88 new88 new88
new88 new88 new88 new88 new88 new88 new88 new88 new88 new88
new88 new88 new88 new88 new88 new88 new88
new88 new88 new88 new88 new88 new88 new88 new88 new88 new88 new88 new88 new88 new88 new88 new88 new88 new88 new88 new88 new88 new88 new88
new88 new88 new88 new88 new88 new88 new88 new88 new88 new88 new88 new88 new88 new88 new88 new88
new88 new88 new88 new88 new88 new88 new88 new88 new88 new88 new88 new88 new88 new88 new88 new88 new88 new88 new88 new88 new88 new88 new88
new88 new88 new88 new88 new88 new88 new88 new88 new88 new88
new88 new88 new88 new88 new88 new88 new88 new88 new88 new88 new88 new88 new88 new88 new88 new88 new88 new88 new88
new88 new88 new88 new88 new88 new88 new88 new88 new88 new88 new88 new88 new88
new88 new88 new88 new88 new88 new88 new88 new88 new88 new88 new88 new88 new88 new88 new88 new88 new88 new88 new88 new88 new88 new88 new88 new88 new88 new88 new88
new88 new88 new88 new88 new88 new88 new88 new88 new88
new88 new88 new88 new88 new88 new88 new88 new88 new88 new88 new88
new88 new88 new88 new88 new88 new88 new88 new88 new88 new88 new88 new88 new88
new88 new88 new88 new88 new88 new88 new88 new88 new88 new88 new88 new88
new88 new88 new88 new88 new88 new88 new88 new88 new88
new88 new88 new88 new88 new88 new88 new88 new88 new88 new88
new88 new88 new88 new88 new88 new88 new88 new88 new88 new88 new88 new88 new88
new88 new88 new88 new88 new88 new88 new88 new88 new88 new88 new88
new88 new88 new88 new88 new88 new88 new88 new88 new88 new88 new88 new88 new88 new88
new88 new88 new88 new88 new88 new88 new88 new88 new88 new88 new88 new88 new88 new88 new88 new88 new88 new88 new88 new88 new88
new88 new88 new88 new88 new88 new88 new88 new88
new88 new88 new88 new88 new88 new88 new88 new88 new88 new88
new88 new88 new88 new88 new88 new88 new88 new88 new88 new88 new88 new88 new88 new88 new88 new88 new88 new88 new88 new88 new88 new88 new88
new88 new88 new88 new88 new88 new88 new88 new88 new88 new88 new88
new88 new88 new88 new88 new88 new88 new88 new88 new88 new88 new88 new88 new88 new88
new88 new88 new88 new88 new88 new88 new88 new88 new88 new88
new88 new88 new88 new88 new88 new88 new88 new88 new88 new88 new88 new88 new88 new88 new88 new88
new88 new88 new88 new88 new88 new88 new88 new88 new88 new88 new88
new88 new88 new88 new88 new88 new88 new88 new88 new88 new88 new88 new88 new88
new88 new88 new88 new88 new88 new88 new88 new88 new88
new88 new88 new88 new88 new88 new88 new88 new88 new88 new88 new88 new88 new88 new88 new88 new88 new88 new88 new88 new88 new88 new88 new88 new88 new88 new88 new88 new88 new88 new88 new88 new88 new88 new88 new88 new88 new88 new88 new88 new88 new88 new88
new88 new88 new88 new88 new88 new88 new88 new88 new88 new88 new88 new88 new88 new88 new88 new88 new88 new88 new88 new88
new88 new88 new88 new88 new88 new88 new88 new88 new88 new88 new88 new88 new88 new88
new88 new88 new88 new88 new88 new88 new88 new88 new88 new88 new88 new88
new88 new88 new88 new88 new88 new88 new88 new88 new88 new88 new88 new88 new88 new88
new88 new88 new88 new88 new88 new88 new88 new88 new88 new88
new88 new88 new88 new88 new88 new88 new88 new88 new88 new88
new88 new88 new88 new88 new88 new88 new88 new88 new88 new88 new88 new88
new88 new88 new88 new88 new88 new88 new88 new88 new88 new88 new88 new88 new88
new88 new88 new88 new88 new88 new88 new88 new88 new88 new88 new88 new88 new88 new88 new88 new88 new88 new88 new88 new88 new88
new88 new88 new88 new88 new88 new88 new88 new88 new88 new88
new88 new88 new88 new88 new88 new88 new88 new88 new88 new88 new88 new88 new88 new88 new88 new88 new88 new88
new88 new88 new88 new88 new88 new88 new88 new88 new88 new88 new88 new88 new88 new88 new88 new88
new88 new88 new88 new88 new88 new88 new88 new88 new88
new88 new88 new88 new88 new88 new88 new88 new88 new88 new88 new88 new88 new88 new88 new88
new88 new88 new88 new88 new88 new88 new88 new88 new88 new88 new88 new88 new88 new88
new88 new88 new88 new88 new88 new88 new88 new88 new88 new88 new88 new88 new88 new88 new88 new88
new88 new88 new88 new88 new88 new88 new88 new88 new88 new88 new88 new88 new88 new88 new88 new88 new88 new88 new88 new88 new88
new88 new88 new88 new88 new88 new88 new88 new88 new88 new88 new88 new88 new88 new88 new88 new88
new88 new88 new88 new88 new88 new88 new88 new88 new88 new88 new88 new88 new88 new88 new88 new88 new88 new88 new88 new88 new88 new88 new88 new88 new88 new88 new88
new88 new88 new88 new88 new88 new88 new88 new88 new88 new88 new88 new88 new88 new88 new88 new88 new88 new88 new88
new88 new88 new88 new88 new88 new88 new88 new88 new88 new88 new88 new88 new88 new88 new88 new88 new88 new88 new88 new88
new88 new88 new88 new88 new88 new88 new88 new88 new88 new88 new88 new88 new88 new88 new88 new88 new88 new88 new88
new88 new88 new88 new88 new88 new88 new88 new88 new88 new88
new88 new88 new88 new88 new88 new88 new88 new88 new88 new88
new88 new88 new88 new88 new88 new88 new88 new88 new88 new88 new88 new88 new88 new88 new88 new88 new88 new88 new88
new88 new88 new88 new88 new88 new88 new88 new88 new88 new88 new88 new88
new88 new88 new88 new88 new88 new88 new88 new88 new88 new88 new88 new88 new88
new88 new88 new88 new88 new88 new88 new88 new88 new88 new88 new88 new88
new88 new88 new88 new88 new88 new88 new88 new88 new88 new88 new88
new88 new88 new88 new88 new88 new88 new88 new88 new88 new88 new88 new88 new88 new88 new88 new88 new88 new88 new88 new88 new88 new88 new88
new88 new88 new88 new88 new88 new88 new88 new88 new88 new88 new88 new88 new88
new88 new88 new88 new88 new88 new88 new88 new88
new88 new88 new88 new88 new88 new88 new88 new88 new88 new88 new88 new88 new88 new88 new88 new88 new88 new88 new88 new88 new88 new88 new88 new88 new88 new88 new88
new88 new88 new88 new88 new88 new88 new88 new88 new88 new88 new88
new88 new88 new88 new88 new88 new88 new88 new88 new88 new88 new88 new88
new88 new88 new88 new88 new88 new88 new88 new88 new88 new88
new88 new88 new88 new88 new88 new88 new88 new88 new88 new88 new88 new88 new88 new88 new88 new88 new88 new88 new88 new88 new88
new88 new88 new88 new88 new88 new88 new88
new88 new88 new88 new88 new88 new88 new88 new88 new88 new88 new88 new88
new88 new88 new88 new88 new88 new88 new88 new88 new88 new88 new88 new88 new88 new88 new88 new88
new88 new88 new88 new88 new88 new88 new88 new88 new88 new88 new88 new88 new88 new88 new88 new88 new88 new88 new88 new88 new88 new88 new88 new88 new88 new88
new88 new88 new88 new88 new88 new88 new88 new88 new88 new88
new88 new88 new88 new88 new88 new88 new88 new88 new88 new88 new88 new88 new88 new88 new88 new88 new88 new88 new88 new88 new88 new88 new88 new88 new88
new88 new88 new88 new88 new88 new88 new88 new88 new88 new88 new88 new88 new88 new88 new88 new88 new88 new88
new88 new88 new88 new88 new88 new88 new88 new88 new88
new88 new88 new88 new88 new88 new88 new88 new88 new88 new88 new88 new88 new88 new88 new88 new88 new88 new88 new88 new88 new88 new88 new88 new88 new88 new88 new88 new88 new88 new88 new88 new88
new88 new88 new88 new88 new88 new88 new88 new88
new88 new88 new88 new88 new88 new88 new88 new88 new88
new88 new88 new88 new88 new88 new88 new88 new88 new88 new88 new88 new88 new88 new88 new88 new88 new88 new88 new88 new88
new88 new88 new88 new88 new88 new88 new88 new88 new88
new88 new88 new88 new88 new88 new88 new88 new88 new88 new88 new88 new88 new88 new88 new88 new88 new88 new88 new88
new88 new88 new88 new88 new88 new88 new88 new88 new88 new88 new88 new88 new88 new88 new88 new88
new88 new88 new88 new88 new88 new88 new88 new88 new88 new88
new88 new88 new88 new88 new88 new88 new88 new88 new88 new88 new88
new88 new88 new88 new88 new88 new88 new88
new88 new88 new88 new88 new88 new88 new88 new88 new88 new88 new88 new88 new88 new88
new88 new88 new88 new88 new88 new88 new88 new88 new88 new88 new88 new88 new88 new88 new88 new88 new88 new88
new88 new88 new88 new88 new88 new88 new88 new88
new88 new88 new88 new88 new88 new88 new88 new88 new88 new88 new88
new88 new88 new88 new88 new88 new88 new88 new88 new88 new88 new88 new88 new88
new88 new88 new88 new88 new88 new88 new88 new88 new88 new88
new88 new88 new88 new88 new88 new88 new88 new88 new88 new88 new88 new88 new88 new88 new88 new88 new88 new88
new88 new88 new88 new88 new88 new88 new88 new88 new88 new88
new88 new88 new88 new88 new88 new88 new88 new88 new88 new88 new88
new88 new88 new88 new88 new88 new88 new88 new88 new88
new88 new88 new88 new88 new88 new88 new88 new88 new88 new88 new88
new88 new88 new88 new88 new88 new88 new88 new88 new88 new88 new88 new88
new88 new88 new88 new88 new88 new88 new88 new88 new88 new88 new88 new88 new88
new88 new88 new88 new88 new88 new88 new88 new88 new88 new88 new88 new88 new88 new88 new88 new88 new88 new88 new88 new88 new88 new88
new88 new88 new88 new88 new88 new88 new88 new88 new88 new88 new88 new88 new88 new88 new88 new88 new88 new88 new88 new88 new88 new88 new88 new88 new88 new88 new88 new88 new88 new88
new88 new88 new88 new88 new88 new88 new88 new88 new88 new88 new88 new88 new88 new88 new88 new88 new88 new88 new88 new88 new88 new88 new88 new88 new88 new88 new88 new88 new88 new88
new88 new88 new88 new88 new88 new88 new88 new88 new88 new88 new88 new88 new88 new88 new88 new88
new88 new88 new88 new88 new88 new88 new88 new88 new88 new88 new88 new88 new88 new88 new88
new88 new88 new88 new88 new88 new88 new88 new88 new88 new88 new88 new88 new88
new88 new88 new88 new88 new88 new88 new88 new88 new88 new88
new88 new88 new88 new88 new88 new88 new88 new88 new88 new88 new88 new88 new88 new88 new88 new88 new88 new88 new88 new88 new88 new88 new88 new88 new88 new88
new88 new88 new88 new88 new88 new88 new88 new88 new88 new88 new88 new88 new88 new88 new88 new88 new88
new88 new88 new88 new88 new88 new88 new88 new88 new88 new88 new88 new88 new88 new88 new88 new88 new88 new88
new88 new88 new88 new88 new88 new88 new88 new88 new88 new88 new88 new88 new88 new88 new88 new88 new88 new88 new88 new88 new88 new88 new88
new88 new88 new88 new88 new88 new88 new88 new88 new88 new88 new88 new88 new88 new88 new88 new88 new88 new88 new88 new88 new88 new88 new88 new88 new88 new88 new88 new88 new88
new88 new88 new88 new88 new88 new88 new88 new88 new88 new88 new88 new88 new88 new88 new88 new88
new88 new88 new88 new88 new88 new88 new88 new88 new88 new88 new88 new88 new88 new88 new88 new88 new88 new88 new88
new88 new88 new88 new88 new88 new88 new88 new88 new88 new88 new88 new88
new88 new88 new88 new88 new88 new88 new88 new88 new88 new88 new88 new88 new88 new88 new88 new88 new88
new88 new88 new88 new88 new88 new88 new88 new88 new88 new88 new88 new88 new88 new88 new88 new88 new88 new88
new88 new88 new88 new88 new88 new88 new88 new88 new88 new88 new88 new88 new88 new88
new88 new88 new88 new88 new88 new88 new88 new88 new88 new88 new88 new88 new88 new88 new88
new88 new88 new88 new88 new88 new88 new88 new88 new88 new88 new88 new88 new88 new88 new88 new88 new88 new88 new88 new88
new88 new88 new88 new88 new88 new88 new88 new88 new88
new88 new88 new88 new88 new88 new88 new88 new88 new88 new88 new88 new88 new88 new88 new88 new88 new88 new88 new88 new88 new88 new88 new88 new88 new88
new88 new88 new88 new88 new88 new88 new88 new88 new88 new88 new88 new88
new88 new88 new88 new88 new88 new88 new88 new88 new88 new88 new88 new88 new88 new88 new88 new88 new88 new88 new88 new88 new88 new88 new88 new88
new88 new88 new88 new88 new88 new88 new88 new88 new88 new88 new88 new88 new88 new88 new88 new88 new88
new88 new88 new88 new88 new88 new88 new88 new88 new88 new88 new88 new88 new88 new88 new88
new88 new88 new88 new88 new88 new88 new88 new88 new88 new88 new88
new88 new88 new88 new88 new88 new88 new88 new88 new88 new88
new88 new88 new88 new88 new88 new88 new88 new88 new88 new88 new88 new88 new88 new88 new88 new88 new88 new88 new88 new88 new88 new88 new88 new88 new88 new88 new88 new88 new88 new88 new88 new88 new88 new88 new88
new88 new88 new88 new88 new88 new88 new88 new88 new88 new88 new88 new88 new88 new88 new88 new88 new88 new88 new88 new88
new88 new88 new88 new88 new88 new88 new88 new88 new88 new88 new88 new88 new88 new88 new88 new88 new88 new88 new88 new88 new88 new88 new88 new88 new88 new88
new88 new88 new88 new88 new88 new88 new88 new88 new88 new88
new88 new88 new88 new88 new88 new88 new88 new88 new88 new88 new88 new88 new88 new88 new88 new88 new88 new88 new88 new88
new88 new88 new88 new88 new88 new88 new88 new88 new88 new88 new88 new88 new88 new88 new88 new88 new88 new88
new88 new88 new88 new88 new88 new88 new88 new88 new88 new88 new88
new88 new88 new88 new88 new88 new88 new88 new88 new88 new88 new88 new88 new88 new88 new88
new88 new88 new88 new88 new88 new88 new88 new88 new88 new88 new88 new88 new88 new88 new88 new88 new88 new88
new88 new88 new88 new88 new88 new88 new88 new88
new88 new88 new88 new88 new88 new88 new88 new88 new88 new88 new88 new88 new88 new88 new88 new88 new88 new88 new88 new88 new88
new88 new88 new88 new88 new88 new88 new88 new88 new88 new88 new88 new88
new88 new88 new88 new88 new88 new88 new88 new88 new88 new88 new88 new88 new88 new88 new88 new88 new88 new88 new88 new88 new88 new88 new88
new88 new88 new88 new88 new88 new88 new88 new88 new88 new88 new88
new88 new88 new88 new88 new88 new88 new88 new88 new88 new88 new88
new88 new88 new88 new88 new88 new88 new88 new88 new88
new88 new88 new88 new88 new88 new88 new88 new88 new88 new88
new88 new88 new88 new88 new88 new88 new88 new88 new88
new88 new88 new88 new88 new88 new88 new88 new88 new88 new88 new88 new88
new88 new88 new88 new88 new88 new88 new88 new88 new88 new88 new88 new88 new88 new88 new88
new88 new88 new88 new88 new88 new88 new88 new88 new88 new88 new88 new88 new88 new88 new88 new88 new88 new88 new88 new88 new88 new88 new88
new88 new88 new88 new88 new88 new88 new88 new88 new88 new88
new88 new88 new88 new88 new88 new88 new88 new88
new88 new88 new88 new88 new88 new88 new88 new88 new88 new88 new88 new88
new88 new88 new88 new88 new88 new88 new88 new88 new88
new88 new88 new88 new88 new88 new88 new88 new88 new88 new88 new88
new88 new88 new88 new88 new88 new88 new88 new88 new88 new88 new88 new88 new88 new88 new88 new88 new88 new88 new88 new88 new88 new88 new88
new88 new88 new88 new88 new88 new88 new88 new88 new88 new88
new88 new88 new88 new88 new88 new88 new88 new88 new88 new88 new88 new88 new88 new88 new88 new88 new88 new88 new88 new88 new88 new88 new88 new88 new88
new88 new88 new88 new88 new88 new88 new88 new88 new88 new88 new88 new88 new88 new88
new88 new88 new88 new88 new88 new88 new88 new88 new88
new88 new88 new88 new88 new88 new88 new88 new88 new88
new88 new88 new88 new88 new88 new88 new88 new88 new88 new88 new88 new88 new88 new88 new88 new88 new88 new88
new88 new88 new88 new88 new88 new88 new88 new88 new88 new88 new88 new88 new88
new88 new88 new88 new88 new88 new88 new88 new88 new88 new88 new88 new88 new88 new88 new88 new88 new88 new88
new88 new88 new88 new88 new88 new88 new88 new88 new88 new88
new88 new88 new88 new88 new88 new88 new88
new88 new88 new88 new88 new88 new88 new88 new88 new88 new88 new88 new88 new88 new88 new88 new88 new88 new88 new88 new88 new88 new88 new88 new88 new88 new88 new88 new88 new88 new88 new88 new88 new88 new88 new88 new88 new88 new88 new88 new88
new88 new88 new88 new88 new88 new88 new88 new88 new88 new88 new88 new88 new88 new88 new88 new88 new88 new88 new88 new88 new88 new88 new88 new88 new88 new88 new88
new88 new88 new88 new88 new88 new88 new88 new88 new88 new88 new88 new88 new88 new88 new88 new88 new88 new88 new88 new88 new88 new88 new88 new88
new88 new88 new88 new88 new88 new88 new88 new88 new88 new88
new88 new88 new88 new88 new88 new88 new88 new88 new88 new88 new88 new88 new88 new88 new88 new88 new88 new88 new88 new88 new88 new88 new88 new88 new88 new88 new88 new88 new88 new88 new88
new88 new88 new88 new88 new88 new88 new88 new88 new88 new88 new88 new88 new88 new88 new88
new88 new88 new88 new88 new88 new88 new88 new88 new88 new88 new88 new88 new88 new88
new88 new88 new88 new88 new88 new88 new88 new88 new88 new88 new88 new88
new88 new88 new88 new88 new88 new88 new88 new88 new88 new88 new88 new88 new88 new88 new88 new88 new88 new88 new88 new88 new88 new88 new88 new88 new88 new88 new88 new88 new88
new88 new88 new88 new88 new88 new88 new88 new88 new88 new88 new88 new88 new88 new88 new88 new88 new88 new88 new88 new88
new88 new88 new88 new88 new88 new88 new88 new88 new88 new88 new88 new88 new88
new88 new88 new88 new88 new88 new88 new88 new88 new88 new88 new88 new88 new88 new88 new88 new88
new88 new88 new88 new88 new88 new88 new88 new88
new88 new88 new88 new88 new88 new88 new88 new88 new88 new88 new88 new88 new88 new88 new88 new88 new88
new88 new88 new88 new88 new88 new88 new88 new88 new88 new88 new88 new88 new88 new88
new88 new88 new88 new88 new88 new88 new88 new88 new88 new88 new88
new88 new88 new88 new88 new88 new88 new88 new88 new88 new88
new88 new88 new88 new88 new88 new88 new88 new88 new88 new88 new88 new88 new88 new88 new88 new88 new88 new88 new88 new88
new88 new88 new88 new88 new88 new88 new88 new88 new88 new88
new88 new88 new88 new88 new88 new88 new88 new88 new88 new88 new88 new88 new88 new88 new88 new88 new88 new88 new88 new88 new88 new88 new88 new88 new88
new88 new88 new88 new88 new88 new88 new88 new88 new88 new88 new88 new88 new88 new88
new88 new88 new88 new88 new88 new88 new88 new88 new88
new88 new88 new88 new88 new88 new88 new88 new88 new88 new88
new88 new88 new88 new88 new88 new88 new88 new88 new88 new88 new88 new88
new88 new88 new88 new88 new88 new88 new88 new88 new88 new88 new88 new88 new88
new88 new88 new88 new88 new88 new88 new88 new88 new88 new88 new88 new88 new88 new88 new88 new88 new88 new88 new88 new88 new88 new88 new88 new88
new88 new88 new88 new88 new88 new88 new88 new88 new88 new88 new88 new88 new88 new88 new88 new88 new88 new88 new88 new88
new88 new88 new88 new88 new88 new88 new88 new88 new88 new88 new88 new88 new88 new88
new88 new88 new88 new88 new88 new88 new88 new88 new88 new88 new88
new88 new88 new88 new88 new88 new88 new88 new88 new88 new88 new88 new88
new88 new88 new88 new88 new88 new88 new88 new88 new88 new88 new88 new88 new88 new88 new88 new88 new88 new88 new88 new88 new88 new88 new88 new88 new88 new88 new88 new88 new88 new88 new88 new88 new88 new88 new88
new88 new88 new88 new88 new88 new88 new88 new88 new88 new88 new88 new88 new88 new88 new88 new88 new88 new88 new88 new88 new88
new88 new88 new88 new88 new88 new88 new88 new88 new88
new88 new88 new88 new88 new88 new88 new88 new88 new88 new88 new88 new88 new88
new88 new88 new88 new88 new88 new88 new88 new88 new88 new88 new88 new88 new88 new88 new88 new88 new88 new88
new88 new88 new88 new88 new88 new88 new88 new88 new88
new88 new88 new88 new88 new88 new88 new88 new88 new88 new88 new88 new88 new88
new88 new88 new88 new88 new88 new88 new88 new88 new88 new88 new88
new88 new88 new88 new88 new88 new88 new88 new88 new88 new88 new88 new88
new88 new88 new88 new88 new88 new88 new88 new88 new88 new88 new88 new88 new88
new88 new88 new88 new88 new88 new88 new88 new88 new88 new88 new88 new88 new88 new88 new88
new88 new88 new88 new88 new88 new88 new88 new88 new88 new88 new88 new88 new88 new88 new88 new88 new88 new88 new88 new88 new88 new88 new88 new88 new88 new88 new88 new88 new88 new88 new88 new88 new88 new88 new88 new88 new88 new88 new88
new88 new88 new88 new88 new88 new88 new88 new88
new88 new88 new88 new88 new88 new88 new88 new88 new88 new88 new88 new88
new88 new88 new88 new88 new88 new88 new88 new88 new88 new88 new88
new88 new88 new88 new88 new88 new88 new88 new88 new88 new88 new88 new88 new88
new88 new88 new88 new88 new88 new88 new88 new88
new88 new88 new88 new88 new88 new88 new88 new88 new88
new88 new88 new88 new88 new88 new88 new88 new88 new88 new88 new88 new88 new88 new88
new88 new88 new88 new88 new88 new88 new88 new88 new88 new88 new88
new88 new88 new88 new88 new88 new88 new88 new88 new88 new88 new88 new88 new88 new88 new88 new88 new88 new88 new88
new88 new88 new88 new88 new88 new88 new88 new88 new88 new88 new88 new88 new88 new88 new88 new88 new88 new88 new88 new88 new88 new88
new88 new88 new88 new88 new88 new88 new88 new88 new88 new88 new88
new88 new88 new88 new88 new88 new88 new88 new88
new88 new88 new88 new88 new88 new88 new88 new88 new88 new88
new88 new88 new88 new88 new88 new88 new88 new88 new88 new88 new88 new88 new88 new88 new88 new88 new88 new88
new88 new88 new88 new88 new88 new88 new88 new88 new88 new88 new88 new88 new88 new88 new88 new88 new88 new88 new88 new88 new88 new88
new88 new88 new88 new88 new88 new88 new88 new88 new88 new88 new88 new88 new88 new88 new88 new88
new88 new88 new88 new88 new88 new88 new88 new88 new88 new88 new88 new88 new88 new88 new88 new88
new88 new88 new88 new88 new88 new88 new88 new88 new88 new88 new88 new88 new88 new88 new88 new88
new88 new88 new88 new88 new88 new88 new88 new88 new88 new88 new88 new88 new88 new88 new88 new88 new88 new88 new88 new88 new88
new88 new88 new88 new88 new88 new88 new88 new88 new88 new88 new88 new88 new88
new88 new88 new88 new88 new88 new88 new88 new88 new88 new88
new88 new88 new88 new88 new88 new88 new88 new88 new88
new88 new88 new88 new88 new88 new88 new88 new88 new88 new88 new88
new88 new88 new88 new88 new88 new88 new88 new88 new88 new88 new88 new88 new88 new88
new88 new88 new88 new88 new88 new88 new88 new88 new88 new88
new88 new88 new88 new88 new88 new88 new88 new88
new88 new88 new88 new88 new88 new88 new88 new88 new88 new88
new88 new88 new88 new88 new88 new88 new88 new88 new88 new88 new88 new88 new88 new88 new88 new88 new88 new88 new88 new88 new88
new88 new88 new88 new88 new88 new88 new88 new88 new88 new88 new88 new88
new88 new88 new88 new88 new88 new88 new88 new88 new88 new88 new88 new88 new88 new88 new88 new88
new88 new88 new88 new88 new88 new88 new88 new88 new88 new88 new88 new88 new88 new88 new88 new88
new88 new88 new88 new88 new88 new88 new88 new88 new88 new88
new88 new88 new88 new88 new88 new88 new88 new88 new88 new88
new88 new88 new88 new88 new88 new88 new88 new88 new88 new88 new88 new88 new88 new88
new88 new88 new88 new88 new88 new88 new88 new88 new88 new88 new88 new88 new88 new88
new88 new88 new88 new88 new88 new88 new88 new88 new88 new88 new88
new88 new88 new88 new88 new88 new88 new88 new88
new88 new88 new88 new88 new88 new88 new88 new88 new88 new88
new88 new88 new88 new88 new88 new88 new88 new88
new88 new88 new88 new88 new88 new88 new88 new88 new88 new88
new88 new88 new88 new88 new88 new88 new88 new88
new88 new88 new88 new88 new88 new88 new88 new88 new88 new88 new88
new88 new88 new88 new88 new88 new88 new88 new88
new88 new88 new88 new88 new88 new88 new88 new88 new88 new88 new88 new88 new88 new88 new88 new88
new88 new88 new88 new88 new88 new88 new88 new88 new88 new88 new88 new88 new88
new88 new88 new88 new88 new88 new88 new88 new88 new88 new88
new88 new88 new88 new88 new88 new88 new88 new88 new88 new88 new88 new88 new88 new88 new88 new88 new88 new88 new88 new88
new88 new88 new88 new88 new88 new88 new88 new88 new88 new88 new88 new88
new88 new88 new88 new88 new88 new88 new88 new88 new88 new88 new88 new88 new88
new88 new88 new88 new88 new88 new88 new88 new88 new88 new88 new88 new88
new88 new88 new88 new88 new88 new88 new88 new88 new88 new88 new88 new88 new88 new88 new88 new88 new88 new88 new88 new88 new88 new88 new88 new88 new88 new88 new88 new88
new88 new88 new88 new88 new88 new88 new88 new88 new88 new88 new88 new88 new88 new88 new88 new88
new88 new88 new88 new88 new88 new88 new88 new88 new88 new88 new88
new88 new88 new88 new88 new88 new88 new88 new88 new88 new88 new88
new88 new88 new88 new88 new88 new88 new88 new88 new88 new88 new88 new88 new88 new88 new88 new88 new88 new88 new88 new88 new88
new88 new88 new88 new88 new88 new88 new88 new88 new88 new88 new88 new88
new88 new88 new88 new88 new88 new88 new88 new88 new88 new88 new88
new88 new88 new88 new88 new88 new88 new88 new88 new88 new88 new88 new88 new88 new88
new88 new88 new88 new88 new88 new88 new88 new88 new88 new88 new88 new88 new88 new88 new88 new88
new88 new88 new88 new88 new88 new88 new88 new88 new88 new88
new88 new88 new88 new88 new88 new88 new88 new88
new88 new88 new88 new88 new88 new88 new88 new88 new88 new88 new88 new88 new88 new88 new88 new88 new88 new88 new88 new88 new88 new88 new88 new88 new88 new88
new88 new88 new88 new88 new88 new88 new88 new88 new88 new88 new88 new88
new88 new88 new88 new88 new88 new88 new88 new88 new88 new88 new88 new88 new88 new88 new88
new88 new88 new88 new88 new88 new88 new88 new88 new88 new88 new88 new88 new88 new88 new88 new88 new88 new88 new88 new88 new88 new88
new88 new88 new88 new88 new88 new88 new88 new88 new88 new88
new88 new88 new88 new88 new88 new88 new88 new88 new88 new88 new88 new88 new88 new88 new88 new88 new88 new88 new88 new88
new88 new88 new88 new88 new88 new88 new88 new88 new88 new88 new88 new88 new88
new88 new88 new88 new88 new88 new88 new88 new88 new88 new88 new88 new88 new88 new88 new88 new88 new88 new88
new88 new88 new88 new88 new88 new88 new88 new88 new88 new88 new88 new88 new88
new88 new88 new88 new88 new88 new88 new88 new88 new88 new88 new88 new88 new88 new88 new88 new88
new88 new88 new88 new88 new88 new88 new88 new88 new88 new88 new88
new88 new88 new88 new88 new88 new88 new88 new88 new88 new88 new88 new88 new88 new88
new88 new88 new88 new88 new88 new88 new88 new88 new88 new88 new88 new88
new88 new88 new88 new88 new88 new88 new88 new88 new88 new88 new88 new88 new88 new88 new88 new88 new88 new88 new88 new88 new88 new88 new88 new88
new88 new88 new88 new88 new88 new88 new88 new88 new88 new88 new88 new88
new88 new88 new88 new88 new88 new88 new88 new88 new88
new88 new88 new88 new88 new88 new88 new88 new88 new88 new88 new88 new88 new88 new88
new88 new88 new88 new88 new88 new88 new88 new88 new88 new88 new88 new88 new88 new88
new88 new88 new88 new88 new88 new88 new88 new88 new88 new88 new88 new88 new88 new88 new88
new88 new88 new88 new88 new88 new88 new88 new88 new88
new88 new88 new88 new88 new88 new88 new88 new88 new88 new88 new88 new88 new88 new88 new88 new88 new88 new88 new88 new88 new88 new88 new88 new88 new88 new88 new88 new88 new88 new88
new88 new88 new88 new88 new88 new88 new88 new88 new88 new88 new88 new88 new88 new88 new88 new88 new88 new88 new88 new88 new88 new88 new88 new88
new88 new88 new88 new88 new88 new88 new88 new88 new88 new88 new88 new88 new88 new88 new88 new88 new88
new88 new88 new88 new88 new88 new88 new88 new88 new88 new88 new88 new88 new88 new88 new88
new88 new88 new88 new88 new88 new88 new88 new88 new88 new88 new88 new88 new88 new88
new88 new88 new88 new88 new88 new88 new88 new88 new88 new88 new88 new88 new88
new88 new88 new88 new88 new88 new88 new88 new88 new88 new88 new88 new88 new88 new88 new88 new88 new88 new88 n
Fantastic items from you, man. I have consider your stuff prior to and
you are simply too fantastic. I actually like what you have
got right here, really like what you're saying and the best way through which you assert it.
You're making it entertaining and you still take care of to stay it smart.
I can not wait to learn much more from you.
That is really a wonderful site.
I visited various web pages however the audio quality for audio songs existing at this web page is actually wonderful.
You actually make it seem so easy along with your presentation however Iin finding this opic to be really something which I think
I might by no means understand. It sort of feels too complex and very vast for me.
I am looking forward for your subsequent put up, I will try to
gett the grasp oof it!
You actually make it seem really easy together with your presentation however I in finding this topic to be really one thing that I think I
would by no means understand. It seems too complex and very large for me.
I'm having a look ahead to your subsequent submit, I will
try to get the hold of it!
Hey just wanted to give you a quick heads up and let you know a few of the images aren't loading properly.
I'm not sure why but I think its a linking issue.
I've tried it in two different browsers and both show the same results.
Howdy this is kinda of off topic but I was wanting to know if blogs
use WYSIWYG editors or if you have to manually code with
HTML. I'm starting a blog soon but have no coding know-how so I wanted to
get advice from someone with experience. Any help would be greatly appreciated!
Nice post. I was checking continuously this blog and I am impressed!
Extremely helpful info specifically the last part :) I care for such
information much. I was looking for this particular information for a very long time.
Thank you and good luck.
Hmm is anyone else experiencing problems with the pictures on this blog loading?
I'm trying to find out if its a problem on my end or if it's the blog.
Any responses would be greatly appreciated.
Howdy! I could have sworn I've visited your blog before but after browsing through a few of the posts I realized
it's new to me. Anyways, I'm definitely happy I came
across it and I'll be book-marking it and checking back regularly!
Wow that was strange. I just wrote an extremely long comment but after I clicked submit
my comment didn't appear. Grrrr... well I'm not writing
all that over again. Anyway, just wanted to say fantastic blog!
I read this piece of writing fully on the topic of the difference of newest and earlier technologies, it's awesome article.
Great web site you've got here.. It's hard to find high quality writing like yours nowadays.
I truly appreciate individuals like you! Take care!!
Interesting blog! Is your theme custom made or did you download it from somewhere?
A theme like yours with a few simple adjustements would
really make my blog stand out. Please let me know where you got your design. Bless you
It's impressive that you are getting ideas from this paragraph as well as from our dialogue made at
this place.
I know this web page ocfers quality depdndent artucles
and other data, is there any other ssite which offers these
kinds of information in quality?
Do you mind if I quote a few of your articles as
long as I provide credit and sources back to your webpage?
My blog site is in the exact same area of interest as yours and my
visitors would certainly benefit from a lot of the information you present here.
Please let me know if this alright with you.
Many thanks!
Thanks for any other magnificent post. The place else may anyone get that
kind of info in such a perfect way of writing? I have a presentation subsequent week, and I am on the search for
such info.
porn
Rasha porn
Very nice post. I just stumbled upon your blog and wanted
to say that I have truly enjoyed browsing your blog posts.
In any case I'll be subscribing to your rss feed and I hope you write again soon!
Link exchange is nothing else but it is simply placing the other person's webpage link on your page at appropriate place and other person will also do similar
in support of you.
Why viewers still make use of to read news papers when in this technological world everything
is presented on web?
Howdy would you mind letting me know which hosting company you're working with?
I've loaded your blog in 3 different browsers and I must
say this blog loads a lot faster then most. Can you recommend a good hosting
provider at a fair price? Thanks, I appreciate it!
Heya i'm foг the fіrst tіme heгe. I came acrosѕ this board ?nd I find It tгuly ?seful & it helped mе
out а lot. І hope to give something back ?nd aid ?thers li?e ?ou aided me.
Thanks for the good writeup. It in truth was once a leisure account
it. Glance advanced to far added agreeable from you!
By the way, how could we communicate?
I quite like reading through an article that can make people think.
Also, thank you for allowing me to comment!
Hi! I realize this is somewhat off-topic however I needed to ask.
Does operating a well-established website such as yours
require a large amount of work? I am completely new to writing a blog however
I do write in my journal daily. I'd like to start a blog so I
can share my own experience and views online. Please let me know if
you have any kind of ideas or tips for brand new aspiring blog
owners. Thankyou!
Quality posts is the main to be a focus for the
users to pay a visit the website, that's what this website is
providing.
Excellent beat ! I would like to apprentice even as you amend your website, how could i subscribe for a blog web site?
The account helped me a acceptable deal. I had been tiny bit familiar of this your broadcast provided vivid transparent
concept
Your style is very unique compared to other folks
I've read stuff from. Many thanks for posting when you've got the opportunity, Guess I will just book mark this page.
I need to to thank you for this wonderful read!! I certainly loved every bit of it.
I have got you book-marked to check out new stuff you post…
Hi there mates, its great paragraph concerning educationand completely
explained, keep it up all the time.
Great article! This is the kind of info that are meant to be shared around the internet.
Shame on the search engines for no longer positioning this post higher!
Come on over and consult with my site . Thanks =)
Why viewers still make use of to read news papers when in this technological world the whole thing is available on net?
Hi to every body, it's my first pay a quick visit of this blog;
this website consists of amazing and genuinely good material for readers.
You really make it seem so easy with your presentation but I find this topic to be really something which I think I would never understand.
It seems too complicated and extremely broad for me.
I'm looking forward for your next post, I'll try to get the hang of it!
Great blog you have here but I was curious about if
you knew of any user discussion forums that cover the same topics discussed here?
I'd really love to be a part of group where
I can get comments from other knowledgeable people that share the same interest.
If you have any suggestions, please let me know.
Kudos!
Hi to all, the contents present at this website are in fact remarkable for people
knowledge, well, keep up the good work fellows.
I feel this is among the such a lot vital info for me.
And i'm happy reading your article. However wanna
remark on few common things, The site taste is ideal, the articles is truly great : D.
Just right activity, cheers
Excellent article! We will be linking to this great article on our site.
Keep up the great writing.
Hi there, I read your blog daily. Your writing style is witty, keep
doing what you're doing!
Hello! I'm at work surfing around your blog from my new iphone 3gs!
Just wanted to say I love reading your blog and look forward to all your posts!
Carry on the outstanding work!
Very nice post. I simply stumbled upon your blog
and wanted to mention that I have really loved surfing around
your blog posts. In any case I will be subscribing in your rss feed and I hope
you write again soon!
Touche. Great arguments. Keep up the good spirit.
When I originally commented I clicked the "Notify me when new comments are added" checkbox
and now each time a comment is added I get several emails with the same comment.
Is there any way you can remove me from that service?
Bless you!
This article provides clear idea designed
for the new visitors of blogging, that actually how to do blogging and site-building.
Hello, i think that i saw you visited my weblog so i came to “return the favor”.I'm attempting to find things to improve my site!I suppose its ok to use a few of your ideas!!
Howdy! I'm at work browsing your blog from my new apple iphone!
Jusst wanted tto say Ilove reading through your blog and look forward to all your posts!
Carry on the fantastic work!
I've been surfing on-line greater than three hours today, yet I by no means
found any attention-grabbing article like yours.
It's pretty price enough for me. In my opinion, if all site owners and bloggers made good content as you did, the
web shall be much more helpful than ever before.
I'm really enjoying the design and layout of your blog.
It's a very easy on the eyes which makes it much more pleasant for me to
come here and visit more often. Did you hire out a developer to create your
theme? Excellent work!
Your mode of telling the whole thing in this post is really nice, every one be capable of easily know it, Thanks a lot.
You could certainly see your skills in the article you
write. The world hopes for even more passionate writers like you who are not afraid to mention how they believe.
All the time go after your heart.
Superb blog! Do you have any recommendations for aspiring writers?
I'm planning to start my own site soon but I'm a little lost on everything.
Would you advise starting with a free platform like Wordpress or go for a paid option? There are so many
options out there that I'm totally overwhelmed ..
Any recommendations? Thank you!
Excellent way of telling, and fastidious piece of writing to obtain facts concerning my presentation focus, which i am going to convey in academy.
Fastidious response in return of this issue with genuine arguments and telling everything on the topic of
that.
Hey there! I know this is kinda off topic but I was
wondering if you knew where I could locate a captcha plugin for my comment form?
I'm using the same blog platform as yours and I'm having difficulty finding one?
Thanks a lot!
I like the helpful info you provide in your articles. I'll
bookmark your weblog and check again here regularly. I'm quite sure I'll learn a lot of
new stuff right here! Best of luck for the next!
Hi, i think that i saw you visited my web site so
i came to “return the favor”.I'm trying to find things
to improve my web site!I suppose its ok to use a few of your ideas!!
Simply wish to say your article is as astonishing.
The clearness for your submit is simply great and that i can suppose you're a professional on this subject.
Well together with your permission allow me to snatch your RSS feed to keep updated with drawing close post.
Thank you 1,000,000 and please continue the gratifying
work.
It is the best time to make some plans for the future and
it's time to be happy. I've read this submit and if I may I desire to recommend you some
fascinating things or tips. Maybe you could write next articles
regarding this article. I wish to learn even more things approximately it!
Thanks for sharing your thoughts. I really appreciate your efforts and I will
be waiting for your further post thanks once again.
I'm gone to convey my little brother, that he should also pay
a quick visit this webpage on regular basis to get updated from most up-to-date reports.
Asking questions are really nice thing if you are not understanding
anything completely, but this paragraph
offers nice understanding yet.
We're a group of volunteers and starting a new
scheme in our community. Your site offered us with useful information to work on. You have performed a formidable activity and our whole
group can be thankful to you.
I wanted to thank you for this wonderful read!! I definitely loved every little bit of it.
I have you book-marked to look at new stuff you post…
Hello to all, it's genuinely a nice for me to pay a visit this
site, it includes helpful Information.
At this time it sounds like BlogEngine is the top blogging platform available right now.
(from what I've read) Is that what you're using on your blog?
Hello, this weekend is pleasant for me, since this occasion i am reading this impressive informative paragraph here
at my home.
It's amazing to visit this site and reading the views of all colleagues
regarding this post, while I am also zealous of getting
familiarity.
I was able to find good information from your blog articles.
It is also influenced by your mental state and the approaches you
employ to stay focused and motivated.
I visit daily a few websites and sites to read articles or reviews, but this web site
offers feature based writing.
I pay a visit daily a few sites and blogs to read content, but
this weblog presents quality based content.
Incredible quest there. What occurred after? Good luck!
Yukbet77 berusaha menyempurnakan situs games online dengan melengkapi seluruh jenis permainan yang tersedia di YukBet77.com
Your mode of telling everything in this piece of writing
is in fact fastidious, every one be able to easily know it, Thanks a
lot.
Write more, thats all I have to say. Literally, it seems
as though you relied on the video to make your point.
You clearly know what youre talking about, why throw away your intelligence on just posting videos to
your weblog when you could be giving us something informative to read?
Hi there! I could have sworn I've visited this
web site before but after browsing through a few of the
articles I realized it's new to me. Anyways, I'm certainly pleased I discovered
it and I'll be book-marking it and checking back
often!
What's up friends, its great piece of writing concerning teachingand completely explained, keep it up all the time.
Hi there this is kind of of off topic but I was wondering if blogs use
WYSIWYG editors or if you have to manually code with HTML. I'm starting a blog soon but
have no coding expertise so I wanted to get guidance from
someone with experience. Any help would be greatly appreciated!
Now I am going to do my breakfast, afterward having my breakfast coming over again to
read more news.
Hi my family member! I want to say that this post is
amazing, great written and come with almost all vital infos.
I'd like to peer more posts like this .
%%
Great site you have got here.. It's difficult to find excellent writing like yours nowadays.
I really appreciate people like you! Take care!!
Stunning story there. What happened after? Thanks!
Hi there! This is my 1st comment here so I just wanted to give a
quick shout out and say I genuinely enjoy reading your articles.
Can you recommend any other blogs/websites/forums that cover
the same topics? Thanks a lot!
Hi, I log on to your new stuff regularly. Your story-telling style is awesome, keep
up the good work!
Pretty great post. I simply stumbled upon your weblog
and wished to mention that I have really enjoyed surfing around your weblog posts.
After all I will be subscribing for your feed and I'm hoping you write
once more very soon!
Apr?s avoir d?couvert v?rit? surprenante, il se met
en qu?te de le trouver et rencontre Jo Jae-mi (Lee Yoo-mi).
Thank you for the good writeup. It in fact was a amusement account it.
Look advanced to more added agreeable from you!
By the way, how could we communicate?
Hello there, just became aware of your blog through Google, and found that it is truly
informative. I am going to watch out for brussels. I'll be grateful if you continue this in future.
Numerous people will be benefited from your writing. Cheers!
%%
Good information. Lucky me I came across your site by chance (stumbleupon).
I have bookmarked it for later!
With havin so much written content do you ever run into any issues of plagorism or copyright infringement?
My site has a lot of unique content I've either written myself or outsourced but it
appears a lot of it is popping it up all over the web without my permission. Do you
know any techniques to help stop content from being stolen? I'd really appreciate
it.
What's Going down i am new to this, I stumbled upon this I've discovered It positively helpful and it has helped
me out loads. I hope to give a contribution & assist
other users like its helped me. Great job.
Thank you for every other magnificent post. The place else may just anyone get that type of info in such a perfect method of writing?
I've a presentation subsequent week, and I am at the search for such information.
I wanted to thank you for this wonderful read!! I absolutely loved every
bit of it. I've got you book-marked to check out new things
you post…
porn
Wow! After a?l I got a web site from where I can actually ?btain uѕeful innformation regarding my stujdy and knowledg?.
Напрягайте найденные мышцы на
3 секунды, https://florinka.at.ua/forum/38-31803-1 а после
одобрения расслабляйте.
Hi! I've been reading your weblog for some time now and finally got the
bravery to go ahead and give you a shout out from Porter Tx!
Just wanted to say keep up the good work!
If some one needs expert view on the topic of blogging after that i suggest him/her to pay a quick visit this website, Keep up
the pleasant job.
best Porn
Fantastic beat ! I wish to apprentice at the same time as you amend your web site, how can i subscribe for a blog site?
The account helped me a acceptable deal. I have been a little bit acquainted
of this your broadcast offered shiny clear idea
best Porn
Greetingѕ! Veгy helpful advixe wit?in this post!
It іs the little ?hanges thаt ?ill makke thе
greatest ?hanges. Thanks a llot for sharing!
Hurrah! At last I got a webpage from where I can truly obtain helpful information regarding my study and knowledge.
I believe everything published made a bunch of sense. However, think about this, suppose you typed a catchier post title?
I mean, I don't wish to tell you how to run your website, however what if you added a headline that grabbed folk's attention? I mean Создание шаблона
Joomla, как изменить шаблон, основные настройки
и параметры / Разработка шаблонов Joomla .:.
Документация Joomla! CMS is kinda vanilla.
You might glance at Yahoo's front page and see how they create news titles to grab people to open the links.
You might add a related video or a related
pic or two to get people interested about what you've got to say.
Just my opinion, it could bring your website a little
bit more interesting.
Porn 1080
Hi, i believe that i saw you visited my site so i got here to return the prefer?.I'm trying to find things to enhance my site!I
suppose its good enough to make use of some of your concepts!!
Excellent blog here! Additionally your website rather a lot
up very fast! What web host are you the usage of? Can I am getting your affiliate hyperlink for your host?
I wish my site loaded up as quickly as yours lol
HD porn
free porn
I love your blog.. very nice colors & theme. Did you make this website yourself or did you hire someone
to do it for you? Plz reply as I'm looking to design my own blog and would like to
know where u got this from. thanks a lot
8Porno
May I simply say what a relief to find someone that genuinely knows what they are talking about over the internet.
You actually realize how to bring an issue to light and make it important.
More and more people really need to read this and understand this side of your story.
I was surprised that you aren't more popular because you
most certainly possess the gift.
Thanks for the good writeup. It in fact used to be a amusement account
it. Glance complicated to more brought agreeable from you!
By the way, how could we keep in touch?
I do consider all the ideas you have introduced on your
post. They are really convincing and can definitely work. Nonetheless, the posts are very brief for
novices. May you please prolong them a little from next time?
Thank you for the post.
porn Incest
Hi there, this weekend is pleasant in favor of me, since this time i am
reading this fantastic educational paragraph here at my residence.
Wonderful goods from you, man. I have understand your stuff previous to and you're just extremely
great. I really like what you've acquired here, really like what you're stating and the way in which you say it.
You make it entertaining and you still care for to keep it smart.
I can not wait to read much more from you. This is really
a great web site.
Хотите срочно продать автомобиль?
Компания "Скупка Авто Ярославль" - ваш надежный партнер!
Мы предлагаем посетить сайт https://yaroslavl.skupkavto.ru/ и сдать авто в любом состоянии, по выгодной цене и без ненужных затрат времени и
сил.
Почему стоит обратиться к нам:
Оперативный выкуп: Мы выкупаем автомобили в кратчайшие сроки, в течение 1 часа.
Справедливая цена: Мы предлагаем максимально возможную цену за ваш автомобиль, до 95% от
цены нового.
Срочный выкуп: Скупаем автомобили в любом состоянии, битые,
залоговые, проблемные.
Экономия вашего времени и сил: Мы
берем на себя все хлопоты по оформлению сделки, вам не нужно никуда ездить.
Безопасная сделка: Мы гарантируем юридическую
чистоту сделки.
Персональный подход: Мы подберем для вас наиболее подходящий вариант с учетом
ваших пожеланий.
"Скупка Авто Ярославль" - это:
Профессионализм: Мы работаем на рынке более десяти лет.
Квалификация: Наши специалисты имеют большой опыт в оценке
автомобилей.
Надежность: Мы дорожим своей именем и
гарантируем честную сделку.
Безопасность: Мы гарантируем конфиденциальность
вашей информации.
Ищете ответы на свои вопросы? Звоните
нам по телефону +7 (964) 765-97-97 или оставьте заявку на
сайте компании по выкупу авто в ярославле:
https://yaroslavl.skupkavto.ru/ .
Мы всегда готовы прийти вам на помощь!
Наш адрес: г. Ярославль, ул.
Угличская, 39
Приезжайте к нам, мы всегда рады вам помочь!
"Скупка Авто Ярославль" - ваш надежный партнер
в продаже автомобиля!
Porn vijdeo online
Good write-up. I definitely love this website. Stick with it!
Aporno online
Superb, what a website it is! This web site provides
helpful information to us, keep it up.
When I originally commented I clicked the "Notify me when new comments are added" checkbox and now
each time a comment is added I get three e-mails with the same comment.
Is there any way you can remove people from that service?
Thank you!
Remember: aubetonlinepoker.com free sweepstakes are registered
on balance separately from {your|your main bankroll.
Если автор не справился - мы вернем https://xn----8sbjufbbcmolbtcflf .
Disobedience makes you want to insist on your own when someone challenges you, the australiabetonlinepoker.com, but it will
to disaster if have no cards in your tablet.
Porn
Справочник drugomir.ru/blog.php?user=Iamorial33&blogentry_id=2020 по
элементарной математике. Геометрия.
Техника использования.
Статистика. Вероятность.
кое-то говорит стихи и согласны почитать классическую литературу, https://usman48 .
I am extremely impressed together with your writing talents and
also with the layout on your blog. Is this a paid
topic or did you modify it your self? Either
way keep up the nice high quality writing, it is rare to see
a nice blog like this one nowadays..
Wonderful work! That is the kind of info that are supposed to be
shared across the net. Disgrace on the seek engines for no longer positioning this submit higher!
Come on over and consult with my website . Thank you =)
Hello i am kavin, its my first occasion to commenting anyplace, when i read this piece
of writing i thought i could also create comment due to this sensible paragraph.
I got this web page from my friend who shared with me
concerning this web site and at the moment
this time I am visiting this web site and reading very informative articles or reviews at this place.
Специалист партнерствует с фотографами, видеографами,
работа досуг изданиями и моделями
из различных стран.
С одного ip адреса каждый гость может создать https://radiostopfm.com/ один аккаунт.
beznaeba (it.beznaeba.xyz)
Having read this I believed it was extremely enlightening.
I appreciate you finding the time and effort to put this content together.
I once again find myself spending way too much time both reading
and leaving comments. But so what, it was still worthwhile!
I'm not sure exactly why but this web site is loading extremely slow for me.
Is anyone else having this issue or is it a problem on my end?
I'll check back later and see if the problem still exists.
Porn
в числе таких https://sertifikaliegitimler.com/#vhod-casino и россии.
Количество учетных записей.
you are the new president (19) and viewer also you are a person confirming
your identity, thanks to a photo taken for the government;
persons participating in the elections, and you (21), what striving to
avoid participation in the 1wingames .
porn download
Фрибеты, обычно, bookmakers.website.yandexcloud.net/ могут быть применены на происходящее из разных видов спорта.
Every weekend i used to pay a visit this site, as i
wish for enjoyment, for the reason that
this this website conations actually good funny stuff too.
Good post. I learn something totally new and challenging on blogs
I stumbleupon every day. It will always be exciting to read through articles from other writers and use something from their websites.
Пользователи все яснее будут представлять,
что красивости сайта интернет маркета не главное, важнее при покупке типовых товаров.
Just desire to say your article is as surprising.
The clearness in your post is simply spectacular and i could assume you're
an expert on this subject. Well with your permission let me
to grab your RSS feed to keep updated with forthcoming post.
Thanks a million and please continue the enjoyable
work.
I am not sure where you are getting your information, but good topic.
I needs to spend some time learning much more or understanding more.
Thanks for fantastic info I was looking for this
info for my mission.
Сайт Справочник организаций - продвинутый и универсальный справочник организаций, находящихся на территории
рф.
Hi there very cool site!! Guy .. Excellent .. Amazing ..
I'll bookmark your site and take the feeds additionally?
I'm happy to search out numerous helpful information right here in the
publish, we want develop extra strategies on this regard, thank you for sharing.
. . . . .
4. Find products related to richardcoles.com/ products.
2. Exporters of frozen fish goods and seafood.
1. Frozen seafood for wholesale distributors.
Рассмотрим некоторые инструменты
аналитики. может потребоваться вывод
на базар нового средства, ребрендинг старого, https://focus .
Онлайн-школа выдает так называемые наностепени - сертификаты
о прохождении курсов, https://yorkstudy .
with us really there beautiful secured and paved parking lot that provides an opportunity to park quickly, which you deserve
in the https://brooksqrle06284.free-blogz.com/73766386/find-convenient-airport-parking-options-with-parkingnearairports-io .
we select this monitor in our team for over 2x centuries what with the same force works no less good, as in this day when we have iterm2.
нужно помнить, что в сегменте внешней рекламных материалов
насчитывается более многоэтапное, нежели
в рекламной бизнеса в целом,.
KA
Aw, this was an incredibly good post. Taking the time and actual effort to generate a great article… but what can I say… I put things off a lot and never seem to get anything done.
I know this web site offers quality depending articles and extra data, is there
any other site which presents these kinds of things in quality?
Greetings! Very helpful advice in this particular post!
It's the little changes that produce the most significant changes.
Thanks a lot for sharing!
при этом лица с таким заявлением, Национальный оператор по вождению автомобильными дорогами или
местные исполнительные органы.
search engine will give out whole list portals, where
current bonus codes 1win will be published and the https://facebook.com/groups/1xbetpromocodesomalia code.
I loved as much as you will receive carried out right here.
The sketch is tasteful, your authored material stylish.
nonetheless, you command get got an shakiness over that you wish be delivering the following.
unwell unquestionably come further formerly again as exactly
the same nearly a lot often inside case you shield this increase.
not including the hard limit, this is most likely the case
https://slothana-coin.io/ is served first, or the risk of being blocked when all tokens run out.
Nice post. I was checking constantly this blog and I am impressed!
Very helpful information specifically the last part :) I care for such
info much. I was looking for this particular information for a very long time.
Thank you and good luck.
It's amazing to pay a quick visit this site and reading the views of all friends on the topic of this article, while
I am also keen of getting knowledge.
Its like you learn my thoughts! You appear to know a lot about this, such as you wrote the e-book in it or something.
I believe that you simply could do with some p.c. to force
the message home a bit, however other than that, that is wonderful blog.
A fantastic read. I will definitely be back.
I really like your blog.. very nice colors & theme. Did you design this website yourself or did you hire
someone to do it for you? Plz respond as I'm looking to construct my
own blog and would like to find out where u got this from.
thank you
Just desire to say your article is as astounding. The clarity in your
post is just spectacular and i can assume you are an expert on this subject.
Well with your permission allow me to grab your feed to keep updated
with forthcoming post. Thanks a million and please keep up the enjoyable work.
Howdy! This post couldn't be written any better! Looking through this article reminds me of my previous roommate!
He always kept preaching about this. I am going to forward this article to him.
Fairly certain he will have a great read. I appreciate you for sharing!
Thank you for another informative web site. The place else may just I
am getting that type of info written in such a perfect method?
I've a mission that I'm simply now working on, and I've been at the glance out for such
info.
Do you mind if I quote a couple of your articles as long as
I provide credit and sources back to your webpage? My blog
is in the very same area of interest as yours and
my visitors would certainly benefit from some of the information you
provide here. Please let me know if this okay with
you. Cheers!
First off I would like to say excellent blog! I had a quick question in which I'd like to ask
if you do not mind. I was curious to know how you center yourself and clear your
head prior to writing. I have had a difficult time clearing my mind in getting my thoughts out there.
I truly do enjoy writing but it just seems like the first 10 to 15 minutes are usually lost just trying to figure out how to begin. Any suggestions or tips?
Many thanks!
Asking questions are truly fastidious thing if you are not understanding something fully,
however this paragraph presents pleasant understanding even.
After I originally left a comment I seem to have clicked on the -Notify me when new comments are added- checkbox and now every time a comment
is added I receive 4 emails with the exact same
comment. There has to be a way you can remove me from that service?
Kudos!
Wow that was odd. I just wrote an extremely long comment but after I clicked submit my comment didn't appear.
Grrrr... well I'm not writing all that over again. Anyhow, just wanted to say great blog!
Do you mind if I quote a few of your posts as long
as I provide credit and sources back to your weblog?
My blog is in the very same area of interest as yours and my users would certainly benefit from a lot of the information you
present here. Please let me know if this okay with
you. Thanks a lot!
Hi every one, here every one is sharing such experience,
so it's pleasant to read this web site, and I used to visit this webpage every day.
This website was... how do I say it? Relevant!! Finally I've found
something that helped me. Many thanks!
I used to be recommended this blog by my cousin. I am now not sure whether this
post is written through him as no one else know such unique
approximately my trouble. You're wonderful! Thanks!
this promotes the development of you a sense of belonging and trust to the Cybro.
There is definately a lot to know about this topic. I like
all of the points you made.
If you want to take much from this article then you have to apply these methods to your won website.
What's up everyone, it's my first visit at this web
site, and post is truly fruitful designed for
me, keep up posting these types of content.
It's impressive that you are getting thoughts from this
article as well as from our argument made at this time.
I've been browsing online more than three hours today, yet I never found any interesting article like yours.
It's pretty worth enough for me. In my view,
if all site owners and bloggers made good content as you did, the web will be much more useful than ever before.
I am no longer positive where you're getting your info, however great topic.
I needs to spend a while learning much more or working out more.
Thank you for wonderful info I was looking for this information for my mission.
Розмір: 23,5 см х 21,5 см х 7 див.
https://vn.20minut.ua/Zdorovya/posluga-z-dostavki-likiv-v-m-vinnitsya-vid-internet-apteki-etabletka-n-11924787 .
Hi! Would you mind if I share your blog with my facebook group?
There's a lot of folks that I think would really appreciate your content.
Please let me know. Cheers
I really like what you guys are usually up too.
Such clever work and reporting! Keep up the terrific works guys I've included you guys to blogroll.
The Survival Preparation Shop has every one of the info you need to select the right solar generator for your needs.
Hey there! I know this is kinda off topic but I was wondering if you knew where I could locate a
captcha plugin for my comment form? I'm using the same blog platform
as yours and I'm having problems finding one? Thanks
a lot!
Pretty part of content. I simply stumbled upon your weblog
and in accession capital to claim that I get in fact enjoyed account
your weblog posts. Any way I will be subscribing to your augment or even I achievement you get entry to constantly quickly.
Hey! Do you know if they make any plugins to help with SEO?
I'm trying to get my blog to rank for some targeted keywords but I'm not seeing very good
results. If you know of any please share. Cheers!
My family all the time say that I am killing my time here at net, except I know
I am getting familiarity every day by reading thes good
articles.
hey there and thank you for your info – I've certainly picked up anything new
from right here. I did however expertise a few technical points using this website, as I experienced to reload the
website many times previous to I could get it to load properly.
I had been wondering if your hosting is OK? Not that I'm
complaining, but slow loading instances times will sometimes affect your placement in google and could damage
your high-quality score if ads and marketing with Adwords.
Anyway I'm adding this RSS to my email and can look out for a lot more of your respective fascinating content.
Make sure you update this again soon.
Hello this is somewhat of off topic but I was wanting to know if blogs use WYSIWYG editors or if you have
to manually code with HTML. I'm starting a blog soon but have no coding knowledge so I
wanted to get advice from someone with experience.
Any help would be greatly appreciated!
I just like the helpful information you provide for your articles.
I will bookmark your weblog and take a look at again right here regularly.
I'm quite certain I'll learn lots of new stuff proper here!
Good luck for the next!
I'm really enjoying the design and layout of your site.
It's a very easy on the eyes which makes it much more
pleasant for me to come here and visit more often. Did you hire out a
developer to create your theme? Excellent work!
hi!,I like your writing very much! percentage we keep in touch extra about your post on AOL?
I require a specialist on this house to resolve
my problem. Maybe that's you! Taking a look ahead to peer you.
Hey there I am so grateful I found your webpage, I really found you
by error, while I was researching on Aol for something else, Regardless I
am here now and would just like to say kudos for a marvelous post and
a all round interesting blog (I also love the theme/design), I don't have
time to browse it all at the moment but I have bookmarked it and also added your RSS feeds, so when I
have time I will be back to read much more, Please
do keep up the awesome job.
Thanks for the auspicious writeup. It actually used to be a
entertainment account it. Glance advanced to more
brought agreeable from you! However, how can we keep
up a correspondence?
Hi, yup this paragraph is genuinely good and I have learned lot of things
from it concerning blogging. thanks.
First of all I would like to say wonderful blog! I had a quick question in which I'd
like to ask if you do not mind. I was interested to know how you center yourself and
clear your head prior to writing. I've had a difficult time clearing my thoughts in getting my ideas out.
I do enjoy writing but it just seems like the first 10 to 15 minutes are wasted simply just trying
to figure out how to begin. Any suggestions or tips?
Thanks!
You actually make it seem really easy along with your presentation but I find this matter to be actually something that I believe I might
by no means understand. It seems too complex and extremely vast for
me. I am having a look ahead to your next submit, I'll attempt to
get the hold of it!
Wow, that's what I was searching for, what a stuff! present here at this
blog, thanks admin of this web page.
Great blog here! Also your site loads up fast! What web host are you using?
Can I get your affiliate link to your host? I wish my site loaded up as
fast as yours lol
bookmarked!!, I like your web site!
Excellent beat ! I wish to apprentice whilst you amend your site,
how can i subscribe for a weblog site? The account aided me a appropriate deal.
I have been a little bit acquainted of this your broadcast offered vivid clear concept
3. Выберите организацию, https://omontazhe.ru/dizayn-interera/vybor-italyanskoj-myagkoj-mebeli.html которая расположена в вашем городе или в ближайших городах.
Hello everyone, it's my first go to see
at this web site, and post is genuinely
fruitful for me, keep up posting such articles.
Hi I am so thrilled I found your weblog, I really found you by error, while I was researching on Bing for something else, Nonetheless
I am here now and would just like to say many thanks for a tremendous post and a all round interesting blog (I also love the theme/design),
I don't have time to go through it all at the minute
but I have bookmarked it and also added in your RSS feeds, so when I have time I will be
back to read more, Please do keep up the great work.
I just like the helpful info you provide on your articles. I'll
bookmark your weblog and take a look at once more right here frequently.
I'm slightly certain I'll learn lots of new stuff proper here!
Best of luck for the following!
I absolutely love this Mr. West poster! I just got another one yesterday and it looks
fantastic in my room. Mr. West's design is incredibly
motivating!
Good day! I just would like to offer you a big thumbs up for your great
information you have right here on this post.
I am coming back to your site for more soon.
I quite like reading through an article that can make men and women think.
Also, thanks for permitting me to comment!
Because the admin of this web page is working, no question very rapidly it will be renowned, due to
its feature contents.
I read this piece of writing completely concerning the comparison of most up-to-date and earlier technologies, it's remarkable
article.
Thank you for the auspicious writeup. It in fact was
a amusement account it. Look advanced to more added agreeable from you!
By the way, how can we communicate?
naturally like your web site but you need to take a look at the
spelling on several of your posts. Many of them are rife with spelling problems and I to find it very troublesome to inform the reality then again I'll definitely come
again again.
Incredible points. Great arguments. Keep up the amazing work.
There is certainly a lot to know about this issue.
I like all the points you've made.
Pretty portion of content. I simply stumbled upon your blog and in accession capital to say that I get actually loved account
your blog posts. Anyway I'll be subscribing for your
feeds or even I achievement you get right of entry to persistently quickly.
I know this site offers quality dependent posts and extra information, is there any other web page which gives these kinds of information in quality?
This is a topic which is close to my heart... Cheers! Where are your contact details though?
whoah this blog is magnificent i like reading your posts.
Stay up the great work! You realize, a lot of people are searching round for this information, you could help them greatly.
What's up, this weekend is pleasant for me, since this point
in time i am reading this enormous informative article here at my house.
Hi, just wanted to tell you, I loved this article. It was practical.
Keep on posting!
Thanks for ones marvelous posting! I seriously enjoyed reading it, you could be a great author.
I will be sure to bookmark your blog and will eventually come back in the future.
I want to encourage you to ultimately continue your great job, have a nice evening!
Hello! Would you mind if I share your blog with my myspace group?
There's a lot of folks that I think would really appreciate your
content. Please let me know. Thanks
Hey there! Do you know if they make any plugins to assist with Search Engine Optimization? I'm trying to get my blog to rank for some targeted keywords but I'm not seeing
very good gains. If you know of any please share.
Many thanks!
My brother suggested I might like this blog. He was totally right.
This post actually made my day. You cann't imagine just how much time I had spent for this information! Thanks!
Thanks for sharing your thoughts about создание шаблона joomla.
Regards
Wow! After all I got a weblog from where I can actually
obtain useful information regarding my study and knowledge.
It's enormous that you are getting ideas from this article as well as from our argument made at this
time.
It is appropriate time to make some plans for the future and it's time to be happy.
I have read this post and if I could I want to suggest you some interesting things or tips.
Perhaps you could write next articles referring to this article.
I desire to read more things about it!
I don't even know how I ended up here, but I thought this put up was great.
I don't know who you might be but definitely you're going to a well-known blogger in the event you aren't already.
Cheers!
I have been browsing online greater than 3 hours lately,
but I by no means discovered any interesting article like yours.
It's lovely value enough for me. In my opinion, if all webmasters and
bloggers made just right content as you did,
the web will likely be much more useful than ever before.
You really make it seem really easy along with your presentation however I
to find this matter to be actually one thing which I
feel I might never understand. It kind of feels too complex and extremely broad for me.
I am having a look forward for your subsequent publish,
I'll try to get the grasp of it!
Do you have a spam problem on this site; I also am a blogger, and I
was wondering your situation; many of us have created some nice methods and we
are looking to trade methods with other folks, please shoot me
an email if interested.
It's hard to come by knowledgeable people for this subject, however, you seem like you know what you're talking about!
Thanks
I really like what you guys are usually up too. Such clever work and coverage!
Keep up the good works guys I've incorporated you guys to my own blogroll.
Asking questions are really nice thing if you are not understanding anything
totally, except this post provides good understanding even.
Металлический шкаф для https://harmony-press.ru/krovat-razmerom-140x200-yavlyaetsya-idealnym-resheniem-dlya-interera/ шин отличается
многофункциональностью.
I all the time used to read article in news papers but now as
I am a user of internet so from now I am using net for
content, thanks to web.
I seriously love your blog.. Pleasant colors & theme.
Did you create this amazing site yourself? Please reply back as I'm
trying to create my own website and want to know where you got
this from or what the theme is named. Thank you!
I have read so many articles or reviews regarding
the blogger lovers but this paragraph is genuinely a nice piece of writing, keep it up.
You actually make it seem so easy with your presentation but I find
this matter to be really something that I think I would never understand.
It seems too complicated and extremely broad for
me. I'm looking forward for your next post, I will try to get the hang of it!
Terrific work! That is the type of information that
are supposed to be shared around the web. Disgrace on the seek engines for no longer positioning this publish upper!
Come on over and visit my web site . Thank you =)
This post gives clear idea in favor of the new users of
blogging, that truly how to do running a blog.
Для получения диплома, вам необходимо
успешно завершить обучение в учебном заведении, выполнить все требования
программы обучения и успешно сдать все необходимые экзамены.
После этого вам будет выдан диплом,
подтверждающий вашу квалификацию и успешное завершение
учебы.
у нас вы можете приобрести дипломы
такие как
Купить диплом в Азове онлайн по оптимальной стоимости
все проходит в официальном порядке обращайтесь за консультацией мы вам все обьясним
123
Great weblog right here! Also your website a lot up fast!
What host are you the usage of? Can I am getting your affiliate link for
your host? I wish my website loaded up as quickly as
yours lol
WOW just what I was looking for. Came here
by searching for https://costerpanid.site
Вам надоело удовлетворяться
средними покупками в онлайн-магазинах?
Кракен даркнет маркет тор предлагает что-то другое!
Благодаря широкому ассортименту товаров и категорий кракен вход гарантирует, что вы найдете именно то,
что ищете. Наслаждайтесь простотой регистрации без указания электронной почты и изучите дополнительные функции безопасности, такие как Google TFA.
Присоединяйтесь к kraken darknet tor сейчас и откройте для себя новый способ делать
покупки в Интернете.
My brother recommended I might like this blog.
He used to be entirely right. This post actually made my day.
You cann't imagine just how a lot time I had spent for this info!
Thanks!
great publish, very informative. I'm wondering why the opposite
specialists of this sector do not notice this.
You should continue your writing. I'm sure, you have a great readers' base already!
Wow, awesome weblog structure! How long have you been blogging for?
you made blogging glance easy. The full glance of your web site is fantastic,
let alone the content!
Simply wish to say your article is as astounding.
The clarity on your submit is simply nice and i could assume
you are knowledgeable in this subject. Well along with your permission let me
to grab your feed to keep updated with forthcoming post.
Thanks one million and please continue the enjoyable work.
I like the helpful info you provide to your articles.
I'll bookmark your weblog and take a look at once more right here regularly.
I am slightly certain I'll be told plenty of new stuff right right here!
Best of luck for the following!
You have made some good points there. I checked on the internet to learn more about the issue and found most individuals will
go along with your views on this website.
Hey I know this is off topic but I was wondering if you knew of any widgets I could add to
my blog that automatically tweet my newest twitter updates.
I've been looking for a plug-in like this for quite
some time and was hoping maybe you would have
some experience with something like this. Please let me know if you run into
anything. I truly enjoy reading your blog and I look forward to your
new updates.
Asking questions are truly good thing if you are not understanding something fully, except this piece of writing presents fastidious understanding even.
Kanye is a visionary in the music industry.
His music never fail to impress and reflect his artistic evolution.
Starting with his debut album, he's set the bar high. His production are thought-provoking.
He blends genres in a way that is unmatched.
Additionally, his contributions is seen in various fields.
His ventures in design is groundbreaking. He's
a trendsetter as well as a producer.
His public persona is equally interesting. Regardless of the drama, he
stays relevant in the public eye.
Regardless of how you feel about him, his genius is indisputable.
His work will endure for a long time.
I'm gone to convey my little brother, that he should also pay a visit this web site on regular basis to
obtain updated from newest reports.
It's in point of fact a nice and helpful piece of info.
I'm glad that you shared this useful information with us.
Please keep us up to date like this. Thanks for sharing.
Right here is the perfect webpage for anyone who really wants to find out about this topic.
You know so much its almost tough to argue with you (not that I
really would want to…HaHa). You certainly put a fresh spin on a topic that's been discussed for ages.
Great stuff, just wonderful!
Hello, yup this piece of writing is actually pleasant
and I have learned lot of things from it concerning blogging.
thanks.
Pretty nice post. I just stumbled upon your weblog and wished
to say that I have really enjoyed surfing around your blog posts.
After all I'll be subscribing to your rss feed and I hope you
write again very soon!
I all the time emailed this blog post page to all my associates, for the reason that if like to read
it then my links will too.
Keep on working, great job!
Cet article est une mine d'or pour tout artisan voulant se digitaliser.
Des conseils pratiques et pertinents!
I think everything typed was very logical.
But, what about this? suppose you were to write a awesome
title? I ain't suggesting your information isn't good,
however what if you added a title that makes people want more?
I mean Создание шаблона Joomla, как изменить шаблон, основные настройки и параметры / Разработка
шаблонов Joomla .:. Документация Joomla!
CMS is kinda boring. You could peek at Yahoo's front page and note how they create post titles to grab viewers to open the links.
You might add a related video or a related pic or two
to grab readers interested about everything've got
to say. In my opinion, it could bring your posts a
little livelier.
Heya i'm for the primary time here. I came across this board and I in finding
It truly helpful & it helped me out a lot. I'm hoping to present something
back and aid others such as you aided me.
Excellent article et tr?s informatif! Les services de gestion en ligne offrent une commodit? incroyable pour les entreprises.
Merci pour le partage de cet article et pour les conseils pratiques!
Nice post. I used to be checking continuously this weblog and I am impressed!
Extremely useful info specifically the closing part :) I deal with such information a lot.
I used to be looking for this certain info for a long time.
Thank you and good luck.
What's up, its fastidious post about media print,
we all know media is a great source of facts.
Fantastic beat ! I would like to apprentice while you amend your site,
how can i subscribe for a blog site? The account helped me a acceptable deal.
I had been a little bit acquainted of this your broadcast offered bright clear idea
Hello, i feel that i saw you visited my weblog so i got here to go back the choose?.I'm
trying to in finding issues to enhance my web site!I guess its good enough to make
use of some of your concepts!!
An outstanding share! I have just forwarded this onto a colleague
who was conducting a little research on this. And he actually ordered me lunch simply
because I discovered it for him... lol. So let me reword this....
Thank YOU for the meal!! But yeah, thanx for spending time to discuss this
topic here on your internet site.
It's remarkable designed for me to have a website, which is good in support of my know-how.
thanks admin
5.1 a kib-net.ru/news/pgs/1xbet_promokod_bonus_pri_registracii.html 1xbet ? confi?vel?
I used to be able to find good information from your blog articles.
Hey there, Came across your blog and had to drop a comment about
Kanye West. Kanye's artistry is so diverse.
His music and fashion sense are both groundbreaking, Kanye
never fails to leave a lasting impression. I especially
love how he fearlessly expresses himself. Tracks like "Heartless" and "Runaway" resonate with me on a
personal level. But his impact goes beyond just music, Kanye's also a visionary in the
fashion world. Yeezy has completely transformed the world of street fashion.
To wrap it up, Kanye West is a living legend. Appreciate the opportunity to voice my opinions!
I always used to read post in news papers but now
as I am a user of net therefore from now
I am using net for content, thanks to web.
I absolutely love your website.. Pleasant colors &
theme. Did you develop this amazing site yourself?
Please reply back as I'm looking to create my very own site and would love to know where you
got this from or just what the theme is named. Many thanks!
After I originally commented I appear to have clicked on the -Notify me when new comments are added-
checkbox and now whenever a comment is added I
recieve four emails with the exact same comment. Perhaps there is
a way you can remove me from that service? Appreciate it!
I am sure this post has touched all the internet people, its really really pleasant paragraph
on building up new website.
Убедитесь, https://udipediya-theme.ru/pri-vybore-kuxonnoj-garnitury-dlya-malenkoj-kuxni/ что вы информированы о
статусе вашего заявки и ожидаемой дате завершения.
Write more, thats all I have to say. Literally, it seems as though
you relied on the video to make your point. You obviously
know what youre talking about, why throw away
your intelligence on just posting videos to your blog when you
could be giving us something informative to read?
Thanks in support of sharing such a nice opinion, article
is fastidious, thats why i have read it entirely https://smallbusinessusa.com/listing/cactus-vacation-rentals.html
This article will assist the internet viewers for setting up new weblog or even a weblog from start to end.
ООО "ЛАДА-АРМ" является ведущим поставщиком трубопроводной арматуры и инженерного оборудования.
Мы работаем с крупнейшими производителями и обеспечиваем лучшее соотношение цены и качества.
I seriously love your site.. Pleasant colors & theme. Did you develop this site yourself?
Please reply back as I'm looking to create my own website and would love to learn where
you got this from or what the theme is called. Thank you!
Nice post. I learn something totally new and challenging on sites I stumbleupon every day.
It's always useful to read articles from other writers and practice something
from their websites.
hello!,I like your writing very much! percentage we keep up a correspondence extra approximately your article
on AOL? I need an expert in this space to solve my problem.
May be that's you! Looking ahead to peer you.
I’m not that much of a internet reader to be honest but your blogs really nice, keep it up!
I'll go ahead and bookmark your website to come back later.
Cheers
в нашем приложении вы найдете рингтоны all gods, https://mobrington.ru/ и другие рингтоны 2024 года.
Attractive element of content. I simply stumbled upon your web site and in accession capital to say that I get actually loved account your weblog posts.
Any way I'll be subscribing in your augment and even I success you get admission to
consistently fast.
Right here is the perfect web site for everyone
who wants to understand this topic. You understand so much its almost tough to argue with you (not
that I really will need to…HaHa). You certainly put
a fresh spin on a subject that's been written about for years.
Great stuff, just excellent!
Write more, thats all I have to say. Literally, it seems as though you relied
on the video to make your point. You obviously know what youre talking about, why waste your intelligence on just posting videos to
your site when you could be giving us something enlightening to
read?
страсть к гемблингу, pinup казино совершенство и стремление к постоянному улучшению - конкретно эти принципы
показали себя базой Пин Ап.
this is most main moment, since ace per head remains first in sphere
maintenance bc with fee for man, and their white-label solutions
do not face peers. https://prsarahevans .
Woah! I'm really enjoying the template/theme of this blog.
It's simple, yet effective. A lot of times it's challenging
to get that "perfect balance" between superb usability and
appearance. I must say you've done a superb job with this.
Also, the blog loads extremely fast for me on Opera. Exceptional Blog!
Также https://asmasters.org/articles/zachem-nuzhnyi-virtualnyie-nomera-dlya-telegramm.html они определяют курс.
их ассортимент превышает 600.
I'm not sure exactly why but this blog is loading extremely slow for me.
Is anyone else having this issue or is it a problem on my end?
I'll check back later and see if the problem still exists.
My developer is trying to convince me to move to .net from PHP.
I have always disliked the idea because of the expenses.
But he's tryiong none the less. I've been using Movable-type on various websites for about a year and am anxious about switching
to another platform. I have heard very good things about blogengine.net.
Is there a way I can transfer all my wordpress posts into it?
Any kind of help would be really appreciated!
Hi there, I desire to subscribe for this website to get most up-to-date updates, thus where can i do it please help
out.
It's truly very complex in this active life to listen news on Television, thus
I only use the web for that purpose, and obtain the most up-to-date news.
What's up to all, the contents existing at this website are genuinely remarkable for people knowledge, well, keep up the
good work fellows.
Hello, all is going perfectly here and ofcourse
every one is sharing information, that's truly fine, keep up writing.
Hi there, of course this post is genuinely pleasant and I have learned
lot of things from it on the topic of blogging.
thanks.
Currently it seems like Expression Engine is the preferred
blogging platform available right now. (from
what I've read) Is that what you're using on your blog?
Excellent web site. Lots of useful info here. I am sending it to a few buddies ans additionally sharing in delicious.
And of course, thank you in your effort!
Основной экран предлагает яркую
и стильную графику, pinup казино которая сразу обращает на себя большое
внимание и создает комфорт игры.
It's going to be finish of mine day, but before ending I am reading this enormous piece
of writing to improve my knowledge.
Usually I don't read post on blogs, however I would like to say that this write-up very forced me to try and do it!
Your writing taste has been surprised me. Thank you, quite nice post.
Wow! In the end I got a blog from where I be able to really take helpful data regarding
my study and knowledge.
Have you ever considered about including a little bit more than just your articles?
I mean, what you say is fundamental and all.
Nevertheless imagine if you added some great visuals or videos to give your posts
more, "pop"! Your content is excellent but with pics and clips, this website could definitely be one of the best in its niche.
Fantastic blog!
Very descriptive post, I loved that a lot. Will there be
a part 2?
Excellent post. I will be facing some of these issues as well..
Heya i'm for the first time here. I found this board and I find It
really useful & it helped me out much. I hope to give something back and aid others like you aided me.
Greetings I am so excited I found your site, I really
found you by accident, while I was researching on Digg for something else,
Anyways I am here now and would just like to say thanks a lot for a tremendous post and a all round enjoyable blog (I also love the theme/design), I don't have time to read it all at the minute but I have
book-marked it and also included your RSS feeds, so when I have
time I will be back to read a lot more, Please
do keep up the superb work.
I'm excitedd to uncover this website. I wanted to thank yoou for ones time
just for this wonderful read!! I definitely loved every
part of it and i also have yyou bookmatked too look at new things
in your site.
What's up Dear, are you genuinely visiting this website regularly,
if so after that you will without doubt take nice knowledge.
Kanye West posters are a fantastic choice for anyone's room.
The artwork are often bold and highlight his artistic vision. No
matter if you're a fan of his albums or just appreciate unique designs, there's
something for everyone.
Owning a Kanye West poster doesn't just shows your liking for his work, but also adds a trendy vibe to your room.
From his early albums to "Jesus Is King", there's a
print depicting every moment of his career.
Recently added a Ye poster to my collection, and I love it.
The quality is excellent, and it brightens up the room.
If you're on the fence about buying one, go for it—you won't regret it.
whoah this blog is magnificent i like studying your posts.
Stay up the great work! You realize, a lot of individuals are hunting around for this
information, you can aid them greatly.
Fantastic site you have here but I was wanting to know if
you knew of any user discussion forums that cover the same topics discussed in this article?
I'd really love to be a part of community where I can get responses from
other knowledgeable people that share the same interest.
If you have any recommendations, please let me know.
Kudos!
очень важно теперь для меня следить
за наличием интернета mostbet зеркало рабочее на сегодня на своем телефоне.
I don't know whether it's just me or if
perhaps everybody else encountering problems with
your blog. It looks like some of the text in your posts are running off the screen. Can somebody
else please provide feedback and let me know if this is happening to them too?
This might be a issue with my web browser because I've had
this happen before. Cheers
Hello there I am so grateful I found your weblog, I really found you by error, while I was looking on Digg for something else, Anyways
I am here now and would just like to say thanks for a tremendous post and a all round
thrilling blog (I also love the theme/design), I don't have time to read through it all at the minute but I have book-marked
it and also added your RSS feeds, so when I have time I will be back to read a lot more, Please do keep up the great
job.
I'm really enjoying the design and layout of your website.
It's a very easy on the eyes which makes it much more enjoyable for me to come here
and visit more often. Did you hire out a designer
to create your theme? Exceptional work!
Everything is very open with a precise description of the issues.
It was truly informative. Your website is extremely helpful.
Thanks for sharing!
I've read some good stuff here. Definitely worth bookmarking for revisiting.
I surprise how so much attempt you set to make this kind of wonderful informative site.
Greetings, I believe your website might be having browser compatibility issues.
Whenever I take a look at your site in Safari, it looks fine however when opening in I.E., it's got some overlapping issues.
I simply wanted to give you a quick heads up! Aside from that,
wonderful website!
Kanye West prints are a great addition for any fan's decor.
These prints are usually bold and capture his unique style.
No matter if you love his music or enjoy cool artwork, you'll find a perfect fit.
Displaying a Ye poster doesn't just display your liking for his talent, but also brings a modern touch to
your space. From his early albums to his latest projects, there's a poster that captures each phase of his career.
Just got a Ye poster to my collection, and it looks fantastic.
The artwork is excellent, and it brightens up the room.
If you're considering getting one, go for it—it's totally worth it.
You ought to take part in a contest for one of the highest quality websites on the internet.
I'm going to recommend this site!
Thanks for finally writing about >Создание шаблона Joomla, как изменить
шаблон, основные настройки и параметры / Разработка шаблонов Joomla
.:. Документация Joomla! CMS <Liked it!
These are genuinely wonderful ideas in about blogging.
You have touched some fastidious factors here. Any way keep up
wrinting.
Hello, constantly i used to check web site posts here early in the break of day, for the reason that i enjoy to
find out more and more.
Somebody essentially lend a hand to make seriously posts I'd state.
This is the very first time I frequented your web page and so
far? I surprised with the analysis you made to make this particular put up amazing.
Magnificent task!
Howdy! Someone in my Myspace group shared this website with us so I came to take a look.
I'm definitely loving the information. I'm book-marking and will be tweeting this
to my followers! Wonderful blog and fantastic design and style.
These are genuinely impressive ideas in about blogging.
You have touched some good things here. Any way keep up wrinting.
I've been following the career of Kanye West for many years.
From his beginnings as a producer to becoming a renowned rapper, he's always
been a trailblazer in the music scene.
What distinguishes Kanye is his skill in merging different genres to craft something original.
His production style is truly unique. Be it sampling soul tracks or incorporating electronic elements, he always brings something new to the table.
I vividly recall the first time I heard "The College Dropout".
It was revolutionary. Tunes like "Jesus Walks" and "Through the Wire" stood out from
anything else at the time. They revealed Kanye's lyrical depth
and his ability to tackle weighty subjects.
As Kanye's career progressed, he kept evolving as an artist.
Every album introduced something new. From "Late Registration" to "Graduation", his musical output always stayed
innovative. He wasn't afraid to take risks, and that
is something I greatly admire.
Kanye's impact is not limited to music. His ventures into fashion have been a massive success.
The Yeezy brand has become synonymous with high-end
streetwear. Yeezy sneakers are incredibly popular, and the designs are innovative.
In spite of his numerous successes, Kanye has faced his share
of controversies. His forthrightness has often been controversial.
However, it's also what makes him so intriguing. He boldly shares
his opinions, and while I don't always agree with him, I appreciate his honesty.
A particularly memorable moment is his interruption of Taylor Swift at the VMAs.
It was shocking, but it also showed his fervor and spontaneity.
Kanye is someone who is very open about his feelings, and that level of emotion is mirrored in his musical
work.
Mental health is a subject Kanye has discussed openly. His struggles
with his mental health have been widely reported. It takes
a lot of courage to discuss such personal matters publicly.
I think his openness has aided in reducing the stigma
surrounding mental health.
Ye is, without question among the most influential artists today.
His influence on music, fashion, and broader culture is vast.
He has changed the game in so many ways, and I eagerly
await his next moves. Kanye's creativity and skills are unmatched, and there is no doubt
that he will remain a major player for a long time.
It's in point of fact a great and useful piece of info.
I'm glad that you shared this helpful info with us.
Please keep us up to date like this. Thank you for sharing.
I will immediately clutch your rss feed as I can't to find your email subscription link or e-newsletter service.
Do you have any? Please allow me recognize
in order that I may subscribe. Thanks.
Everyone loves what you guys are usually up too. This kind of
clever work and exposure! Keep up the wonderful works guys I've incorporated you
guys to our blogroll.
Shopping centers will be a quick place to grab last minute gifts but don't expect the price to be
cheap. Very few places offer travelers the same level of profound thrills as the unique city of Davao.
Delhi, the capital city of India, is one of the most sought after tourist destinations in the
country.
I've consistently followed the journey of Kanye West.
From his beginnings in Chicago, to his global fame as an artist, he's never been anything short
of extraordinary. His experiences have been a whirlwind, filled with highs and lows.
What draws people to Kanye's narrative is his inventive spirit and determination. He is always evolving, and
this has kept him relevant over the decades. His music, fashion, and
ideas have always pushed boundaries.
I remember first hearing "Late Registration," it was
clear that Kanye was a musical innovator. Songs like "Gold Digger" and "Touch the Sky" demonstrated his range and solidified his status in the hip-hop world.
His words were thought-provoking, and his beats were groundbreaking.
When Kanye ventured into fashion made just as big
of a splash. Through Yeezy, he revolutionized street fashion. His fashion sense is cutting-edge,
and they have inspired many young designers.
His personal life has often been in the spotlight.
From his relationship with Kim Kardashian, to his openness about mental health
issues, he has kept it real and honest. His willingness to share his vulnerabilities is something I truly respect.
The influence Kanye wields extends beyond just the entertainment industry.
He has shifted the cultural landscape. Whether you are a fan or a critic,
his genius is undeniable. I look forward to seeing what Kanye does next, because he always surprises us.
All in all, Kanye West is a multi-talented individual whose contributions to music, fashion, and culture will be remembered for
years to come. His story is far from over, and I, for one, am excited what he
will create next.
When I initially left a comment I appear to have clicked on the -Notify me when new comments are added- checkbox and
now every time a comment is added I recieve 4 emails with the same comment.
Is there a way you can remove me from that service?
Thank you!
It's perfect time to make some plans for the future and it's time to be happy.
I have read this post and if I could I wish to suggest you few interesting things or suggestions.
Maybe you can write next articles referring to this article.
I want to read even more things about it!
What i don't understood is in reality how you're
now not actually much more smartly-liked
than you may be right now. You're so intelligent. You know thus considerably when it comes to this
topic, produced me personally believe it from so many varied angles.
Its like men and women are not fascinated until it's something to accomplish with Woman gaga!
Your personal stuffs excellent. All the time care for it up!
Today, while I was at work, my sister stole my apple ipad and tested to see if it can survive a 25 foot drop, just so she can be a youtube sensation. My apple ipad is now broken and she has 83 views.
I know this is entirely off topic but I had to share it with someone!
Hello, I think your blog might be having browser compatibility issues.
When I look at your blog in Chrome, it looks fine but when opening
in Internet Explorer, it has some overlapping.
I just wanted to give you a quick heads up! Other then that, superb blog!
Excellent site you have got here.. It's hard to find excellent writing like
yours nowadays. I really appreciate people like you!
Take care!!
Are you a fan of Kanye West? If so, you might be interested in the
latest Kanye West poster currently on the market.
Posters of Kanye West are an excellent choice for expressing your fandom.
Whether you're sprucing up your space, a poster featuring
Kanye West can add style and personality to any room.
From classic photos of Kanye, these posters capture his essence as a creative force and cultural
influencer. There are multiple designs to choose from, from
simple to striking, ensuring there's a poster to suit every taste.
Put up a Kanye West poster in your living room for a creative boost.
Every piece is printed on high-quality paper, making sure it's clear and long-lasting.
Whether you've been following him for years or just discovering his music, a Kanye West poster is essential.
It's more than just decor; it's a symbol of appreciation for his creativity and influence.
What are you waiting for? Get your Kanye West poster today and
display your passion for an icon in the music industry.
Transform your room with a touch of Kanye's greatness with an iconic and stylish poster.
I know this if off topic but I'm looking into starting my own weblog and was curious what all is required to get setup?
I'm assuming having a blog like yours would cost a pretty penny?
I'm not very web smart so I'm not 100% certain. Any suggestions or advice
would be greatly appreciated. Kudos
avez la possibilit? de commencer chat avec n'importe lequel de ces putes magnifiques et d'inviter leur dans le chat
priv? sexe, pour voir/ conna?tre, comment ils font tout, que vous cherchez,
pour https://pl.ruletka-888 .
Good day! I know this is somewhat off topic but I was wondering if you knew where I could locate a
captcha plugin for my comment form? I'm using the same blog platform as yours and I'm having difficulty finding one?
Thanks a lot!
Wow, amazing blog layout! How long have you been blogging
for? you make blogging look easy. The overall look of your website is
wonderful, as well as the content!
It's appropriate time to make a few plans for the long run and it's
time to be happy. I've learn this post and if I may just
I want to counsel you some attention-grabbing things or tips.
Maybe you could write next articles referring to this article.
I wish to read even more issues about it!
Discover iconic art
When collectors consider to notable masterpiece posters, Kanye West's poster of Kanye West's 808s & Heartbreak is remarkable.
Launched back in this year, Kanye's 808s & Heartbreak denoted a significant
change through the artist's artistic career.
Kanye's visual representation reflects this core regarding this creation impeccably.
The poster is a reflection for this album's unusual integration featuring synth-heavy rhythms and powerful lyrics.
Owning that Kanye West 808s & Heartbreak poster is an tribute in an legendary skill at transform music.
That item not only shows the core regarding 808s & Heartbreak, it also serves as
a timeless item regarding many enthusiast's display.
Therefore, even if a fan are not the loyal follower
plus a art admirer, the collectible remains the amazing item.
Acquire the poster now so you can celebrate an art that transformed the industry for all
time.
pepu will be next https://pepeunchained.io/ ? 0.0080964 and implement place bets to
receive bonus relative to amount up to 1920% per annum.
The rapper's childhood is truly compelling. Raised in Chitown, he lived through numerous struggles that molded his vision on life.
His mother maintained a significant role in supporting
his abilities and teaching standards that are enduringly
evident in his music today. It truly is uplifting to watch how his background go on propel his artistic ventures.
Pretty section of content. I just stumbled upon your blog and in accession capital to assert that I get actually enjoyed account
your blog posts. Anyway I will be subscribing to
your feeds and even I achievement you access consistently quickly.
Thanks for sharing your thoughts on создание шаблона joomla.
Regards
Woah! I'm really digging the template/theme of this blog.
It's simple, yet effective. A lot of times it's tough to get that "perfect balance" between usability and visual appearance.
I must say you've done a excellent job with this.
In addition, the blog loads super quick for me
on Opera. Excellent Blog!
Good day! I could have sworn I've visited this website before
but after looking at many of the articles I realized it's new to me.
Nonetheless, I'm definitely delighted I discovered it and I'll
be book-marking it and checking back regularly!
Hi there, just became alert to your blog through Google, and
found that it's really informative. I'm gonna watch out
for brussels. I will appreciate if you continue this in future.
Numerous people will be benefited from your writing. Cheers!
This is really interesting, You are a very skilled blogger.
I've joined your feed and look forward to seeking more of your wonderful
post. Also, I have shared your web site in my social networks!
I believe what you published was very logical. However,
think about this, suppose you were to write a awesome headline?
I am not saying your content isn't good., but suppose you added a post title
that grabbed people's attention? I mean Создание шаблона Joomla, как изменить шаблон, основные настройки и параметры / Разработка шаблонов Joomla .:.
Документация Joomla! CMS is kinda
boring. You should peek at Yahoo's front page and see how they write news
headlines to grab people to click. You might try adding
a video or a related pic or two to grab readers excited about what you've
got to say. Just my opinion, it could make your blog a little bit
more interesting.
This text is worth everyone's attention. How can I find out more?
Kanye West has transcended traditional poster art with the advent of
digital posters. These innovative creations not only celebrate his music but also
embrace his influence in the digital realm.
Digital posters of Kanye West are more than mere visuals; they represent a fusion of artistry and technology, capturing his dynamic persona in new and captivating ways.
Within the domain of digital artwork, Kanye West digital posters stand out for their striking artistic compositions and creative use of digital technologies.
These posters highlight his legendary style and musical innovation through engaging visual
aesthetics and emotionally resonant imagery.
Each digital poster celebrates Ye's creative evolution over the
years, showcasing key moments from his albums like "The College Dropout," "Late Registration," and "808s & Heartbreak." These posters not just
mirror his creative brilliance, but also act as an affirmation of his impact on modern culture.
Furthermore, Kanye West digital posters are becoming
an artistic canvas to display partnerships with up-and-coming
digital artists, resulting in a blend of creative visions that propel
the limits of modern artistry.
In conclusion, Posters in the digital sphere featuring Kanye West go
beyond being simple adornments; they represent a merging of music alongside digital innovation, offering a fresh perspective
on celebrity and also creative expression in today's digital world.
Are you a fan of Kanye West? Then you'll likely be intrigued by
the newest Kanye West poster that's out now.
Kanye West-themed posters are perfect for showing your admiration. Whether you're enhancing your living area, a poster featuring Kanye West can inject style and personality
to any room.
Featuring iconic images of Kanye, these posters encapsulate his essence as a creative
force and cultural influencer. You can choose from various designs, from subtle
to eye-catching, so there's something to match everyone's preferences.
Display a Kanye West poster in your living room to inspire creativity.
Every poster features high-quality printing, making
sure it's clear and long-lasting.
If you've been a fan for a while or are newly discovering his music,
having a Kanye West poster is essential. It's more than just decor; it's a symbol
of appreciation for his contributions to music and culture.
What are you waiting for? Grab your Kanye West poster now and show your love for one
of the most influential artists of our time. Enhance your space with a touch of Kanye's greatness with a stylish and
iconic poster.
Are you a fan of Kanye West? If so, you might be interested in the newest Kanye West poster currently on the market.
Posters of Kanye West are an excellent choice for expressing your fandom.
Whether you're decorating your room, a poster featuring Kanye West can inject style and personality to any room.
From classic photos of Kanye, these posters encapsulate his
essence as a creative force and cultural influencer.
You can choose from various designs, ranging from minimalist
to bold, so there's something to match everyone's preferences.
Put up a Kanye West poster in your office for a creative boost.
Every poster features high-quality printing, making sure it's clear and long-lasting.
Whether you're a longtime fan or are newly discovering
his music, a Kanye West poster is a necessity.
It's not just a decoration; it's an expression of
fandom for his artistry and impact.
What are you waiting for? Order your Kanye West poster today
and display your passion for one of the most influential artists of our time.
Transform your room with a bit of Kanye's style with a stylish and iconic poster.
I'm not sure why but this website is loading very slow for me.
Is anyone else having this issue or is it a problem on my end?
I'll check back later and see if the problem still exists.
I'm not sure exactly why but this web site is loading very slow for me.
Is anyone else having this problem or is it a issue on my end?
I'll check back later on and see if the problem still exists.
Have you ever considered creating an ebook or guest authoring
on other blogs? I have a blog centered on the same ideas you
discuss and would really like to have you share some
stories/information. I know my visitors would appreciate your work.
If you are even remotely interested, feel free to send me an e mail.
You need to take part in a contest for one of the highest
quality sites on the internet. I'm going to recommend this
web site!
For newest news you have to pay a visit world wide web and
on web I found this website as a finest site
for newest updates.
These are truly fantastic ideas in about blogging. You have
touched some pleasant points here. Any way keep up wrinting.
These are really wonderful ideas in regarding blogging. You have touched
some fastidious factors here. Any way keep up wrinting.
What a stuff of un-ambiguity and preserveness of valuable experience about unexpected emotions.
I pay a visit each day some sites and sites to read articles, however this weblog provides quality based content.
Hi there, You've done a fantastic job.
I will certainly digg it and personally recommend to my
friends. I'm sure they'll be benefited from this website.
Heya just wanted to give you a brief heads up and let you know a few of the images aren't loading
properly. I'm not sure why but I think its a linking issue.
I've tried it in two different browsers and both show the same outcome.
Thanks a lot for sharing this with all people you really understand what
you're talking about! Bookmarked. Kindly additionally
seek advice from my site =). We could have a hyperlink trade
agreement between us
Fantastic website you have here but I was wanting to know if you knew of any community forums that
cover the same topics talked about in this article? I'd really love to
be a part of community where I can get advice from other
experienced individuals that share the same interest.
If you have any recommendations, please let me know. Bless you!
Learn how to use them, and which games are available
on iPhone and Android.
bookmarked!!, I like your site!
Very rapidly this web site will be famous among all blogging viewers, due to it's nice
content
Howdy I am so excited I found your site, I really found you by error, while
I was searching on Yahoo for something else, Regardless I am here
now and would just like to say thank you for a incredible post and a all round interesting blog (I also love the theme/design), I don't have time to browse it all at the moment but I
have saved it and also added in your RSS feeds, so when I have time I will be
back to read much more, Please do keep up the superb work.
It's going to be ending of mine day, except before end I am reading
this enormous paragraph to improve my experience.
Ye artworks are seriously awesome. They capture his one-of-a-kind aesthetic excellently.
Everybody who adores his music should certainly buy one.
They bring a great touch to every room.
Moreover, the variety of prints offered is vast. Whether you prefer
clean aesthetic or bold images, there’s an option for anyone.
They are ideal decor for loved ones who are fans of
Kanye too.
Besides, owning Kanye posters in your studio could initiate fun chats
with anyone who visits. They usually be focal points, encouraging discussions
about Kanye's impact.
In conclusion, Kanye prints are a perfect choice for any fan. They improve your living space and highlight your love for an iconic artist.
Hello, I log on to your blog like every week. Your writing style is awesome,
keep up the good work!
Hi! Do you know if they make any plugins to safeguard against hackers?
I'm kinda paranoid about losing everything I've worked hard on. Any recommendations?
Thanks designed for sharing such a pleasant idea, piece of writing is fastidious, thats why i
have read it entirely
I am really loving the theme/design of your web site. Do
you ever run into any internet browser compatibility problems?
A couple of my blog audience have complained about my blog not working correctly in Explorer but looks great in Safari.
Do you have any solutions to help fix this issue?
It is appropriate time to make some plans for the future and it
is time to be happy. I have read this post and if I could I desire to
suggest you few interesting things or suggestions.
Maybe you can write next articles referring to this article.
I desire to read more things about it!
Good write-up. I absolutely appreciate this website. Keep writing!
Hey there! This is my 1st comment here so I just wanted to give a quick
shout out and tell you I really enjoy reading your articles.
Can you suggest any other blogs/websites/forums that deal with
the same topics? Thanks!
Greetings from California! I'm bored to tears at work so I decided to browse your website on my iphone during lunch break.
I really like the information you provide here and
can't wait to take a look when I get home. I'm surprised at how fast your blog loaded on my phone ..
I'm not even using WIFI, just 3G .. Anyhow, amazing site!
Thanks a bunch for sharing this with all people you actually understand what
you are speaking approximately! Bookmarked. Kindly
additionally talk over with my web site =). We could have
a link exchange contract between us
A https://baltimorepropainting.com/ el uso de programas de terceros, como rastreadores,
scripts de selecci?n de mesas y movimientos, est? estrictamente Prohibido.
Thanks for sharing your thoughts about создание шаблона
joomla. Regards
Hello, I enjoy reading through your article.
I wanted to write a little comment to support you.
customer should not should expect injuries during this of the course, however this is it may happen, if you seriously "screw up" at
https://pokerbetonlineaustralia.com/ , so please take this note before
registering.
Today, I went to the beachfront with my children. I found a sea shell and
gave it to my 4 year old daughter and said "You can hear the ocean if you put this to your ear." She put the shell to her
ear and screamed. There was a hermit crab inside and it pinched her ear.
She never wants to go back! LoL I know this is completely off topic but I had to tell someone!
y otro, pero aproximadamente significativo: hay una funci?n EV cashout, https://proplayggpokerag.com/ , permite a los jugadores
mitigar los efectos de la desviaci?n retirando su apuesta en canje por
una Comisi?n modesta relativa a Tama?o del 1%.
Ye posters are absolutely awesome. They represent his distinctive essence perfectly.
Any fan who appreciates his music should surely pick up one.
They provide a wonderful touch to every space.
On top of that, the selection of designs you can find
is vast. Whether you want simple designs or colorful pieces, there’s a poster
for everyone. They serve as great presents for family who idolize Kanye too.
Besides, showcasing Kanye posters in your office might start fun talks with friends.
They usually act as conversation starters, prompting chats
about music.
In conclusion, Kanye posters are a great addition for every dedicated art
lover. They enhance your living space and display your love for an iconic musician.
Canales oficiales de discord y https://argentinaggpoker.com/ telegram.
Sin embargo, las mesas con apuestas magn?ficas suelen estar
ocupadas por personas conocedoras personas.
Lo siento; surgi? https://proplayggpokerag.com/problema , con ggpoker.
Usando la c?mara de su Tel?fono m?vil, escanee el c?digo a continuaci?n y descargue la aplicaci?n kindle.
I just could not go away your site before suggesting
that I actually enjoyed the standard info an individual provide to your visitors?
Is gonna be back regularly to check up on new posts
Hey there I am so delighted I found your blog page, I
really found you by accident, while I was researching on Google for something else, Regardless I am here now and would just like to
say kudos for a marvelous post and a all round interesting blog (I also love the
theme/design), I don’t have time to read through it all
at the moment but I have bookmarked it and also added in your RSS
feeds, so when I have time I will be back to read
a great deal more, Please do keep up the awesome b.
Cool blog! Is your theme custom made or did you download it from
somewhere? A theme like yours with a few simple adjustements would really make my blog stand out.
Please let me know where you got your design. Bless you
I am not sure where you're getting your information, but good topic.
I needs to spend some time learning much more
or understanding more. Thanks for magnificent information I was looking for
this info for my mission.
Thanks for a marvelous posting! I really enjoyed
reading it, you might be a great author. I will be sure
to bookmark your blog and will come back sometime soon. I want to encourage you to definitely continue your great writing, have a nice weekend!
I'm not sure where you're getting your information,
but great topic. I needs to spend some time learning more or understanding more.
Thanks for fantastic information I was looking for this information for my mission.
An impressive share! I've just forwarded this onto a friend who had
been conducting a little research on this. And he in fact ordered me lunch because I discovered it for him...
lol. So allow me to reword this.... Thank YOU for the meal!!
But yeah, thanx for spending the time to discuss this subject here
on your web site.
Hello there, You've done a fantastic job. I'll definitely digg it and personally recommend to my friends.
I am sure they will be benefited from this web site.
Good day! Would you mind if I share your blog with my
facebook group? There's a lot of folks that I think would
really appreciate your content. Please let me know. Thank you
This info is priceless. When can I find out more?
Ye prints are really fantastic. They capture his distinctive vibe
excellently. Anyone out there who is into him should definitely grab one.
They offer a amazing feature to your home.
Plus, the selection of styles available is vast.
Whether you enjoy clean posters or eye-catching artworks, there’s an option for anyone.
They make ideal presents for fellow fans who idolize Kanye equally.
Furthermore, displaying Kanye prints in your studio could start fun discussions with guests.
They often serve as icebreakers, encouraging chats about creativity.
In conclusion, Kanye posters are essential for every dedicated art lover.
They improve your environment and highlight your admiration for an iconic artist.
Hello friends, how is the whole thing, and what you would like to say on the topic of this paragraph, in my view its really amazing in favor
of me.
Hello, I enjoy reading all of your article. I wanted to write a little comment to support you.
Every weekend i used to visit this web page, as i want
enjoyment, since this this website conations genuinely fastidious funny information too.
Thanks for sharing your thoughts about создание шаблона joomla.
Regards
These are truly great ideas in on the topic of blogging.
You have touched some good points here. Any way keep up wrinting.
отыгрыш бонуса 1win
You have spoiled me for all substandard material with your unfailingly intellect-enlarging
posts. I'm hooked for life!
Its not my first time to pay a quick visit this site, i am visiting this web page dailly and obtain fastidious facts from here every day.
Kanye prints are absolutely awesome. They show his distinctive essence perfectly.
Everybody who appreciates Ye should absolutely
pick up one. They provide a fantastic feature to any home.
On top of that, the variety of designs available is vast. Whether you want clean posters or vibrant images, there’s something for anyone.
They serve as excellent presents for loved ones who are fans
of Kanye too.
Furthermore, displaying Kanye prints in your home might start fun conversations with visitors.
They tend to act as focal points, encouraging discussions about art.
To sum up, Kanye prints are essential for every music enthusiast.
They improve your living space and showcase your admiration for one of creative genius.
Usually I don't learn article on blogs, but I wish to say that this write-up very compelled me to
try and do it! Your writing taste has been amazed
me. Thank you, quite nice article.
obviously like your website but you have to check the spelling on quite a
few of your posts. A number of them are rife with spelling problems and I
to find it very bothersome to tell the reality however
I'll surely come back again.
Good site you have here.. It's hard to find good quality
writing like yours nowadays. I really appreciate people like you!
Take care!!
Yeezy artworks are truly cool. They show his distinctive aesthetic impeccably.
Anyone who is into him should definitely buy one. They provide a fantastic touch to any home.
Plus, the array of prints out there is vast. Whether you enjoy simple posters or bold pieces, there’s
something for every taste. They serve as ideal decor for family who idolize Kanye also.
In addition, displaying Kanye posters in your home could spark engaging chats with guests.
They can be topics of interest, inspiring chats about music.
To sum up, Kanye images are a great addition for any art
lover. They upgrade your decor and celebrate your passion for an iconic musician.
I'm gone to say to my little brother, that he should also pay a quick visit this web site on regular basis to obtain updated from latest reports.
This is my first time go to see at here and i am actually
pleassant to read all at one place.
Nice response in return of this issue with genuine arguments and describing all concerning
that.
The main problem where the introduction of photovoltaic power
plants is faced with is interruptions in business, which are able to lead to instability
of the https://htx-wallet.io/ network.
Yeezy images are truly awesome. They represent
his special vibe flawlessly. Everybody who adores his music should definitely buy
one. They add a fantastic element to any wall.
Moreover, the variety of options available is huge. Whether you want minimalist designs or bold prints, there’s a poster for everyone.
They are perfect gifts for family who respect Kanye as well.
Also, showcasing Kanye prints in your home could initiate fun conversations with anyone who visits.
They can act as topics of interest, inspiring chats about Kanye's impact.
All in all, Kanye posters are essential for
any true fan. They beautify your home and
celebrate your respect for an iconic creative genius.
Definitely believe that which you said. Your favorite reason seemed to be on the internet the easiest
thing to be aware of. I say to you, I definitely
get annoyed while people think about worries that they just do not know about.
You managed to hit the nail upon the top and also defined
out the whole thing without having side effect , people could take a signal.
Will probably be back to get more. Thanks
Noise reduction: The wall mountable server rack suppresses noise up to 36% dB (no what makes|will make|your purchase|purchase on Aliexpress more |as reasonable|thoughtful and economical|economically profitable as possible!
this is a type of digital currency, is allows for people to make payments directly
to each other via online-a https://lendcoin.io/ system.
These exchange rates have been available in digital format
since March 1994 year in the form raymondzmft462.bearsfanteamshop.com/how-to-claim-discount-ftmo in downloadable files.
under Legislation, an individual or organization must be registered with FCNB if they are engaged in trading or consulting on securities or derivatives in New Brunswick, https://jaxxwallet-liberty .
Doshi, vidhi https://lendcoin.io/ (October 9, 2019).
"Unicef is now accepting donations via Bitcoin and ether." In late summer
2021, Cuba adopted resolution 215 on respect and regulation of cryptocurrencies, like bitcoin.
The Labor government has stated that the bill will provide owners of bitcoin and other digital assets with more
legal assistance https://magameme.io/ .
Kanye images are really cool. They represent his unique essence perfectly.
Everybody who adores Kanye should absolutely buy one.
They bring a wonderful touch to a home.
Moreover, the variety of options out there is impressive.
Whether you want understated designs or vibrant pieces, there’s something for
every fan. They are perfect gifts for family who respect Kanye also.
In addition, owning Kanye art in your office could start fun chats
with visitors. They usually act as icebreakers, inspiring
conversations about music.
In summary, Kanye prints are a must-have for any true
fan. They upgrade your home and showcase your admiration for an iconic musician.
I never envisioned this subject could be so riveting.
You proved me erroneous in the optimal way!
Excellent article et tr?s informatif! Les services de gestion en ligne offrent une commodit? incroyable pour les
entreprises. Merci pour le partage de cet article et pour les conseils pratiques!
because many brands are placed in the regulated ??????? market
america, competition increases the number of available games.
We mark unlicensed playgrounds in america, so that you could avoid them.
n?s regularmente lan?amos novos m?quinas ca?a-n?queis, respectivamente, voc?
pode gire para ganhar constantemente! * gire a roda, para obter "bolos"
de slots emocionantes roleta, jogo/ jogo em Slots https://namodemello.com .
практически, в любой культуре присутствуют упоминания об казино: в
игры на деньги играли в древней греции и Риме, лучшие мобильные.
Hi there, I found your web site by the use of Google at the same time as
searching for a similar topic, your site came up,
it looks great. I have bookmarked it in my google bookmarks.
Hello there, simply turned into alert to your blog thru Google, and found that it's truly informative.
I am going to watch out for brussels. I will appreciate if you happen to continue
this in future. A lot of folks can be benefited from your writing.
Cheers!
Yeezy images are absolutely awesome. They depict his one-of-a-kind vibe flawlessly.
Any fan who appreciates his music should definitely
buy one. They bring a fantastic element to every wall.
Plus, the range of prints you can find is impressive. Whether you enjoy simple designs
or bold artworks, there’s something for everyone. They serve as ideal gifts for fellow
fans who admire Kanye too.
Also, displaying Kanye art in your studio can spark interesting conversations with friends.
They can act as conversation starters, prompting discussions about Kanye's impact.
To sum up, Kanye prints are a must-have for any true music enthusiast.
They improve your home and highlight your admiration for a legendary
artist.
Aw, this was an incredibly good post. Taking a few minutes and actual effort to produce a very
good article… but what can I say… I put things
off a lot and never manage to get nearly anything done.
Ye prints are absolutely awesome. They capture his distinctive vibe perfectly.
Anyone out there who is into Ye should certainly pick up one.
They provide a amazing touch to a space.
On top of that, the selection of designs you can find is extensive.
Whether you like understated posters or colorful artworks, there’s a poster for every taste.
They serve as ideal decor for family who idolize Kanye also.
In addition, showcasing Kanye posters in your studio could begin great discussions with friends.
They can be topics of interest, encouraging discussions about art.
To sum up, Kanye images are a great addition for every collector.
They improve your environment and highlight your passion for one of musician.
Yeezy prints are truly awesome. They represent his unique vibe flawlessly.
Anyone out there who adores him should absolutely pick up one.
They add a amazing touch to every home.
Plus, the range of styles offered is huge. Whether you like
clean posters or eye-catching artworks, there’s an option for everyone.
They are excellent surprises for loved ones who respect Kanye equally.
Besides, showcasing Kanye prints in your office could
begin great conversations with visitors. They usually act as icebreakers, prompting chats about Kanye's impact.
All in all, Kanye posters are essential for any music enthusiast.
They improve your environment and highlight your admiration for a remarkable creative genius.
those who have been illegally visited and/or personally excluded from
the little-witch.ru/topic7444.html ?
at the dawn of the 20th century in United States of America https://torkwasepeterson.com/forum/business-forum/casino-by-play-casino-by-hoover-dam gameplay in gambling house was prohibited by state law.
It's actually very difficult in this active life
to listen news on TV, so I simply use the web for that purpose, and
take the hottest information.
Greate post. Keep writing such kind of information on your site.
Im really impressed by your site.
Hi there, You have done an excellent job. I will definitely
digg it and in my view recommend to my friends.
I'm confident they'll be benefited from this site.
Woah! I'm really loving the template/theme of this site.
It's simple, yet effective. A lot of times it's difficult to get that "perfect balance" between superb usability and visual appearance.
I must say you have done a amazing job with this.
Also, the blog loads very fast for me on Chrome.
Superb Blog!
If you are going for most excellent contents like myself, only visit this site every
day for the reason that it presents quality contents,
thanks
This is a great tip especially to those fresh to
the blogosphere. Brief but very accurate info… Thanks for sharing this one.
A must read article!
Wow that was unusual. I just wrote an incredibly long comment but after I clicked submit my comment didn't show up.
Grrrr... well I'm not writing all that over again.
Anyway, just wanted to say wonderful blog!
Excellent article et tr?s informatif! Les services de gestion en ligne offrent une commodit?
incroyable pour les entreprises. Merci pour le partage
de cet article et pour les conseils pratiques!
As a critical on-line casino, we try to be as transparent and honest as potential with our gamers in all our dealings.
With this in mind, all of our slot machines are powered by a Random Number Generator (RNG), leading to a wonderful payout price for our users.
Hey there! I just wanted to ask if you ever have any
trouble with hackers? My last blog (wordpress) was hacked and I
ended up losing months of hard work due to no back up. Do you have any solutions to protect against hackers?
Asking questions are actually good thing if you are not understanding something fully, except this paragraph provides fastidious understanding yet.
This is my first time go to see at here and i
am actually pleassant to read everthing at one place.
What's up, all the time i used to check weblog posts here in the
early hours in the morning, for the reason that i like to find out more and more.
When you’re in need of a Kanye West art print, you’re sure to find an amazing selection of cool designs.
Including styles from his legendary records like The Life of Pablo, or even latest art pieces, there’s something for
every fan. A Kanye West poster can elevate your
interior.
Pretty nice post. I just stumbled upon your weblog and wanted to mention that
I have truly enjoyed surfing around your blog posts. After all I'll be subscribing to your rss
feed and I'm hoping you write again soon!
Very good blog post. I absolutely appreciate this site. Stick with it!
This post offers clear idea designed for the new visitors of
blogging, that truly how to do running a blog.
What's up i am kavin, its my first occasion to commenting anywhere,
when i read this piece of writing i thought i could also
create comment due to this good piece of writing.
Hi there, just became aware of your blog through Google, and found that it is truly
informative. I'm going to watch out for brussels. I'll be grateful if
you continue this in future. Lots of people will
be benefited from your writing. Cheers!
I'd like to find out more? I'd like to find out more details.
I am really pleased to glance at this weblog posts which
contains tons of helpful information, thanks for
providing such statistics.
Hello! Someone in my Myspace group shared this website with us so I came to give it a
look. I'm definitely loving the information. I'm book-marking and will be tweeting
this to my followers! Fantastic blog and excellent design and style.
Good day I am so grateful I found your blog, I really found you by
accident, while I was searching on Google for something else, Regardless
I am here now and would just like to say thanks a lot for a tremendous post and a all round exciting blog (I also love the theme/design), I don’t have time to browse it all at the moment
but I have book-marked it and also added in your RSS
feeds, so when I have time I will be back to read more, Please do keep
up the fantastic b.
Farming is a crucial driver of deforestation in many portion of the globe.
Lasting Farming methods are required to shield rainforests as well as lessen the impact of horticulture on the environment.
Press releases are vital for delivering messages about your business.
They empower media outlets to deliver stories about the important news.
An expertly written press release often attracts the attention of journalists,
leading to favorable media coverage.
Additionally, corporate announcements offer an official
record of information, which news outlets refer to.
By publishing consistent public statements,
companies ensure their visibility within the market,
building authority while establishing partnerships with media outlets.
Hi, everything is going nicely here and ofcourse every one is sharing
information, that's really excellent, keep up writing.
Thank you for sharing your thoughts. I truly appreciate your efforts and I am waiting for your
further post thank you once again.
A motivating discussion is definitely worth comment. There's
no doubt that that you ought to write more on this subject,
it might not be a taboo matter but typically people don't discuss these subjects.
To the next! Many thanks!!
I blog often and I genuinely thank you for
your content. This great article has truly peaked my interest.
I will bookmark your blog and keep checking for
new details about once per week. I opted in for your Feed as
well.
Thanks for the marvelous posting! I genuinely enjoyed reading it, you could be a great author.I will make sure to bookmark your blog and
will eventually come back down the road. I want to encourage
you to ultimately continue your great work, have a nice morning!
Hi there, aall the time i used to check website posts here in the earky hours in the break of day,
as i like to learn moore and more.
you're actually a just right webmaster. The website loading speed is incredible.
It kind of feels that you're doing any distinctive trick.
In addition, The contents are masterpiece.
you've performed a magnificent activity in this topic!
museumbolaHasilkan Uang Dengan Program Afiliasi Dengan Menemukan Rahasia Pemasar Afiliasi Super!
Pemasaran afiliasi disebut sebagai salah satu model
bisnis online yang paling menguntungkan dan termudah.
Anda dapat dengan mudah menghasilkan uang melalui penggunaan model bisnis online yang
hebat ini. Jika Anda memanfaatkan model bisnis online ini, Anda bahkan akan memulai bisnis online Anda secara instan dan mendapatkan uang
dengan program afiliasi. Agar sukses dalam model perusahaan online ini,
ada beberapa bagian penting yang tidak boleh Anda abaikan. Jika Anda benar-benar ingin menghasilkan uang dengan program afiliasi, pertimbangkan tip menarik yang dibagikan dalam artikel ini.
Cara tercepat untuk memulai tentu saja dengan membuat
daftar pilihan Anda sendiri. Untuk memaksimalkan hasil akhir Anda, berikan beberapa bonus atau
gratisan yang sensitif terhadap waktu ke listing Anda.
Ini bertindak sebagai umpan untuk menarik akun Anda agar membeli melalui tautan afiliasi Anda.
Ini adalah taktik yang terbukti dan selalu berhasil.
I read this paragraph completely concerning the comparison of most recent and preceding technologies, it's awesome article.
Keep this going please, great job!
Hello there! I simply wish to give you a huge thumbs up for the excellent information you have here on this post.
I am coming back to your site for more soon.
I do not leave a response, but after reading thfough a great
deal of responses on Создание шаблона Joomla, как изменить шаблон,
основные настройки и параметры / Разработка шаблонов
Joomla .:. Документация Joomla! CMS. I do have a couple of questions
for you if it's allright. Is it simply me orr does it seem like some of the responses comme across like they
are coming from brain dead visitors? :-P And, if you are
writing on other sites, I'd like to follow everything new you have to post.
Could you make a list of the complete urls of your shared pages lijke
your linkedin profile, Facebook page or twitter feed?
My coder is trying too convince me to move to .net
from PHP. I have always disliked the idea because of the expenses.
But he's tryjong none thee less. I've beewn using Movable-type oon a number of websites
for about a year and am concerned about swqitching to
another platform. I have heard good things about blogengine.net.
Is there a way I can transfer all my wordpress posts into it?
Any hrlp would be greatly appreciated!
Undeniably believe that which you said. Your fvorite reason seemed to be
on the net the simplest thing to be aware of.
I say to you, I certainly get annoyed while people think about worris
thaqt they just don't know about. You managed to hit the nail upon the top and also defined
out the whole thing without having side effect , people could take a signal.
Will likely be back to get more. Thanks
Why visitors still use to read news papers when in this technological globe everything is existing on net?
Great blog! Do you have any tips and hints for aspiring writers?
I'm hoping to start my own website soon but I'm a
little lost on everything. Would you suggest starting with a free platform like Wordpress or
go for a paid option? There are so many options out there that I'm completely confused
.. Any recommendations? Appreciate it!
Hello there! Do you know if they make any plugins to protect against hackers?
I'm kinda paranoid about losing everything I've worked hard on. Any suggestions?
It shows how well you comprehend this subject. Added this page, is for additional.
What's up, I log on to your new stuff regularly.
Your story-telling style is awesome, keep it up!
I am really impressed along with your writing talents as well
as with the structure to your blog. Is that this a paid theme or
did you customize it yourself? Anyway stay up the excellent quality writing, it is
rare to look a great weblog like this one today..
Выбрав exbase человек не поймете разных доплат.
следует уяснить, https://odessamama.net/forum.php ?
It is not my first time to pay a visit this website, i
am visiting this website dailly and take nice information from here every day.
I was more than happy to finnd this page. I wanted to thank you for ones time duue to this fantastic read!!
I definitely savored every little biit oof it and I have you bookmarked to check out new stuff on your site.
Hi! I just wanted to ask if you ever have any issues with
hackers? My last blog (wordpress) was hacked and I ended up losing many
months of hard work due to no back up. Do you have any methods to
stop hackers?
Wow that was unusual. I just wrote an really
long comment but after I clicked submit my comment didn't show up.
Grrrr... well I'm not writing all that over again. Anyways, just wanted to say excellent blog!
What's up to all, for the reason that I am genuinely eager off
reading this weblog's post to be updated on a
regular basis. It includes good information.
I'm no longer positive where you are getting your info, however good topic.
I needs to spend some time finding out much more or figuring out more.
Thanks for great information I used to be on the lookout for this information for
my mission.
I am extremely impressed along with your writing abilities as neatly as with the structure to your blog.
Is his a paid topic or diid you modify itt yourself? Anyway stay up the excellent
high quality writing, it is uncommon to see a great weblog like this one nowadays..
Good post. I learn something totally new and challenging on websites I stumbleuplon everyday.
It will always be interesting to read content from othher wrters and use something from
oher websites.
Very great post. I simply stumbled upon your
weblog and wished to mention that I have truly enjoyed surfing around
your blog posts. In any case I will be subscribing https://youtube.com/watch?v=qipbRXLkLpE in your rss feed and I am
hoping you write once more soon!
Fine waay of telling, and pleasant article to take information on the topic of my presentation focus, which
i am goiing to convey iin academy.
I'd like to find out more? I'd want too find out moe details.
Most transactions are processed quickly, with deposits and withdrawals typically completed within just
a few minutes.
If you wish for to get much from this post then you have to apply such methods
to your won blog.
You actually make it seem really eawy along with your presentation however I
to fibd this matter to be actually something
that I feel I'd never understand. It seems too compoicated and very extensive for me.
I am taking a look ahead for your next put up, I'll atempt
tto get the dangle off it!
Saved as a favorite, I love your site!
Hey there, I think your site might be having browser compatibility
issues. When I look at your blog in Ie, it looks
fine but when opening in Internet Explorer, it has some overlapping.
I just wanted to give you a quick heads up! Other then that, amazing blog!
Heya i am for the first time here. I came across this board and I find It really useful & it
helped me out a lot. I hope to give something back and help others like
yoou aided me.
Write more, thats all I have to say. Literally, it seems as though you relied on thee
video to make your point. You obviously know what youre talking about, why throw away your
intelligence on just posting videos to your sit when you could be giving us something informative to read?
There are various tools and websites that claim to allow users to view private Instagram profiles, but it's important to
entre these like caution. Many of these tools can be unreliable, may require personal information, or could violate Instagram's terms of service.
Additionally, using such tools can compromise your own security or guide
to scams. The safest and most ethical way to view a private profile is to send a follow request directly to the user.
Always prioritize privacy and admiration in your online interactions.
Definitely believe that which you said. Your favorite justification appeared to be on the net the simplest thing
to be aware of. I say to you, I certainly get
irked while people think about worries that they just
do not know about. You managed to hit the nail upon the top and
defined out the whole thing without having side effect , people
could take a signal. Will probably be back to get more.
Thanks
I think that is among the such a lot important information ffor me.
And i'm happy reading your article. But anna commentary on few comjon things, The web site taste is
ideal, the articles iis acually great : D. Just right process, cheers
I'm extremely inspired along with your writing abilities as smartly as with the
formazt in youur blog. Is that this a paid topic or did you customize it yourself?
Either way stay up the nice high quality writing, it's
uncommon to look a nice weblog like this one these days..
Just want to say your article is as astonishing.
The clarity for your post is simply spectacular and i can suppose you're knowledgeable on this subject.
Well with your permission allow me to grasp your feed to stay updated with
impending post. Thank you one million and please keep up
the gratifying work.
Hi there, You've done an excellent job. I will definitely digg it and personally suggest to my friends.
I'm confident they'll be benefited from this site.
It's a shame you don't have a donate button! I'd certainly donate to
this fantastic blog! I guess for now i'll settle for bookmarking and adding your
RSS feed to my Google account. I look forward to new
updates and will share this website with my Facebook group.
Talk soon!
I loved as much as you wil receive carried out right here.
The sketch is attractive, your athored material stylish.
nonetheless, you command get bought an nervousness over tnat you
wish be delivering the following. unwell unquestionably come further formerly again as exactly thee
same nearly a lot oftenn inside case you shield this hike.
I needed to thank you for this great read!! I certainly
enjoyed every bit of it. I've gott you book marked to look at new stuff you post…
all the time i used to read smaller articles which aas well clear their motive,
and that is also happening with this piece of writing which I am reading here.
This means you can gamble without anyone knowing who you are, which
can make it harder for Big Brother to track your activities.
It's really very difficult in this full of activity life to listen news on Television, thus I simply use world
wide web for that reason, and obtain the newest news.
No matter if some one searches for his essential thing, therefore he/she desires
to be available that in detail, so that thing is maintained over here.
Kanye West Music Posters – Perfect Addition for Every Music Lover
The Allure of Kanye West Posters
For supporters of Kanye Omari West – an creative mind – there's no better way to recognize his innovative style
than by displaying Kanye posters in your bedroom.
Kanye West has become an iconic figure in the entertainment world, known for his musical brilliance, bold
fashion statements, and cultural footprint. These posters not only commemorate his creative work but also help you express your respect
and fandom in a meaningful way.
Whether you're into album cover art prints, Kanye West
concert posters, or fan-created Kanye West prints, posters of Kanye West allow you
to incorporate a visual tribute to his impact into your room.
Below, we dive deeper into the various varieties of Kanye West
wall art, top stores for buying them, and how to display them to add
to your music studio.
Incredible Kanye West Posters Every Fan Should Have**
Kanye West Album Art Posters
Album covers is one of the most emblematic aspects of Kanye’s career.
His album art are both visually creative but also representative of his ability to blend fashion, music, and
creativity. Posters featuring album covers from
albums like My Beautiful Dark Twisted Fantasy, are some of the
most coveted options. These posters are ideal for showcasing
the transformation of his music and how each project has
contributed to defining his impact.
https://tumblr.com/kanye-west-posters/751574461874094080/kanye-west-posters
Kanye West Tour Posters
For many fans, attending a Kanye West live performance is a unforgettable
experience. The vibe, the music experience,
the setlist – it’s all part of what makes his shows distinctive.
Tour posters capture that moment and allow you
to relive those moments. Posters from Kanye’s tours, such as the The
Graduation Tour, feature dynamic visuals from his concerts and are a must-own for
any fan who has seen Kanye perform or simply respects his stage presence.
Custom Kanye West Portraits
Another fantastic option is artistic portrait
posters of portrait of Kanye West. These posters focus on creative and visualizations of Kanye’s
image. Whether it's a abstract portrait, a pop art
style, or a bold and vibrant design, these posters can be
a creative addition to your room.
Rare Kanye West Posters
limited edition Kanye West posters are special
and can bring a custom touch to your space. These posters can feature a
variety of artistic interpretations of Kanye’s music and are
often one-of-a-kind, making them an even more personalized addition to any fan's collection.
Where to Find Kanye West Posters:
Places to Shop for Kanye West Posters Online
Affordable Kanye West Posters
How to Display Kanye West Posters
Posters for Bedrooms
https://sites.google.com/view/kanye-west-blog
Iconic Kanye West Wall Art – A Must-Have for Every Fan
Why Kanye West Posters Are a Great Collectible
For admirers of Kanye – an musician – there's no
better way to pay tribute to his cultural influence than by
displaying Kanye West posters in your bedroom. Kanye West has become
an pioneering figure in the music world, known for his
trailblazing albums, distinct fashion choices, and impact on culture.
These posters do more than just commemorate his creative work but also
help you express your respect and passion in a unique way.
Whether you're into music posters, Kanye West concert
posters, or fan-created Kanye West prints, Kanye West posters allow you to incorporate a
symbolic tribute to his genius into your space.
Below, we dive deeper into the various categories of
Kanye West wall art, where to buy them, and how to arrange them to add to your
home decor.
Essential Kanye West Posters for Collectors**
Posters Featuring Kanye West’s Iconic Albums
Album art is one of the most legendary aspects of Kanye Omari
West’s career. His album art are not only visually eye-catching but also reflective
of his ability to blend fashion, songwriting, and vision.
Posters featuring album covers from record releases like My Beautiful Dark Twisted
Fantasy, are some of the most coveted options.
These posters are ideal for showcasing the transformation of his
music and how each album has contributed to solidifying his impact.
https://tumblr.com/kanye-west-posters/751574461874094080/kanye-west-posters
Kanye West Tour Posters
For many fans, attending a Kanye West concert is a life-changing experience.
The energy, the stage design, the songs – it’s all part of
what makes his shows distinctive. Live performance posters capture that moment
and allow you to experience again those moments.
Posters from memorable Kanye tours, such as the
Watch the Throne Tour, feature stunning visuals from
his shows and are a must-own for any fan who has seen Kanye
perform or simply loves his stage presence.
Kanye West Art Prints
Another fantastic option is artistic portrait posters of portrait
of Kanye West. These posters focus on artistic and digital renditions of
Kanye’s image. Whether it's a abstract portrait, a graffiti-inspired style, or a bold
and vibrant design, these posters can be a great addition to your space.
Fan-Created Kanye West Posters
exclusive Kanye West posters are unique and can bring a individual touch to your space.
These posters can feature a variety of creative designs of Kanye’s brand and are often exclusive, making them an even more meaningful
addition to any fan's collection.
Where to Find Kanye West Posters:
Places to Shop for Kanye West Posters Online
Kanye West Poster Prices
Creative Ideas for Displaying Kanye West Posters
Posters for Music Studios
https://sites.google.com/view/kanye-west-blog
Thanks in support of sharing such a fastidious thinking, piece of
writing is pleasant, thats why i hae read it entirely
I don't even know how I ended up here, but I thought this post was good.
I do not know who you are but definitely you're
going to a famous blogger if you aren't already ;) Cheers!
Outstanding post but I waas wanting to know if you could write a litte more
on this topic? I'd be very thankful if you could elaborate a little bit further.
Apprsciate it!
Kanye West Music Posters – Discover the Best Kanye West Posters
Why Kanye West Posters are Popular
For followers of Kanye West – an cultural figure – there's no better way to show appreciation for his
innovative style than by displaying Kanye West album posters in your bedroom.
Kanye West has become an legendary figure in the art world, known for his groundbreaking work, bold fashion statements, and
cultural footprint. These posters do more than just
commemorate his musical contribution but also help you express your love and
fandom in a memorable way.
Whether you're into Kanye West album posters,
tour posters, or artistic renderings, Kanye West wall art allow you to incorporate a musical tribute to his creativity into your living space.
Below, we dive deeper into the various varieties of Kanye West posters, where to
buy them, and how to display them to add to your music studio.
Unique Types of Kanye West Posters for Your Collection**
Album Covers as Posters
Album artwork is one of the most legendary aspects of Kanye’s career.
His album art are not only visually eye-catching but also
representative of his ability to blend sound, production, and creativity.
Posters featuring album covers from LPs like
808s & Heartbreak, are some of the most sought-after options.
These posters are ideal for showcasing the transformation of his
music and how each record has contributed to defining his
legacy.
https://tumblr.com/kanye-west-posters/751574461874094080/kanye-west-posters
Kanye West’s Concert Moments in Poster Form
For many fans, attending a Kanye West tour event is a memorable experience.
The vibe, the visuals, the setlist – it’s all part of what makes his shows unforgettable.
Live performance posters capture that moment and allow you to experience again those
moments. Posters from Kanye West’s concert tours, such as
the The Graduation Tour, feature stunning visuals from his shows and are a must-own for any fan who has seen Kanye perform
or simply admires his stage presence.
Custom Kanye West Portraits
Another fantastic option is custom portrait posters of portrait of Kanye West.
These posters focus on creative and artistic renditions of Kanye’s
image. Whether it's a abstract portrait, a minimalist design, or a clean-cut design, these posters can be a ideal addition to your room.
Rare Kanye West Posters
Fan-created Kanye West posters are special and
can bring a custom touch to your space. These posters can feature a
variety of creative designs of Kanye’s image and are often one-of-a-kind,
making them an even more personalized addition to any fan's collection.
Where to Find Kanye West Posters:
Kanye West Poster Stores
Where to Get Budget-Friendly Kanye West Posters
Framing Kanye West Posters
Posters for Different Rooms
https://sites.google.com/view/kanye-west-blog
Hi there, the whole thing is going sound here and
ofcourse every one is sharing data, that's truly fine, keep
up writing.
Good way of telling, and pleasant piece of writing to get facts regarding my presentation subject matter, which i am going to present in school.
I can’t believe I finally got a Kanye West Graduation poster,
and it exceeded all my expectations. The artwork looks incredibly bold, and it’s made my wall look amazing.
As someone who appreciates Kanye’s artistry,
this piece was essential for my collection. The Graduation artwork
add so much personality to my decor.
I can’t recommend this poster enough. It was packaged perfectly and arrived in mint condition, and the quality of the poster is
top-notch.
This is just the first of many posters I’ll get from
here, and I’ll be telling all my friends about this place.
I’m super thankful for this incredible poster!
Woah! I'm really loving the template/theme of this website.
It's simple, yet effective.A lot of times it's very hardd to get that
"perfect balance" between user friendliness and visual appeal.
I must say that you've done a amazing job with this. In addition, the blpog loads extremely
quick for me on Opera. Superb Blog!
Foor latest news you have to go to see world-wide-web and on world-wide-web I found this web site as a most excellent web site for most recent updates.
I finally ordered a Kanye West Graduation poster, and it’s a masterpiece.
The colors are so vibrant, and it instantly brightened up my space.
Being a long-time Kanye West fan, this poster is everything I was looking for.
The bold colors look incredible up close.
I think every Kanye fan should have one. It was packaged perfectly and
arrived in mint condition, plus the poster is flawless.
This is just the first of many posters I’ll get from here, and
I’ll definitely spread the word. I’m super thankful for this
incredible poster!
This piece of writing is actually a pleasant
one it helps new net viewers, who are wishing in favor
of blogging.
I, I think the Kanye West Graduation poster stands
out as a masterpiece.
The gradient effects showcased in the piece genuinely
showcase the imaginative direction of the Graduation era.
For admirers of Kanye West, this Kanye West poster is something to cherish.
Putting it up in your office might draw attention.
This is an iconic representation, and a tribute to his innovation.
Honestly, I believe the Graduation album
poster by Kanye West is truly an artistic gem.
The incredible color scheme that make up the design undoubtedly enhance the creative vibe
within his music.
For Kanye West enthusiasts, this poster is essential.
Incorporating it in your personal space is bound to
enhance the vibe.
This is an iconic representation, while also being a celebration of his cultural impact.
Have you ever thought about creating an e-book or guest
authoring on other blogs? I have a blog centered on the same subjects you discuss and would really like to have you share some stories/information.
I know my visitors would enjoy your work. If you're even remotely
interested, feel free to send me an email.
Hmm is anyone else experiencing problems with the images on this blog loading?
I'm trying to find out if its a problem on my end or if
it's the blog. Any responses would be greatly appreciated.
I was able to find good information from your blog articles.
Helpful information. Lucky me I found your site unintentionally,
and I'm shocked why this twist of fate didn't happened earlier!
I bookmarked it.
For me, I think the iconic Kanye West Graduation poster can be described as a must-have for fans.
The intricate design in the artwork genuinely emphasize the innovative
style of the album.
For collectors of music posters, this poster would be
an amazing addition.
Hanging it in your studio would certainly add personality.
It’s an artistic statement, and also a symbol
of his artistry.
Thanks for finally talking about >Создание шаблона Joomla, как изменить шаблон, основные
настройки и параметры / Разработка шаблонов Joomla .:.
Документация Joomla! CMS <Liked it!
This is the perfect blog for anybody who would
like to find out about this topic. You understand so much its almost tough to argue with you (not that
I actually would want to…HaHa). You certainly put a brand new spin on a
subject which has been written about for decades. Excellent stuff,
just wonderful!
Undeniably imagine that that you stated. Your favourite justification appeared to
be on the web the simplest factor to remember of. I say to you,
I certainly get irked whilst other folks consider issues that they
just do not know about. You managed to hit the nail upon the top as smartly as defined
out the entire thing without having side effect , people could take a signal.
Will likely be again to get more. Thanks
I do not know whether it's just me or if everybody
else experiencing problems with your site. It looks like some of the text within your
content are running off the screen. Can somebody else please comment
and let me know if this is happening to them too?
This could be a problem with my web browser because I've had this happen previously.
Cheers
Unquestionably believe that which you said. Your favorite justification seemed
to be on the web the simplest thing to be aware of.
I say to you, I definitely get irked while people consider worries that
they plainly don't know about. You managed to hit the nail upon the top and also
defined out the whole thing without having side-effects ,
people could take a signal. Will probably be back to get more.
Thanks
in response to a recent kousokuwiki.org/wiki/The_Connection_Between_Porn_And_Reduced_Sexual_Frustration , Senator Abbot held a press conference at which he categorically denied that currently on he
himself was captured in the footage.
Hello, I think your website might be having browser compatibility issues.
When I look at your website in Safari, it looks fine but when opening in Internet Explorer,
it has some overlapping. I just wanted to give you a quick
heads up! Other then that, terrific blog!
Excellent article et tr?s informatif! Les services de gestion en ligne offrent une commodit? incroyable pour les entreprises.
Merci pour le partage de cet article et pour les conseils pratiques!
bookmarked!!, I love your blog!
Awesome! Its really remarkable post, I have got much clear idea on the
topic of from this piece of writing.
Here, all new visitors can claim a welcome casino bonus of an extra
200% up to an incredible C$25,000.
hey there and thank you for your info – I have definitely picked up anything
new from right here. I did however expertise some technical points using
this site, as I experienced to reload the website many times previous to I could get it to load properly.
I had been wondering if your hosting is OK?
Not that I am complaining, but sluggish loading instances times
will very frequently affect your placement in google and could damage
your high quality score if ads and marketing with Adwords.
Well I am adding this RSS to my e-mail and could look out for much more
of your respective interesting content. Ensure that you update
this again very soon.
For most up-to-date information you have to visit the
web and on the web I found this website as a best web site for most up-to-date
updates.
It's very straightforward to find out any topic on net as compared to textbooks, as
I found this piece of writing at this web page.
Hello, i think that i saw you visited my
site thus i came to “return the favor”.I
am attempting to find things to improve my website!I suppose its ok to use a few of your ideas!!
I used to be able to find good information from your blog
articles.
A private Instagram viewer is a tool or relieve expected to permit users to view private Instagram accounts
without needing to follow the account or get cheer from the account owner.
Typically, these spectators claim to bypass privacy
settings and find the money for right of entry to posts, stories, and new content that would
on the other hand be restricted to followers.
though some people may use these tools out of curiosity or for social media analysis, its important to note that using such services raises supreme ethical and
legitimate concerns. Most of these viewers play a part
in a gray area, often violating Instagram's terms
of give support to and potentially putting users' privacy and data at risk.
In addition, many of these tools require users to definite surveys
or find the money for personal information, which can lead to scams, phishing attempts, or malware infections.
Instagram has strict policies neighboring unauthorized access
to accounts and may recognize authenticated act out against both users and facilities functioning in breaching privacy.
otherwise of relying on private Instagram viewers, it's advisable to adulation users' privacy
settings and follow accounts in a true manner.
If someone has made their account private, its generally a sign that they
hope to limit access to their content, and these boundaries should be respected.
Hey There. I found your blog using msn. This is a very well written article.
I will be sure to bookmark it and come back to read more of your useful information. Thanks for the post.
I'll certainly comeback.
Bolaslot adalah partner resmi bolaslot88 sehingga login bola slot 88 bisa dilakukan melalui aplikasi milik bolaslot 88 selaku penyedia games online yang turut memberikan bocoran rtp akurat.
Bagi yang ingin bermain slot dengan nilai deposit kecil dan berpeluang menang jutaan rupiah bisa gabung di Bolaslot atau login Bolaslot88 karena kemenangan member merupakan sebuah prioritas untuk memberikan kenyamanan dalam bermain.
Mainzeus dengan pengalaman sensasional di link terbaru main zeus slot
deposit kecil kemenangan beruntun jadi jackpot jutaan tak ternilai withdraw cuma dalam 2 menit tersedia
banyak jenis games yang bisa dimainkan dengan satu akun id
saja
Do you mind if I quote a few of your posts as long as I provide credit and sources back to your site?
My blog site is in the very same area of interest as yours
and my visitors would really benefit from some of the information you
present here. Please let me know if this ok with you.
Regards!
Fantastic beat ! I wish to apprentice while you amend your
web site, how could i subscribe for a blog website? The account helped me a acceptable deal.
I had been a little bit acquainted of this your broadcast provided bright clear idea
I am now not certain where you're getting your information, however great
topic. I must spend a while learning much more or figuring out more.
Thank you for great info I was looking for this information for my mission.
Its like you read my mind! You appear to know a lot about this, like you wrote the book in it or something.
I think that you could do with some pics to drive the message home a bit, but
instead of that, this is great blog. A fantastic read.
I will certainly be back.
PP
Hmm it appears like your blog ate my first comment (it was super long) so I guess
I'll just sum it up what I had written and say, I'm thoroughly enjoying your blog.
I too am an aspiring blog blogger but I'm still new to everything.
Do you have any points for novice blog writers? I'd certainly appreciate it.
Today, while I was at work, my cousin stole my apple ipad
and tested to see if it can survive a thirty foot drop, just so she can be a youtube sensation. My
apple ipad is now broken and she has 83 views. I know this is totally
off topic but I had to share it with someone!
I enjoy looking through a post that can make men and women think.
Also, many thanks for allowing me to comment!
Thanks to my father who told me about this website, this website is truly remarkable.
Hi there! This article could not be written much better!
Reading through this article reminds me of my previous roommate!
He constantly kept preaching about this. I will send this information to him.
Fairly certain he will have a great read.
I appreciate you for sharing!
Hi, I do think your web site may be having web browser compatibility problems.
Whenever I take a look at your website in Safari, it looks fine however when opening in Internet Explorer, it's got some overlapping issues.
I merely wanted to provide you with a quick heads up!
Apart from that, wonderful site!
Excellent piece! Press statements are crucial forr crafting media messages and sharing important details.
They facilitate establish relationships between organizations and reporters.
Crafting impactful press releases necessitates being clear, matched with the needs of
relevant news channels. In today’s digital age,
press releases also function a key role in digiyal outreach.
They also address conventional news outkets but
additionally generate engagement and elevate a business’s online footprint.
Adding images, such ass photos, can render
press releades further appealing and shareable. Adapting to the evolving media landscape while upholding core principles can significantly enhance a press release’s reach.
How do you feel on leveraging multimedia in press releases?
Before we delve into the specifics, let’s clarify what exactly No KYC Casinos are.
We do not accept payment from crypto gambling sites to
give them special treatment.
Pretty! This was an extremely wonderful post. Thank you for supplying this information.
Do you have a spam issue on this blog; I also am a blogger, and I was
wanting to know your situation; many of us have developed some nice methods and we
are looking to trade solutions with others, why
not shoot me an email if interested.
I have been surfing online more than three hours today, yet I never found any interesting article like
yours. It is pretty worth enough for me. In my opinion, if all site owners and bloggers made good content as you did, the
net will be much more useful than ever before.
My brother recommended I might like this blog.
He was entirely right. This post actually made my day.
You can not imagine simply how much time I had spent for this information! Thanks!
I think this is among the most important info for me. And i'm glad reading
your article. But wanna remark on few general things, The site style is great, the articles is really nice : D.
Good job, cheers
This is a very good tip particularly to those fresh to the blogosphere.
Simple but very precise info… Thank you for sharing this one.
A must read article!
My developer is trying to convince me to move to .net from PHP.
I have always disliked the idea because of the costs.
But he's tryiong none the less. I've been using Movable-type on various websites for about
a year and am anxious about switching to another platform.
I have heard good things about blogengine.net. Is there a way I can transfer all my wordpress posts into
it? Any kind of help would be really appreciated!
betflik282
Simply want to say your article is as astonishing. The clearness in your post is simply great and i can assume you're an expert on this subject.
Fine with your permission let me to grab your
feed to keep updated with forthcoming post. Thanks a million and
please continue the rewarding work.
Hi, everything is going well here and ofcourse every one is sharing data, that's genuinely fine, keep up writing.
Thanks for sharing your thoughts about создание шаблона joomla.
Regards
Appreciating the time and energy you put into your website and in depth information you present.
It's great to come across a blog every once in a
while that isn't the same unwanted rehashed information. Wonderful read!
I've saved your site and I'm including your RSS feeds
to my Google account.
Link exchange is nothing else however it is simply placing the
other person's webpage link on your page at suitable place and
other person will also do similar for you.
My brother suggested I might like this web site.
He was entirely right. This post truly made my day.
You cann't imagine simply how much time I had spent for this info!
Thanks!
in addition the customer can switch between devices without interrupting the session, ensuring uninterrupted play,
regardless because of this, whether you use your phone, other device,
https://shreebalajistore .
Its like you learn my mind! You seem to know a lot about this,
like you wrote the ebook in it or something. I feel that you simply could
do with a few percent to pressure the message house a little bit, but other than that, that is excellent
blog. An excellent read. I will definitely be back.
Thanks for sharing your thoughts about создание шаблона joomla.
Regards
I will right away snatch your rss feed as I can not in finding your
e-mail subscription link or e-newsletter service. Do you have any?
Kindly permit me understand so that I could subscribe. Thanks.
I loved as much as you'll receive carried out right here.
The sketch is attractive, your authored subject matter
stylish. nonetheless, you command get bought an edginess over that you wish be delivering the following.
unwell unquestionably come further formerly again since exactly the
same nearly very often inside case you shield this hike.
What's up every one, here every one is sharing these experience,
therefore it's nice to read this blog, and I used to
visit this weblog daily.
Ensure you look at the number of games offered by a certain online before landing on one.
Wow, amazing blog structure! How lengthy have you
been blogging for? you make blogging look easy.
The whole glance of your site is magnificent, let alone the content!
I got this website from my friend who informed me about this website
and now this time I am visiting this website and reading very
informative content at this place.
you are truly a good webmaster. The site loading velocity
is amazing. It kind of feels that you are doing any distinctive
trick. Moreover, The contents are masterpiece.
you have done a excellent task on this matter!
Wow, this creative display is absolutely unreal! Kanye’s
Graduation era was such a pivotal chapter in the entertainment world, and this
poster truly illustrates the boldness of that time.
The retro-futuristic palette and the iconic character defying gravity through the
timeless expanse make it feel so dreamlike.
This is definitely a timeless beauty for any Kanye!
??????????????????
Wow, this wall art is absolutely crazy good! Kanye’s Graduation era was such a milestone in album cover design, and this art truly
defines the boldness of that time.
The colorful spectrum and the flying bear zooming through
the dream world make it feel so beyond creative.
This is definitely a visual gem for any creative soul! ??????????????????
Thanks for sharing such a nice thinking, article is nice, thats why i have read it fully
you're actually a just right webmaster. The web site loading velocity
is amazing. It seems that you are doing any unique trick.
Moreover, The contents are masterwork. you have done a
magnificent job in this topic!
Wow, this cover is absolutely phenomenal! Kanye’s Graduation era was such a game-changer
in fashion influence, and this piece of history truly immortalizes
the creativity of that time.
The eye-popping palette and the iconic character propelling upward through the otherworldly realm make it feel so captivating.
This is definitely a artistic masterpiece for any design! ??????????????????
Wow, this design is absolutely fire! Kanye’s Graduation era was such a milestone in fashion influence, and this futuristic vision truly reinterprets the vision of that time.
The psychedelic mix and the legendary symbol launching through the sky make it
feel so visionary.
This is definitely a visual gem for any hip-hop!
??????????????????
Thank you for the auspicious writeup. It in fact was a amusement account it.
Look advanced to more added agreeable from you! However, how
could we communicate?
This article is genuinely a good one it helps new the web
users, who are wishing in favor of blogging.
This is a topic that is close to my heart...
Thank you! Where are your contact details though?
It is perfect time to make a few plans for
the longer term and it is time to be happy. I've read this publish and if I may just
I want to counsel you few interesting issues or tips. Maybe you can write subsequent articles
referring to this article. I wish to read even more issues about it!
This efficient payment system enhances the overall gaming experience, making it easy for players to manage their funds.
Every weekend i used to pay a visit this website, for the reason that i wish for enjoyment, as this this web site conations
truly fastidious funny information too.
You need to take part in a contest for one of the best websites on the web.
I most certainly will highly recommend this website!
Admiring the time and effort you put into your site and in depth information you present.
It's great to come across a blog every once in a
while that isn't the same out of date rehashed material.
Great read! I've saved your site and I'm including your RSS feeds to my Google account.
Yes! Finally something about kraken 7 org.
Thank you for the good writeup. It in fact was once a amusement account it.
Glance complicated to more introduced agreeable from you!
However, how can we keep up a correspondence?
Fine way of describing, and good post to obtain data on the topic of
my presentation topic, which i am going to deliver in school.
betflik
This is a really good tip particularly to those new to the
blogosphere. Short but very precise information… Thanks for sharing
this one. A must read post!
I know this if off topic but I'm looking into starting my own blog and was wondering what
all is required to get setup? I'm assuming having a
blog like yours would cost a pretty penny? I'm not very internet savvy so I'm not 100% certain. Any suggestions
or advice would be greatly appreciated. Cheers
Touche. Sound arguments. Keep up the good work.
With a strong background in search optimization and a hiwtory of efficient results, I have actually aided companiess of various ranges accomplish their
development purposes. By including determined preparation with innovative techniques, I regularly create substantial end outcomes.
When I'm not evaluating info, I stay upgraded on the most present developments in SEO.
Enable's evaluation improving your digital impact.
Providing the Chicagoland region, NfiniteLimits.com is a reliable service carrier of electronic remeddies based
in Mundelein, IL. My method merges real-world
understandings with fad understanding to produce significant enhancements.
When I'm not maximizing internet sites, I'm looking into thee current SEO trends.
Let's discuss just how we can improve yor search exposure.
Sustaining serrvices in Northern Illinois, NfiniteLimits.com is your
go-to company for search engine optimization headquartered in Mundelein, Illinois.
Pretty nice post. I simply stumbled upon your blog and wished to mention that I've truly loved browsing your blog posts.
After all I'll be subscribing in your feed and
I am hoping you write once more soon!
It's fantastic that you are getting thoughts from this
post as well as from our argument made at this place.
Great blog here! Also your web site loads up very fast!
What host are you using? Can I get your affiliate link to your
host? I wish my site loaded up as quickly as yours lol
Since the admin of this web site is working, no hesitation very shortly it will be well-known,
due to its feature contents.
I blog frequently and I truly appreciate your content.
The article has truly peaked my interest. I'm going to book mark your site and keep checking for new information about once a week.
I subscribed to your Feed as well.
I don't even know how I ended up here, but I thought this post was good.
I do not know who you are but definitely you're going to a famous blogger if you aren't already ;
) Cheers!
Great article, totally what I was looking for.
Personally, I feel Kanye West's Graduation artwork poster is definitely something worth showcasing.
The incredible color scheme in the artwork undoubtedly highlight the
imaginative direction within his music.
If you enjoy vibrant designs, this iconic work is something
you’ll love.
Displaying it in your personal space is guaranteed to create a statement.
This is a reflection of Kanye’s genius, and a reminder of his musical
evolution.
In my opinion, I believe the poster from Kanye West's Graduation album is clearly something
worth showcasing.
The bright hues featured in the design immensely amplify the artistic flair of his creative work.
If you’re a fan, this collectible is worth adding to your decor.
Incorporating it in your office can enhance the vibe.
It represents the spirit of Kanye’s music, while also being a tribute to his genre-defining style.
I, I believe the iconic Kanye West Graduation poster is
definitely a great addition to any collection.
The incredible color scheme highlighted in the visuals truly enhance the artistic flair from that period.
If you’re a fan, this Kanye West poster is essential.
Incorporating it on your feature wall is guaranteed to add personality.
This is more than a poster, in addition to being a reminder of his cultural impact.
Personally, it seems the Graduation album poster by Kanye West is definitely an iconic piece.
The intricate design highlighted in the visuals really bring out the album’s theme within his music.
For collectors of music posters, this collectible belongs in your
collection.
Hanging it in your home is guaranteed to make
your decor pop.
It goes beyond being a poster, as well as serving as a tribute to his artistry.
I, it seems Kanye West's Graduation artwork poster stands out
as a stunning work of art.
The gradient effects featured in the design remarkably highlight the artistic flair of the Graduation era.
If you’re into music-themed decor, this
art piece is a perfect choice.
Displaying it on your gallery wall will add personality.
This is more than a poster, alongside being an homage to his visionary approach.
In my opinion, I find Kanye West's Graduation artwork poster can be described as
something worth showcasing.
The vivid tones in the artwork remarkably amplify the
innovative style of the Graduation era.
For collectors of music posters, this poster is worth adding
to your decor.
Adding it to your wall in your room is guaranteed to create a statement.
This is an iconic representation, but an homage to his genre-defining style.
I, it seems the Kanye West Graduation poster can be described as an iconic piece.
The bold palette present in the poster undoubtedly enhance the artistic flair of Kanye's music.
If you appreciate iconic artwork, this collectible is something to cherish.
Showcasing it in your creative space could add a creative
touch.
It goes beyond being a poster, and also a reflection of his
visionary approach.
In my opinion, I think the Graduation album poster by Kanye West is definitely an iconic piece.
The bright hues showcased in the piece immensely enhance the creative vibe
of the album.
If you appreciate iconic artwork, this design is a must-have.
Having it as part of your decor on your feature wall could spark conversations.
It represents the spirit of Kanye’s music, as well as a reflection of
his cultural impact.
For me, I think Kanye West's Graduation artwork poster
stands out as a masterpiece.
The gradient effects captured in the artwork significantly reflect the artistic
flair of the album.
For Kanye West enthusiasts, this Kanye West poster would look great
in any space.
Hanging it on your feature wall would certainly make your decor pop.
This is more than a poster, in addition to being a celebration of his creativity.
Honestly, it seems the iconic Kanye West Graduation poster can be described as a must-have for fans.
The bold palette in the poster greatly capture the energy of Kanye's
music.
If you’re a fan, this design is something you’ll love.
Framing it on your gallery wall could elevate the aesthetic.
It represents the spirit of Kanye’s music, and also an homage to his legacy.
Honestly, I believe the iconic Kanye West Graduation poster is undoubtedly a stunning work of art.
The vivid tones in the poster remarkably amplify the album’s mood of
the Graduation era.
If you’re a fan, this art piece is something you’ll love.
Putting it up in your home is bound to add
a creative touch.
It isn’t just a poster, plus a testament to his legacy.
Honestly, I think Kanye West's Graduation artwork
poster is definitely an artistic gem.
The gradient effects present in the poster genuinely showcase the imaginative direction within his music.
For admirers of Kanye West, this piece is a must-have.
Framing it on your gallery wall would certainly create a statement.
This is a reflection of Kanye’s genius, but a nod to his creativity.
Honestly, I feel the iconic Kanye West Graduation poster is a great
addition to any collection.
The incredible color scheme in the poster genuinely reflect the playful essence of Kanye's
music.
If you’re a fan, this Graduation poster is a must-have.
Framing it in your creative space is bound to make your decor pop.
It’s an artistic statement, in addition to being a tribute to
his innovation.
Honestly, I feel the Graduation album poster
by Kanye West is undoubtedly an iconic piece.
The colors showcased in the piece profoundly amplify
the playful essence of the Graduation era.
For collectors of music posters, this design would look great in any space.
Having it as part of your decor on your gallery
wall will make your decor pop.
It’s an artistic statement, in addition to
being an homage to his visionary approach.
I am sure this paragraph has touched all the internet viewers, its really
really good piece of writing on building up new web site.
In my opinion, I feel the Kanye West Graduation poster is clearly an iconic piece.
The striking visuals captured in the artwork genuinely capture the innovative style of Kanye's music.
For collectors of music posters, this piece is a perfect choice.
Showcasing it in your personal space is sure to create a statement.
It represents the spirit of Kanye’s music, in addition to being a testament to his artistry.
I, I think the iconic Kanye West Graduation poster is truly a
true collector's item.
The colors captured in the artwork profoundly bring
out the energy of the Graduation era.
For collectors of music posters, this Kanye West poster is a perfect choice.
Framing it in your creative space will be a talking point.
This is a reflection of Kanye’s genius, but a reflection of his creativity.
Honestly, I think the poster from Kanye West's Graduation album is
clearly a masterpiece.
The bright hues showcased in the piece really enhance the album’s theme of the album.
For Kanye West enthusiasts, this design is a perfect choice.
Hanging it in your office could make your decor pop.
This is more than a poster, as well as an expression of his artistry.
I, I believe the Graduation album poster by Kanye West is definitely a phenomenal design.
The vivid tones featured in the design profoundly enhance the vibrant spirit
of Kanye's music.
If you’re a fan, this collectible is something to cherish.
Hanging it in your home might add a creative touch.
This is a reflection of Kanye’s genius, but a nod to his innovation.
For me, I feel Kanye West's Graduation artwork poster
is a stunning work of art.
The vivid tones showcased in the piece undoubtedly emphasize the energy of his creative
work.
For admirers of Kanye West, this iconic work
would be an amazing addition.
Making it a part of your space on your feature wall
could add personality.
It’s truly a piece of history, but a reminder of his creativity.
For me, I find the iconic Kanye West Graduation poster is definitely an artistic gem.
The bold palette featured in the design immensely convey the innovative style
from that period.
For collectors of music posters, this iconic work is worth
adding to your decor.
Showcasing it wherever you’d like is likely to draw attention.
It’s an artistic statement, alongside being a reminder of his innovation.
Personally, it seems the iconic Kanye West Graduation poster stands out as an artistic gem.
The gradient effects used in this piece really highlight the energy of his creative work.
If you enjoy vibrant designs, this stunning artwork would be an amazing addition.
Framing it wherever you’d like could enhance the vibe.
It isn’t just a poster, and also a tribute to his genre-defining
style.
Hey there superb website! Does running a blog similar to this require a great deal
of work? I have virtually no expertise in coding however I had
been hoping to start my own blog in the near future.
Anyway, should you have any ideas or techniques for new
blog owners please share. I understand this is off topic however I just had to ask.
Thanks a lot!
на родном вам лишь 4 раза за сутки:
09:20, 11:30, 14:30 и 16:30. во время экскурсии вы пройдетесь по цеху, https://adolfbucher.ru/media/pgs/oteli-phuketa-gde-ostanovit-sja .
Ye has always been a trendsetter in the rap industry, but his style
extends beyond accessories—it also includes his smile.
Supporters have long theorized about his veneers, especially after he unveiled a set of gold-embedded
teeth.
Ye’s Unique Dental Transformation
In earlier years, Ye has chosen a extreme dental procedure.
Unlike normal dental work, he decided to swap out his original set with a fixed arrangement of diamond-coated
molars. This unconventional choice left observers in shock, as he announced in an statement that his new teeth were not just grills but an actual dental
innovation.
What Led Kanye West Opt for This Transformation?
There are many reasons behind Kanye’s move.
Some believe he wanted to redefine luxury, while others say it was a symbol of his
wealth. Ye himself has mentioned that he adores the idea of permanent ornamented
molars.
Price Tag of Kanye’s Smile
Having a set of diamond teeth of this magnitude is not inexpensive.
Reports indicate that Kanye’s custom dental transformation set him back hundreds
of thousands. This luxury dental enhancement places him in the ranks
of musicians who push boundaries in their public
persona.
Reactions from Celebrities
The fans had diverse reactions about Kanye’s diamond teeth.
Some praised his individuality, calling it a statement.
Others criticized the sanity of such a investment.
Regardless of opinions, Kanye has once again grabbed the headlines with his fearless style.
Wrap-Up
Whether you hate Kanye West’s diamond teeth, there’s no questioning that he is a visionary.
His fearless approach to music extends to
every element of his persona, proving that he marches to the beat of his
own drum. As always, Kanye continues to reshape norms, one iconic moment at a time.
Hey there! I could have sworn I've been to this
website before but after browsing through some of the post
I realized it's new to me. Anyhow, I'm definitely happy I found it and I'll be
bookmarking and checking back frequently!
Hey would you mind letting me know which web host you're working with?
I've loaded your blog in 3 different browsers and I must say this blog loads a lot quicker then most.
Can you suggest a good web hosting provider at a honest price?
Thanks a lot, I appreciate it!
YI
My brother recommended I might like this
website. He was totally right. This post actually made my day.
You can not imagine just how much time I had spent
for this info! Thanks!
certainly like your website but you have to
test the spelling on several of your posts. A number of them are rife with spelling
problems and I find it very troublesome to inform the reality on the other hand I will
definitely come again again.
DQ
Oh my goodness! Amazing article dude! Thanks, However I am
having problems with your RSS. I don't know the reason why
I can't subscribe to it. Is there anybody else getting
similar RSS problems? Anyone who knows the solution will you kindly
respond? Thanks!!
Hello, Neat post. There's a problem together with your website in web explorer, may test this?
IE still is the market leader and a big part of other folks will leave
out your excellent writing because of this problem.
Attractive component to content. I just stumbled upon your site and in accession capital to
say that I get in fact loved account your blog posts. Any
way I'll be subscribing for your augment or even I achievement you get right of entry to persistently fast.
QY
This post is genuinely a pleasant one it assists new web users, who are wishing in favor of blogging.
Hello! I'm at work surfing around your blog from my new iphone!
Just wanted to say I love reading through your blog and look
forward to all your posts! Keep up the great work!
XF
Greetings! Very useful advice in this particular article!
It is the little changes that make the largest changes.
Thanks for sharing!
XR
VX
Kanye West has always been a pioneer in the rap industry, but his fashion sense extends beyond clothing—it also includes his smile.
Admirers have long wondered about his veneers, especially after he showed
a set of gold-embedded teeth.
Kanye West's Dazzling Dental Transformation
In past years, Kanye has chosen a dramatic dental procedure.
Unlike regular dental work, he decided to replace his standard pearly whites with a non-removable arrangement of metal-coated molars.
This daring choice left fans in awe, as he stated in an interview that his new teeth were not just enhancements but an actual replacement.
What Led Kanye West Get Such a Bold Dental Choice?
There are many theories behind Kanye’s decision. Some believe he wanted
to stand out, while others argue it was a representation of his success.
Kanye himself has mentioned that he loves the idea of
everlasting jewelry teeth.
Price Tag of Kanye’s Teeth
Having a custom dental modification of this magnitude is not cheap.
Reports indicate that Kanye’s custom dental transformation set him back hundreds of
thousands. This one-of-a-kind dental upgrade places
him in the league of celebrities who push boundaries in their public persona.
Responses from Celebrities
The public had diverse responses about Kanye’s dental makeover.
Some admired his individuality, calling it a power move.
Others criticized the practicality of such a procedure.
Regardless of viewpoints, Kanye has once again taken over the conversation with his innovative choices.
Conclusion
Whether you love Kanye West’s new smile, there’s no arguing that he is a trendsetter.
His unapologetic approach to personal expression extends to every detail of his image,
proving that he does things his own way. As always, Kanye continues to
reshape norms, one bold move at a time.
RI
KX
XA
RW
My spouse and I stumbled over here coming from a different web
address and thought I might check things out.
I like what I see so now i am following you.
Look forward to going over your web page repeatedly.
Hello, i feel that i saw you visited my website thus i got here to go back the choose?.I am attempting to
to find issues to improve my web site!I guess its ok to use some of your ideas!!
Do you have any video of that? I'd care to find out some additional information.
Howdy this is kind of of off topic but I was wondering if blogs
use WYSIWYG editors or if you have to manually code with HTML.
I'm starting a blog soon but have no coding experience so I wanted to get
guidance from someone with experience. Any help would be enormously appreciated!
Ahaa, its pleasant dialogue on the topic of this paragraph at this
place at this website, I have read all that, so at
this time me also commenting here.
Oh my goodness! Impressive article dude! Many thanks,
However I am going through problems with your RSS.
I don't understand why I am unable to subscribe
to it. Is there anyone else getting similar RSS issues?
Anyone that knows the solution will you kindly respond?
Thanx!!
JJ
KZ
NZ
OW
Hello, its fastidious piece of writing regarding media print, we all be
familiar wuth media is a fantastic sourcce of information.
It's not my first time to pay a visit this website, i am browsing this
web page dailly and get pleasant data from here daily.
My family members every time say that I am wasting my time here at net, but I know I am
getting knowledge every day by reading thes pleasant content.
HM
Thanks ffor anny othher wonderful post. Where else mmay just anyboddy get thyat
type of inforrmation in such a perfect manner oof writing?
I have a prresentation nextt week, andd I am att tthe search for
such info.
Great article! We are linking to this great post
on our site. Keep up the great writing.
I simply couldn't go away your site before suggesting that I really enjoyed the
standard information a person provide to your visitors? Is gonna be back frequently to check up
on new posts
Hey! I realize this is somewhat off-topic however I had to ask.
Does operating a well-established website like yours take a
massive amount work? I am completely new to running a blog but
I do write in my diary everyday. I'd like to start a blog so I can easily share my personal experience and
views online. Please let me know if you have any suggestions or tips for new aspiring blog owners.
Thankyou!
It's remarkable for me to have a web page, which is useful in favor of my knowledge.
thanks admin
Cool blog! Is your theme custom made or did you download it from somewhere?
A theme like yours with a few simple adjustements would really make my blog stand
out. Please let me know where you got your design. With thanks
{ {?????????????????{?????????|?????},
{??????????????????|????????????????}!|{???????????????|????????????????????????}, {?????????????? ??????|?????????????????????????????????}.|??????????????????????????, {??????????????????????????|?????????????????????????????}!|{????????????????????????????????????????????????|??????????????????????????????????????????}?|{???????????????????????????????|????????????????????????}, ???{???????????????????????|??????????????????????????????}.|{???????????????????|?????????????????????????}, {???????????????????????|?????????????????????????????}.|??????????????????????????????????????????????????|????????????????????????????????????, {??????????????????????????|???????????????????????}.|????????????????????????????????????{?????????????|}.|?????????{???????????????
????????????|?????????????????????????}.|{??????????????|??????????????????},
{???????????????????|??????????????????????}.|{??????????????????????|?????????????????????????},
{??????????????????????|??????????????????????????}.|????????????????????????????????,
{??????????|??????????????}.|{??????????????????????????????? ?????????|?????????????????????????}
???????????????????|{????????????????????????????????????|??????????????????????????????????}.|{???????????????????????????????????|????????????????????????????????????}?|{????????????????|?????????????????????},
{????????????????????????|?????????????????????}.|{?????????????????????????????????????????|??????????????????????????????????????????????????}.|{??????????????????????...???????????????|????????????...??????????????????????????????}.|{????????????????????|???????????????????????}, {??????????????????????|???????????????????????}.}
Hello there! Do you know if they make any plugins to assist with Search Engine Optimization? I'm trying to get
my blog to rank for some targeted keywords but I'm not seeing very
good gains. If you know of any please share.
Thanks!
Link exchange is nothing else however it is only placing the other person's web
site link on your page at appropriate place and other person will also do similar in favor
of you.
AB
You're so interesting! I do not believe I've read through something like
this before. So great to find somebody with unique thoughts
on this subject matter. Really.. many thanks for starting this
up. This site is something that is required on the web,
someone with some originality!
Приветствуем вас на нашем веб-сайте!
Здесь вы найдёте всё необходимое для успешного
управления своими финансами.
Мы предлагаем широкий спектр финансовых продуктов, которые помогут вам
достичь ваших целей и обеспечить стабильность в будущем.
В нашем ассортименте представлены различные виды банковских продуктов,
инвестиции, страхование, кредиты и многое другое.
Мы постоянно обновляем нашу базу
данных, чтобы вы всегда были в курсе последних тенденций и инноваций
на финансовом рынке.
Наши специалисты помогут вам выбрать наиболее подходящий продукт, учитывая ваши индивидуальные потребности и предпочтения.
Мы предоставляем консультации и рекомендации, чтобы вы могли принять обоснованное решение и избежать возможных рисков.
Не упустите возможность воспользоваться
нашими услугами и откройте
для себя мир финансовых возможностей!
Заходите на наш сайт, ознакомьтесь с каталогом продуктов и начните свой путь
к финансовой стабильности прямо сейчас!
Условия и тарифы
Its like you read my mind! You appear to know so much about this, like you wrote the book in it or something.
I think that you could do with some pics to drive the message home a
little bit, but other than that, this is excellent blog. A fantastic read.
I will definitely be back.
Ищете идеальное жилье?
У нас есть эксклюзивные предложения в сердце столицы и живописной Подмосковье!
Комфортные квартиры с современным ремонтом, привлекательные цены и отличная инфраструктура.
Не упустите шанс стать владельцем уютного уголка!
Звоните и записывайтесь на просмотр уже сегодня!
===>>>москва жк каскад адрес
I think this is one of the most significant info for
me. And i'm glad reading your article. But
should remark on some general things, The site style is great, the articles is
really excellent : D. Good job, cheers
QY
Thanks for sharing your info. I really appreciate your efforts and I
am waiting for your further post thank you once again.
NC
What a stuff of un-ambiguity and preserveness of precious know-how concerning unpredicted feelings.
Thank you for the good writeup. It in reality was a entertainment account it.
Glance complex to far brought agreeable from you!
However, how could we keep in touch?
That are you ready for? It also appears to be the case that the majority of halo porn games are powerfully influenced by manga porn in the style of animation and gameplay.
The goto style of accessing halo porn game for many (notably the extra informal
porno aficionado ) seems to be, overwhelmingly, to benefit from the many free porno sites.
Apparently, the assortment of halo intercourse games is giant.
Lovers of halo intercourse game rejoice! Stepping into halo hentai sport is like
ascending to halo xxx sport heaven, the place you never run out of titillating and sexy halo xxx video games titles to try.
You've tried the rest - now strive essentially the most helpful of .
I wish to briefly mention that there are wonderful themes right here
and when you take pleasure in rendered intercourse scenes, you'll discover some various
and excessive-quality articles piled up inside this bitch.
Each week, hundreds of worshippers are visiting the web site to take pleasure in our ample selection. We guarantee you
have by no means seen like these earlier than. Should you thought-about you have already played one of the best round the
net, think again! Welcome to the #1 web site for , where you obtain complete and unlimited entry to a plethora of .
Gamers (of ) are synonymous with masturbators, not because they play video
games per se, but as the life model they lead and the leisure activities they prefer usually have a worth --
that worth is being socially inept and failing to
accumulate the one achievement which they will never achieve at any
video sport ever: Getting a real girlfriend. And while you are right
here, be certain you've gotten a look at our own unique , produced in house by our extraordinarily gifted and expert developers.
Are you currently trying to get a place at which you are in a position to play with which come someplace inbetween porn and movie games?
You're in the acceptable place! You notice, some of us need to
play that sort of games to the purpose that they're so drilled
in our brains we feel like zombies. That's simply one of those elements of collaborating in any means.
It's even higher if video games combine joy with sexual arousal; I'm speaking about sexy digital honies ready to be fucked hard,
and all you need is to use your mouse. When it actually is these sensual ,
relationship simulatorshardcore XXX games, there isn't any doubtless wrong with
porn games. The page gives you longer than just a clue and likewise this content material is certainly great.
I want to briefly point out that there are good themes here and if you love rendered fuck-a-thon scenes, you'll find some diverse and excessive-quality articles.
You won't have the flexibility to endure two or extra mins
. That is not any method that you may make it past which mark unless the dick is constructed from metal - no kidding.
If you are the form of man that cums very good, then you'll wish to suppose two occasions about
dangling throughout this web site. Fuck there are
various issues taking place in ' web page, also there has been a lot taking place until I bought into the key class.
We've bought a selection of which is going to continue to keep you busy
and amused for weeks, days and weeks! With an increasing number of added on a weekly foundation, you could come back and check out our updates to love scorching
titles. Make certain to bookmark and stay ready to the launches.
Your whole dearest producers, your whole fave titles and franchises will
be found here! You may by no means have to visit
with another site once more! Why waste time leaping from one site to the following looking for the best when yow will discover them right here?
Let us do the job with YOU! We've spent just a few years combing the world broad internet for the greatest & out
there on the business. Exactly what exactly are you wanting forward to?
Fantasticc beat ! I would like tto apprentioce while you ammend
yor site, how ould i subscribe for a weblog site? The account aided mme a acceptable deal.
I were tony bit amiliar of this yourr brroadcast procided brilliant lear concept
PA
My relatives every time say that I am wasting my time here at net, however I know
I am getting knowledge daily by reading thes fastidious articles.
**Добро пожаловать на наш сайт!
Откройте лучшие финансовые решения прямо сейчас!**
**Наши предложения**
Мы предлагаем широкий ассортимент
финансовых продуктов: потребительские
кредиты, кредитные карты и вклады, чтобы помочь вам достичь ваших целей
и воплотить мечты в реальность.
**Потребительские кредиты для любых
нужд**
Планируете крупные покупки или ремонт?
Наши кредитные программы созданы для
вас. Оформите кредит на нашем сайте за
несколько минут, выбрав лучшие условия и сроки погашения.
**Преимущества наших кредитных карт**
Наши карты обеспечивают удобство безналичных платежей
и множество бонусов:
- **Кэшбэк на повседневные покупки**
- **Программа лояльности**
Оформите карту онлайн и получите все преимущества уже сегодня!
**Быстрые займы для непредвиденных расходов**
Нужны деньги до зарплаты или на
неожиданные расходы? Наши займы – это быстро и
удобно. Мы предлагаем прозрачные условия и мгновенное одобрение заявок.
**Наши преимущества:**
- **Простота и Удобство:** Оформите заявку онлайн за считанные минуты.
- **Надежность и Прозрачность:
** Честные условия без скрытых комиссий.
- **Индивидуальный Подход:** Мы учитываем ваши личные обстоятельства.
Не упустите шанс улучшить свою
финансовую ситуацию! Оформите потребительский кредит,
кредитную карту или займ
на нашем сайте уже сегодня и насладитесь всеми преимуществами сотрудничества с
надежным финансовым партнером.
Переходите на наш сайт и сделайте шаг к своим мечтам!
Все займы без отказа в Хасавюрте
SB
FK
GW
AY
MQ
Someone essentially lend a hand to make significantly posts I'd
state. That is the very first time I frequented your web page and to this point?
I amazed with the analysis you made to create this particular put up amazing.
Wonderful activity!
Hey there! Someone in my Facebook group shared this site with us so I came to take a look.
I'm definitely enjoying the information. I'm bookmarking and will be tweeting
this to my followers! Great blog and terrific design and style.
There's certainly a great deal to know about this issue.
I really like all of the points you have made.
BJ
This is the right webpage for anybody who would
like to understand this topic. You understand a whole lot its
almost tough to argue with you (not that I actually would want
to…HaHa). You certainly put a new spin on a subject which has been discussed for
years. Wonderful stuff, just great!
I don't even know how I ended up here, but I thought this
post was great. I do not know who you are but definitely you are going
to a famous blogger if you aren't already ;) Cheers!
Heya i am for the primary time here. I came across this board and I to find It truly
helpful & it helped me out a lot. I'm hoping to give one thing back and help others such as you aided me.
Ahaa, its pleasant dialogue regarding this paragraph here at
this website, I have read all that, so now me also commenting at this place.
Great article, just what I needed.
My spouse and I stumbled over here by a different website
and thought I should check things out. I like what I
see so i am just following you. Look forward to going over your web page again.
VB
I truly love your blog.. Very nice colors & theme.
Did you create this website yourself? Please reply back as I'm hoping to create my very own blog and would love to know where you got
this from or just what the theme is called. Many thanks!
Need the perfect print to upgrade your walls?
Your search ends here at PosterHud.com!
We offer a extensive range of top-notch prints that match every preference.
Whether you love movies, classic themes, or modern vibes,
our store has something perfect for you.
Why Choose PosterHud?
? Unique Designs? Vibrant Artwork? Speedy Processing? Affordable Offers? Safe Transactions
Transform Your Room
Upgrade your living room with trendy posters from PosterHud.com.
Our prints is designed on premium-grade canvas to provide sharp clarity.
Order Today!
Act fast – shop PosterHud.com now and refresh
your space with stunning posters!
It is not my first time to pay a quick visit this web site, i am browsing this
website dailly and get fastidious data from here all the time.
YK
Need the ideal print to enhance your space? Look no further at PosterHud.com!
Explore a massive collection of top-notch prints that cater to every
preference. If you're into movies, vintage art, or minimalist looks,
our store has something perfect for you.
Why Choose PosterHud?
? One-of-a-kind Designs? Vibrant Artwork? Quick Delivery? Affordable
Deals? Secure Checkout
Transform Your Room
Personalize your bedroom with trendy posters from PosterHud.com.
Each artwork is crafted on premium-grade canvas to
provide vibrant clarity.
Shop Now!
Grab yours now – explore PosterHud.com right away and refresh your walls with amazing posters!
Thankfulness to my father who told me about this website, this website is actually amazing.
Searching for the best print to transform your walls?
Your search ends here at PosterHud.com!
Explore a extensive collection of top-notch prints that cater to every taste.
If you're into music, classic designs, or contemporary looks, you'll find
just what you need for you.
Why Choose PosterHud?
? One-of-a-kind Designs? Vibrant Print Quality?
Quick Shipping? Affordable Prices? Safe Payments
Customize Your Wall
Enhance your bedroom with trendy posters from PosterHud.com.
Each artwork is crafted on premium-grade materials to provide long-lasting details.
Get Yours Today!
Grab yours now – explore PosterHud.com today and
refresh your walls with beautiful posters!
simontok,
bokep indonesia,
bokep viral,
bokep indo terupdate,
porno,
tautan bokep,
film porno,
bokep terkini,
vidio bokep,
web bokep,
film bokep
bokeb,
video porno,
bokep korea,
bokep indonesia terupdate,
indo bokep,
nonton bokep,
bokep viral indo,
bokep indoh,
bokep live,
bokep abg,
bokep indonesia viral,
website porno,
aplikasi bokep,
bokep india,
indo porn,
bokep indo live,
video bokep jepang,
porno indonesia,
situs bokep indo,
bokep si montok,
bokep cindo,
ling bokep,
lingbokep,
xnxx bokep,
bokep asia,
bokep hd,
indonesia porn,
video bokep indo,
video porn,
unduh bokep,
bokep xnxx,
bokep xxx,
simontk,
si mont0k,
linkbokep.to,
ruangbokep,
bokep online,
video simontok,
bokep31,
That is a very good tip especially to those fresh to the blogosphere.
Short but very accurate info… Thank you for sharing this one.
A must read post!
This article offers clear idea for the new people of blogging, that
actually how to do blogging.
No matter if some one searches for his vital thing,
so he/she needs to be available that in detail, therefore that thing is maintained over here.
Spot on with this write-up, I really believe this amazing site needs a lot more attention. I'll probably
be returning to read more, thanks for the info!
AL
This web site really has all the info I needed
about this subject and didn't know who to ask.
EM
simontok,
bokep indonesia,
bokep viral,
bokep indo terbaru,
porno,
link bokep,
film porno,
bokep terkini,
vidio bokep,
laman bokep,
film bokep
bokeb,
video porno,
bokep korea,
bokep indonesia terupdate,
indo bokep,
nonton bokep,
bokep viral indo,
bokep indoh,
bokep live,
bokep abg,
bokep indonesia viral,
laman porno,
aplikasi bokep,
bokep india,
indo porn,
bokep indo live,
video bokep jepang,
porno indonesia,
laman bokep indo,
bokep si montok,
bokep cindo,
ling bokep,
lingbokep,
xnxx bokep,
bokep asia,
bokep hd,
indonesia porn,
video bokep indo,
video porn,
download bokep,
bokep xnxx,
bokep xxx,
simontk,
si mont0k,
linkbokep.to,
ruangbokep,
bokep online,
video simontok,
bokep31,
You are so awesome! I don't suppose I've read through anything like that before.
So good to discover someone with some unique thoughts on this
issue. Seriously.. thank you for starting this
up. This website is something that is needed on the web,
someone with a bit of originality!
I'm extremely inspired with your writing talents and also with the layout to your weblog.
Is this a paid subject or did you modify it your self?
Either way stay up the nice high quality writing, it's uncommon to peer
a great blog like this one these days..
WR
This is my first time pay a quick visit at here and i am in fact happy to read everthing at one place.
I am extremely impressed with your writing skills as neatly
as with the layout in your weblog. Is that this a paid subject matter or did
you modify it your self? Either way keep up the nice
quality writing, it's uncommon to see a great weblog like this one nowadays..
I'd like to find out more? I'd like to find out more details.
QT
It's perfect time to make some plans for the future and it
is time to be happy. I've learn this publish and if I may I wish to counsel you some attention-grabbing things or suggestions.
Maybe you could write subsequent articles relating to this article.
I wish to learn even more things approximately it!
Discover the Art of Decorating with a Posters Store
Craving a quick and creative design refresh? The answer could be as simple as visiting a local or online posters store.
Whether you're into clean minimalism, bold typography, or dreamy nature shots, posters stores offer something for everyone.
Posters Store Explained: Your Gateway to Wall Art
A posters store is a specialized shop that offers art prints and decorative wall
pieces.
These can range from cinematic posters and motivational quotes to abstract art and vintage maps.
Some posters stores also provide custom printing, making
them a one-stop shop for wall transformation.
Why More People Are Turning to Posters Stores for Decor
Here’s why they’re on the rise:
Low-Cost Transformation: Posters stores are perfect for decorating on a budget without sacrificing taste.
Variety at Your Fingertips: Themes for every room, from
bedrooms to home offices.
Style That Speaks: Change the tone of a room instantly with one bold piece.
Tips for Shopping at a Posters Store Like a Pro
Know Your Space – Measure your wall space and decide where your poster will go.
Choose a Theme or Color Scheme – Posters stores often organize by mood, style,
or palette.
Don’t Forget the Frame – Framing elevates even the simplest poster.
Explore Limited Editions – These are great if you want something less common.
Types of Posters You’ll Find in a Posters Store
Motivational Quotes – Clean fonts, bold statements, perfect for workspaces.
Movie & Music Posters – Great conversation starters.
Nature & Landscape Prints – Soothing visuals for any room.
Abstract & Minimalist Art – These never go out of
style.
Pop Art & Retro Posters – A punch of color and nostalgia.
Your Decor Solution Might Be a Posters Store Away
They give you access to design-forward ideas
without the pressure of overspending.
So whether you're revamping your bedroom, personalizing your dorm, or updating your office space, a posters store
is a smart and stylish place to start.
Discover the Art of Decorating with a Posters Store
Want to give your space a facelift without spending a fortune?
Start with a posters store and watch your room come alive.
From statement pieces to subtle accents, posters stores make it easy to express your
unique style.
Breaking Down the Posters Store Concept
A posters store is a focused space that offers art prints and decorative wall pieces.
You’ll often find options curated by theme,
color palette, or interior style.
Some posters stores also provide limited edition collections, making them a one-stop shop for wall transformation.
Posters Stores: Affordable, Stylish, and On-Trend
Posters stores combine affordability with variety, making them ideal for
almost any space.
Budget-Friendly D?cor: You can deck out an entire room for the price
of one canvas print.
Wide Selection: Posters stores constantly update collections to stay on trend.
Instant Personality Boost: It’s art that fits your mood, your lifestyle,
and your budget.
Posters Store Shopping Guide: What to Know Before You
Go
Know Your Space – Measure your wall space and decide where your poster will go.
Choose a Theme or Color Scheme – Match with your existing d?cor
or build a color story from scratch.
Don’t Forget the Frame – Some posters stores offer matching
frames—grab one for a polished look.
Explore Limited Editions – These are great if you want something less common.
Types of Posters You’ll Find in a Posters Store
Motivational Quotes – Clean fonts, bold statements, perfect for workspaces.
Movie & Music Posters – Great conversation starters.
Nature & Landscape Prints – Soothing visuals for
any room.
Abstract & Minimalist Art – These never go out of style.
Pop Art & Retro Posters – A punch of color and nostalgia.
Wrap-Up: Posters Stores Are the Unsung Heroes of Design
Posters stores are more than just places to grab cheap prints—they’re treasure troves of
creativity.
So whether you're revamping your bedroom, personalizing your dorm, or updating
your office space, a posters store is a smart and stylish place to start.
Transform Any Room on a Budget: Visit a Posters Store Today
Want to give your space a facelift without spending a fortune?
Start with a posters store and watch your room come
alive.
Whether you're into clean minimalism, bold typography, or dreamy nature shots, posters stores
offer something for everyone.
Breaking Down the Posters Store Concept
A posters store is a focused space that offers printed visuals in different themes and sizes.
They may be local boutiques, mall shops, or full-featured online stores.
You can walk in or browse online and come out with an entire gallery wall worth of inspiration.
The Growing Popularity of the Posters Store
Here’s why they’re on the rise:
Affordable Style: Why spend hundreds on artwork when a high-quality poster can make the same impact?
Wide Selection: From pop culture to classic art reprints, you’re never limited.
Instant Personality Boost: Posters let you tell your story visually.
Posters Store Shopping Guide: What to Know Before You Go
Know Your Space – Measure your wall space and decide where your poster will go.
Choose a Theme or Color Scheme – Match with your existing d?cor or build a color story from scratch.
Don’t Forget the Frame – Some posters stores offer matching frames—grab one for a polished look.
Explore Limited Editions – These are great if you want something less common.
What’s Hot in Posters Stores Right Now
Motivational Quotes – Clean fonts, bold statements, perfect for
workspaces.
Movie & Music Posters – Great conversation starters.
Nature & Landscape Prints – Bring a sense of calm and the outdoors inside.
Abstract & Minimalist Art – These never go out of style.
Pop Art & Retro Posters – Fun, vibrant, and full of energy.
Your Decor Solution Might Be a Posters Store Away
Posters stores are more than just places to grab cheap prints—they’re
treasure troves of creativity.
So whether you're revamping your bedroom, personalizing your dorm,
or updating your office space, a posters store is a smart and stylish place to start.
Hi therre juust wanted to give you a brief heads upp
annd let you knoow a feww of tthe imaages aren't loading properly.
I'm not sure wwhy but I think iits a linkng issue.
I've tried iit in twwo different browswrs and bth show the same results.
AC
Discover the Art of Decorating with a Posters Store
Craving a quick and creative design refresh? The answer could be as simple as visiting a local or online
posters store.
These stores are packed with ready-to-frame art that suits every personality and budget.
Posters Store Explained: Your Gateway to Wall Art
A posters store is a specialized shop that offers a wide variety of posters.
These can range from cinematic posters and motivational quotes to abstract art and vintage maps.
Some posters stores also provide framing services, making them a one-stop shop for wall transformation.
Why More People Are Turning to Posters Stores for Decor
Posters stores combine affordability with variety, making them ideal for almost
any space.
Low-Cost Transformation: Posters stores are perfect for decorating on a
budget without sacrificing taste.
Variety at Your Fingertips: Posters stores constantly
update collections to stay on trend.
Instant Personality Boost: It’s art that fits your mood, your lifestyle, and your budget.
Tips for Shopping at a Posters Store Like a Pro
Know Your Space – Think ahead: vertical or horizontal?
One large print or a collage set?
Choose a Theme or Color Scheme – Match with your existing d?cor or build a color story
from scratch.
Don’t Forget the Frame – Some posters stores offer matching frames—grab one for a
polished look.
Explore Limited Editions – These are great if you want something
less common.
What’s Hot in Posters Stores Right Now
Motivational Quotes – Stay inspired every time you walk in the
room.
Movie & Music Posters – Celebrate your favorite films and artists with iconic prints.
Nature & Landscape Prints – Bring a sense of calm and the outdoors inside.
Abstract & Minimalist Art – Clean lines, subtle tones—ideal for modern interiors.
Pop Art & Retro Posters – Fun, vibrant, and full of energy.
Wrap-Up: Posters Stores Are the Unsung Heroes of Design
Posters stores are more than just places to grab cheap
prints—they’re treasure troves of creativity.
Don’t underestimate the impact of a well-chosen poster—it might just become your favorite thing
in the room.
MP
Wow, this paragraph is nice, my sister is analyzing such things,
thus I am going to tell her.
LI
Do you have a spam issue on this site; I also am a blogger, and I was wanting
to know your situation; we have created some nice practices and we are looking to trade solutions with others, be
sure to shoot me an e-mail if interested.
приготовление яств выполняется
в ресторане, molbiol.ru/forums/index.php ?
I truly love your blog.. Very nice colors & theme.
Did you build this website yourself? Please reply back as I'm trying to
create my own personal website and would love to know where you got this from or what the theme is called.
Many thanks!
OH
Важливо, https://subscribe.ru/author/31620590 Щоб в групі були
чоловіки і жінки з схожими інтересами.
I am sure this post has touched all the internet viewers, its really really nice post on building up new weblog.
XF
RW
некоторые торговые онлайн данного сайта вправе приостановить реализацию продукции вплоть до блокировки аккаунта до того часа, https://yarllo .
Have you ever thought about publishing an e-book or guest authoring on other websites?
I have a blog based on the same ideas you discuss and would love to have you share some stories/information. I know
my viewers would enjoy your work. If you are even remotely interested, feel
free to shoot me an e-mail.
hey there and thank you for your info – I have certainly picked up anything new from right here.
I did however expertise some technical issues using this web site, since I experienced to reload the site many times previous to I could get
it to load properly. I had been wondering if your hosting is OK?
Not that I'm complaining, but slow loading instances times
will often affect your placement in google and could damage your high-quality score if
ads and marketing with Adwords. Anyway I am adding this RSS to my e-mail and can look out for much more
of your respective exciting content. Ensure that you update this again very soon.
Thanks for sharing your thoughts on создание
шаблона joomla. Regards
MO
Приветствуем на нашем сайте!
Здесь вы найдете всё необходимое для
управления вашими финансами.
У нас широкий ассортимент финансовых продуктов, которые помогут вам достигнуть ваших целей и обеспечить будущее.
В нашем ассортименте есть различные виды банковских продуктов, инвестиции, страхование, кредиты и многое другое.
Мы постоянно обновляем нашу базу данных, чтобы вы всегда были в курсе последних новостей и инноваций на финансовом рынке.
Наши специалисты помогут вам выбрать лучший
продукт, учитывая ваши индивидуальные потребности
и предпочтения. Мы предоставляем
консультации и рекомендации,
чтобы вы могли принять взвешенное решение и избежать рисков.
Не упустите шанс воспользоваться нашими
услугами и откройте для себя мир финансовых возможностей!
Заходите на наш сайт, ознакомьтесь с каталогом продуктов и начните
путь к финансовой стабильности прямо сейчас!
Деньга в Великом Новгороде
ZE
PP
Hi, I check your new stuff daily. Your story-telling style is awesome,
keep doing what you're doing!
I think that is one of the so much vital information for me.
And i'm satisfied studying your article. However should remark on some common issues, The site
taste is wonderful, the articles is really
excellent : D. Good process, cheers
YN
XY
I seriously love your blog.. Very nice colors & theme. Did you develop this web site yourself?
Please reply back as I'm looking to create my own site and would love to find out where you got
this from or just what the theme is named. Kudos!
KQ
QB
VX
XW
GR
Great goods from you, man. I have consider your
stuff previous to and you are just extremely excellent.
I actually like what you've obtained here, certainly like what you're stating and the way in which
through which you say it. You are making it entertaining and you continue to take care
of to stay it sensible. I can not wait to learn much
more from you. This is actually a tremendous website.
IT
SO
LH
UV
??????????????????????, ??????????????????!
DI
amakids - это лидирующая в рф, как и является наиболее крупной в Европе https://salfetka.at .
TY
FF
I know this if off topic but I'm llooking into
startfing myy o?n weblog ?nd ?аѕ wondering w?at all is nee?ed to
get sett up? I'm assuming having a blog like ?o?rs
wo?ld cot a pretty penny? ?'m not vеry internet savvy so
I'm not 100% positive. Any suggestions ?r advice wo?ld be gr?atly appreciated.
Many thanks
gambling in India is the first and, practically, the only tool of economics, easy
in Indian https://giveme5.co/group/discussions-about-episodes/discussion/306ce4a6-9eed-4fc8-ba53-1b9a2462e640 .
NU
NH
LK
"Yes" or no". however in some bets happens multiple https://reverbnation.com/yejin can help set which team will win the championship before the start of the season.
GR
пропонуємо широкий асортимент кращих будматеріалів
для ремонту і https://italiano.org.ua/tehnologyy-proyzvodstva-besshovnih-trub/ ремонт.
Estrella Mister, Boynton Jr. (2010). "The role of general https://bookmark-dofollow .
PU
JZ
PS
JH
PU
GH
Добро пожаловать на наш веб-ресурс!
Здесь вы найдете все, что нужно
для управления вашими финансами.
У нас есть широкий выбор финансовых продуктов, которые помогут вам достигнуть ваших целей и
обеспечить будущее. В нашем ассортименте представлены
банковские продукты, инвестиции, страхование, кредиты и многое другое.
Мы регулярно обновляем нашу базу данных,
чтобы вы всегда были в курсе последних тенденций и инноваций на финансовом рынке.
Наши специалисты помогут вам выбрать наиболее подходящий продукт, учитывая ваши индивидуальные потребности и предпочтения.
Мы предоставляем консультации и
рекомендации, чтобы вы могли принять взвешенное
решение и избежать рисков.
Не упустите возможность воспользоваться нашими услугами и откройте
для себя мир финансовых возможностей!
Посетите наш сайт, ознакомьтесь с каталогом продуктов и начните путь к финансовой стабильности прямо сейчас!
Все кредитные карты в Уссурийске
HH
I want to to thank you for this very good read!!
I absolutely enjoyed every little bit of it. I have got you saved as a favorite to
check out new stuff you post…
VY
Wow, this piece of writing is good, my sister is analyzing these kinds of things,
therefore I am going to convey her.
ZF
SI
HX
JX
For latest information you have to visit world-wide-web and on internet I found this website as a finest website for most recent updates.
QV
This is a really good tip particularly to those fresh to the blogosphere.
Short but very precise information… Thanks for sharing this one.
A must read post!
TR
WJ
EU
BA
FI
RY
CL
YJ
??????????????????????????, ??????????????????????!
XK
LE
CR
pay attention to the model presented "premium domains" said that the pagerank amount for individual page should
be 1. but doubt difficult, if you use the formula given described above.
VA
JV
AI
????????????????????????????,
??????????????????.
якість роботи саппорта.
?????! ?????????? {?????????????????}
??? Ink-Spa ???? ?????? ??
ink-spa ?????? ???? ??? ???? ?????? ???
??? ??????? ???????? ????? ?????? ?????? ???!
GX
лучший виртуальный хостинг
Appreciate the recommendation. Let me try it out. Classicalmusicmp3freedownload.com/ja/index.php?title=Picotement_Du_Cuir_Chevelu_Et_Perte_De_Cheveux_:_Causes_Traitement_Et_Conseils
Appreciate the recommendation. Let me try it out. Classicalmusicmp3freedownload.com/ja/index.php?title=Picotement_Du_Cuir_Chevelu_Et_Perte_De_Cheveux_:_Causes_Traitement_Et_Conseils
I?m not that much of a internet reader to be honest but your sites
really nice, keep it up! I'll go ahead and bookmark your website to come back later.
Many thanks
LF
ZL
KJ
MV
Great article! That is the type of information that are meant
to be shared across the net. Shame on Google for
no longer positioning this publish higher! Come on over and consult with my site .
Thanks =)
LI
DR
?????? ПРОГОН ХРУМЕРОМ + ГСА ОТ 1500 РУБ./СУТКИ!
??????
? Что мы предлагаем?
* Прогоны веб-сайтов высококачественными методами с использованием профессиональных инструментов
— Хрумера и GSA Search Engine Ranker.
* Получение мощного SEO-эффекта буквально
за считанные дни!
* Безопасность и надежность каждого выполненного заказа.
?? Почему выбирают именно нас?
* Мы работаем прозрачно и открыто, показывая отчетность о проделанной
работе.
* Наши специалисты имеют многолетний
опыт успешного продвижения проектов различной сложности.
* Доступная стоимость услуг — всего от 1500 рублей
в сутки.
?? Какие преимущества получите Вы?
* Рост позиций сайта в поисковых системах Яндекс и Google.
* Увеличение органического трафика и числа целевых посетителей.
* Повышение узнаваемости бренда
и увеличение конверсий.
?????? Время действовать! Сделайте заказ прямо сейчас и убедитесь сами, насколько
эффективен наш метод продвижения.
Запустите ваш сайт в ТОП за минимальные сроки
и бюджет!
Свяжитесь с нами уже сегодня и
узнайте подробности нашего уникального предложения.
Ваш успех начинается здесь и сейчас!
все подробности заказа здесь спрашвайте===>> здесь
Hello! Do you use Twitter? I'd like to follow
you if that would be ok. I'm definitely enjoying your blog and
look forward to new posts.
LF
Someone necessarily lend a hand too make critically postts I might
state. Thiis iis thee first tikme I frequented yourr web page andd tgus far?
I amazed wih the analysis you mawde too creatte this particular post incredible.
Fantastic job!
UU
???? ?? ???? ???? ????? ????? ????? ?????
(100 ???????? ??? ????? 888starz download 888?????).
Hi! This is my first comment here so I just wanted to give a
quick shout out and say I really enjoy reading through your blog posts.
Can you recommend any other blogs/websites/forums that deal with
the same subjects? Thank you so much!
Hello there I am so glad I found your blog page, I really found you by error, while
I was looking on Askjeeve for something else, Regardless
I am here now and would just like to say thank you for a fantastic post and a all
round interesting blog (I also love the theme/design), I don't have time to look over it all at the minute but I have saved it and also included your RSS feeds, so when I have
time I will be back to read much more, Please do
keep up the fantastic work.
hey there and thank you for your information – I've certainly picked up anything new from right
here. I did however expertise several technical issues using this web site,
as I experienced to reload the site a lot of times previous
to I could get it to load properly. I had been wondering if your hosting
is OK? Not that I'm complaining, but sluggish loading
instances times will often affect your placement in google and could damage your quality score if ads and
marketing with Adwords. Well I'm adding this RSS to my e-mail and can look out for much more of your respective exciting content.
Ensure that you update this again very soon.
This site certainly has all of the information I wanted concerning this subject
and didn't know who to ask.
JP
HI
TQ
They have the ability to migrate to damaged areas due to innate tropism controlled by growth
factors, chemokines, https://autismhealthsupport.com/ , and cytokines.
appeared opportunities are often confirmed only by anecdotal evidence, by no means not by https://autismtreatmentfrance.com/ . The
brain has no possibility rewrite or even repair damaged dopamine cells.
QA
WZ
KB
BE
ZB
MQ
MK
YJ
???????????????????????????????????, ???????????????????????????????.
HI
QL
PB
Quite insightful post. Never believed that it was this simple after all.
I had spent a beneficial deal of my time looking for someone to explain this topic clearly and you're the only 1 that ever did that.
Kudos to you! Keep it up
AO
VT
When I initially commented I clicked the "Notify me when new comments are added" checkbox and now
each time a comment is added I get four e-mails with
the same comment. Is there any way you can remove people
from that service? Thank you!
What's up, its nice paragraph on the topic of media print, we all understand media is a fantastic source of facts.
AH
JS
VK
DO
XD
FF
regardless because of this, whether you are an iOS user either you have the android application paripesa very light and can serve on old equipment
without taking up a lot of memory.
CTP milletvekili Devrimci Bar?in, yorumlama maddesinden bu
soruda bahsederken dedi Parabet Y?netim plan?nda zorluklarla kar??la?acakt?r.
NH
It's hard to find knowledgeable people on this
subject, but you seem like you know what you're talking about!
Thanks
VE
HB
These are truly enormous ideas in about blogging. You
have touched some fastidious things here. Any way keep up wrinting.
YJ
TU
IC
HQ
AW
IX
Howdy I am so grateful I found your site, I really found you
by error, while I was looking on Aol for something else, Regardless I
am here now and would just like to say many thanks for a fantastic post and
a all round exciting blog (I also love the theme/design),
I don't have time to browse it all at the minute but I have bookmarked it and
also added your RSS feeds, so when I have time I will be
back to read more, Please do keep up the awesome job.
SN
HZ
If you are going for finest contents like me, simply go to see
this web site every day as it provides feature contents, thanks
MV
Wonderful beat ! I wish to apprentice at the same time as you amend
your web site, how could i subscribe for a blog site? The account aided me a
applicable deal. I were a little bit acquainted of this your
broadcast provided shiny clear concept
Spot on with this write-up, I absolutely believe that this web site needs a great deal more
attention. I'll probably be back again to read through more,
thanks for the advice!
MC
MN
GU
VJ
Биржа крипты — твой ключ к прибыли!
Надежная платформа для торговли криптовалютами с высокой ликвидностью и низкими комиссиями.
Безопасность на высшем уровне.
Регистрация быстрая и простая.
Начни зарабатывать прямо сейчас!
узнать можно больше здесь =>>kra33.at
This website was... how do I say it? Relevant!!
Finally I've found something that helped me. Cheers!
HF
AU
ZO
CO
NE
QT
BG
HX
Howdy! Do you know if they make any plugins to protect against hackers?
I'm kinda paranoid about losing everything I've worked hard on. Any suggestions?
Hey there I am so excited I found your site, I really found you by accident, while I was browsing on Digg for something else,
Anyways I am here now and would just like to say thank you for a fantastic post
and a all round exciting blog (I also love the theme/design), I don’t have time to look over
it all at the minute but I have book-marked it and also added your RSS feeds, so when I have time I will be back to read a great deal more, Please do
keep up the great jo.
For most recent news you have to pay a quick visit world wide web and on world-wide-web I found this web page
as a finest web page for most up-to-date updates.
PS
Spot on with this write-up, I actually believe this amazing
site needs a lot more attention. I'll probably be
back again to see more, thanks for the info!
I’m not that much of a internet reader to be honest but your blogs really nice, keep
it up! I'll go ahead and bookmark your website to come back down the road.
Many thanks
https://gemeinde-cammin.de/
Wow, this paragraph is fastidious, my younger sister is analyzing such things,
therefore I am going to convey her.
Very nice article, just what I wanted to find.
EM
QC
PU
LM
UX
NA
YU
LW
ZI
AI
ZL
IX
EE
ST
KN
RB
SV
OS
XB
IP
TJ
DQ
ZC
GK
BF
CB
WP
AS
YV
IV
DR
GH
DZ
GR
RV
EQ
EW
WE
NL
RF
KW
LF
XP
PU
Hello! This post could not be written any better! Reading
this post reminds me of my good old room mate! He always kept talking about this.
I will forward this article to him. Pretty sure he will have a good read.
Many thanks for sharing!
GX
UN
Great blog here! Also your site loads up very fast!
What host are you using? Can I get your affiliate link to your host?
I wish my website loaded up as quickly as yours lol
CI
OS
DM
UG
QL
UL
NM
ZD
Hello, I think your website might be having browser compatibility issues.
When I look at your blog in Opera, it looks fine but when opening in Internet Explorer,
it has some overlapping. I just wanted to give you a quick heads up!
Other then that, awesome blog!
I am not sure where you are getting your information, but good topic.
I needs to spend some time learning much more or understanding more.
Thanks for great info I was looking for this information for my mission.
Very energetic post, I loved that bit. Will there be a part 2?
That is very attention-grabbing, You're an excessively professional blogger.
I've joined your feed and sit up for searching for extra of
your fantastic post. Also, I've shared your
website in my social networks
Hi everyone, it's my first pay a visit at this web page,
and post is genuinely fruitful designed for me, keep up posting
such posts.
I'm really enjoying the theme/design of your site.
Do you ever run into any browser compatibility issues?
A small number of my blog visitors have complained about my website
not working correctly in Explorer but looks great in Safari.
Do you have any recommendations to help fix this problem?
When I originally commented I clicked the
"Notify me when new comments are added" checkbox
and now each time a comment is added I get three e-mails with the same comment.
Is there any way you can remove people from that service?
Thanks!
I was recommended this blog by my cousin. I'm not sure whether this post is
written by him as nobody else know such detailed about my difficulty.
You're amazing! Thanks!
As the admin of this site is working, no question very shortly it will be renowned, due to
its quality contents.
An impressive share! I have just forwarded this onto a co-worker who had been doing a little research on this.
And he actually bought me breakfast because I stumbled
upon it for him... lol. So allow me to reword this....
Thank YOU for the meal!! But yeah, thanks
for spending some time to talk about this topic here on your web page.
This website was... how do you say it? Relevant!!
Finally I have found something that helped me. Thank you!
I'm really loving the theme/design of your weblog.
Do you ever run into any internet browser compatibility issues?
A handful of my blog readers have complained about my site not operating correctly in Explorer
but looks great in Safari. Do you have any advice to help fix this problem?
It's really a great and useful piece of information. I'm glad
that you simply shared this helpful info with us. Please stay us up to date like this.
Thank you for sharing.
CX
Gran trabajo, me encant?. Pas? por mi blog: chusmeando.com
https://chusmeando.com
You really make it seem so easy with your presentation but
I find this topic to be actually something which
I think I would never understand. It seems too complicated
and extremely broad for me. I am looking forward for your next post, I will try to get the hang of it!
Hey there, You have done an incredible job.
I'll certainly digg it and personally recommend to my friends.
I'm sure they'll be benefited from this website.
I don't even know how I ended up here, but I thought this post was good.
I don't know who you are but certainly you are going to
a famous blogger if you aren't already ;) Cheers!
Wah, informasi soal serangan rudal Iran ke basis militer AS ini benar-benar
mengkhawatirkan. Dunia makin tidak bisa diprediksi.
Konflik semacam ini nggak cuma berdampak pada sektor politik dan militer, tapi juga
sangat berpengaruh ke industri online, termasuk layanan seperti
judi bola online yang memerlukan kestabilan jaringan internasional.
Banyak pengguna judi bola terlengkap yang melaporkan gangguan akses setelah insiden tersebut.
Mungkin karena pengalihan server internasional atau pembatasan internet sementara.
Tapi keren juga sih, beberapa judi bola online terpercaya tetap bisa beroperasi
dengan fitur keamanan tambahan. Ini bukti kalau industri judi bola resmi sudah makin siap menghadapi situasi krisis global.
Semoga konflik ini nggak makin meluas ya, karena dampaknya benar-benar terasa
sampai ke mana-mana. Bahkan aktivitas ringan seperti main di bandar judi bola online pun bisa terganggu kalau
jaringan global ikut lumpuh. Tetap waspada dan semoga semua pihak bisa
menahan diri. Perdamaian lebih penting daripada ego negara
besar!
Terima kasih admin sudah membagikan kabar ini.
Sangat informatif dan membuka wawasan. ??????
Hello, i think that i saw you visited my weblog so i came to “return the favor”.I am
trying to find things to enhance my website!I suppose its
ok to use some of your ideas!!
Hi mates, how is all, and what you want to say about this
article, in my view its actually remarkable designed for me.
https://gizbogamez.buzz/ https://gizbogamez.buzz/
Hi mates, how is all, and what you want to say about
this article, in my view its actually remarkable designed
for me. https://gizbogamez.buzz/ https://gizbogamez.buzz/
Hi mates, how is all, and what you want to say about this article, in my view its actually remarkable designed
for me. https://gizbogamez.buzz/
Right here is the right blog for everyone who really wants to find out about
this topic. You understand so much its almost hard to
argue with you (not that I actually will need to…HaHa).
You certainly put a fresh spin on a subject that has been discussed
for years. Great stuff, just great!
Hello there! I know this is kinda off topic however I'd figured I'd ask.
Would you be interested in trading links or maybe guest
writing a blog article or vice-versa? My site addresses a lot of the same topics as yours and I
believe we could greatly benefit from each other.
If you happen to be interested feel free to shoot me an e-mail.
I look forward to hearing from you! Terrific blog by the way!
Pin Up Casino — гейминг, атмосфера и доверие в
одной системе
pin up казино pin up казино сайт — это современное онлайн-казино, получившее интерес игроков из всего
мира. Благодаря широкому выбору игр, казино Пин Ап предлагает все возможности для насыщенного
игрового процесса.
Казино Пин Ап — вход в игровой мир
Став флагманом рынка, пин ап казино предлагает доступ к:
- популярным автоматам;
- рулетке;
- щедрым розыгрышам.
Официальный сайт Pin Up Casino оформлен в винтажном дизайне, который выделяет
проект. Меню проста, а интерфейс подходит
даже пользователям без опыта.
pin up casino официальный сайт — доступен всегда
Зайти на pin up казино официальный можно круглосуточно
— сайт доступен для смартфонов.
Если доступ ограничен, вы можете использовать рабочее зеркало pin up casino, чтобы войти без перебоев.
На портале доступны:
- топовые слоты;
- режим с живыми дилерами;
- промокоды за регистрацию;
- служба поддержки 24/7.
Дополнительно вы можете скачать Пин Ап Казино и
играть в дороге, на смартфоне. Мобильная версия удобна и дублирует браузерную версию.
Почему выбирают пин ап казино?
pin up — это:
- надежность;
- честные розыгрыши;
- разнообразие форматов;
- VIP-статусы.
Игроки рекомендуют Pin-Up Casino за качество обслуживания, а
официальный портал — за инновационные
решения.
IX
As a physician specializing in internal medicine and clinical
pharmacology, I've always been keenly aware of the impact that the right nutrients can have on our health.
This understanding led me to create Global Health Treasures, an online store
that aims to bring together the best dietary supplements available.
Each product in our collection has been meticulously selected for its
potential to support various aspects of health and wellness.
At Global Health Treasures, we go beyond merely selling supplements.
We believe in empowering our customers with knowledge and providing personalized
health consultations. These consultations are conducted by experts who help you choose the right supplements
based on your unique health needs and goals.
Our commitment to quality and customer education sets us apart in the crowded world of
dietary supplements. Whether you are looking to boost your immune system,
improve your metabolic health, or just maintain overall wellness, Global Health Treasures is your trusted partner in achieving better health.
Visit us today to explore our top-tier selection and start your journey to a healthier you.
GT
NY
Ahh, its good conversation about this article at this place at this webpage, I have read all that, so now me also commenting
here.
OV
I visit daily a few web sites and websites to read articles,
except this web site presents quality based posts.
Hello There. I found your weblog the usage of
msn. This is an extremely smartly written article. I'll
be sure to bookmark it and return to learn more of your useful info.
Thanks for the post. I will definitely return.
Everyone loves what you guys tend to be up too. This
kind of clever work and exposure! Keep up
the fantastic works guys I've added you guys to my blogroll.
KW
Hello There. I found your blog the usage of msn. This is an extremely neatly written article.
I'll be sure to bookmark it and return to read extra of your useful info.
Thanks for the post. I'll definitely return.
Wow, wonderful blog structure! How long have you been running
a blog for? you made running a blog glance easy. The whole glance of your web site is great, let alone the
content material!
That is a great tip especially to those new to the blogosphere.
Brief but very accurate information… Many thanks for
sharing this one. A must read article!
GR
Useful information. Lucky me I found your website by chance, and
I'm surprised why this twist of fate did not took place earlier!
I bookmarked it.
Wonderful post! We will be linking to this particularly great content on our site.
Keep up the good writing.
NI
ZP
tamhalekhded
An impressive share! I've just forwarded this onto a
co-worker who has been conducting a little research on this.
And he actually ordered me breakfast due to
the fact that I stumbled upon it for him... lol. So let
me reword this.... Thanks for the meal!! But yeah, thanks for spending time to discuss this
issue here on your blog.
E2Bet Pakistan
Blog Comment: Finally, a platform that caters to Pakistani cricket fans!
E2Bet has everything—live matches, instant
betting options, and unbeatable odds. Loving the experience so far!
Hello There. I found your blog using msn. This is an extremely well written article.
I will make sure to bookmark it and return to read more of
your useful info. Thanks for the post. I'll certainly
return.
The other day, while I was at work, my sister stole my iphone and tested to
see if it can survive a twenty five foot drop, just so she can be a youtube sensation. My apple ipad is now
broken and she has 83 views. I know this is completely off topic but
I had to share it with someone!
YP
There’s this player I met who’s crazy about online gambling.
He’s living in Texas now, but his mom is originally from a small Russian town. He’s got a boyfriend and
they both love hitting the virtual slots.
What’s funny is he’s obsessed with Putin — says he thinks feminine guys are “supposed” to like
him. Not sure I get it, but hey, people are unique like that.
One thing’s for sure — he’s on a lucky streak when it comes to online casinos!
By the way, I found this site — definitely worth
a shot
Truly no matter if someone doesn't be aware
of then its up to other viewers that they will help, so
here it happens.
Everything is very open with a clear description of the issues.
It was really informative. Your website is extremely helpful.
Thanks for sharing!
Thank you, I have just been searching for information approximately this topic for a while
and yours is the greatest I've discovered till now.
However, what concerning the conclusion? Are you sure concerning the source?
I loved as much as you'll receive carried out right here.
The sketch is tasteful, your authored material stylish.
nonetheless, you command get bought an shakiness over that you wish be delivering the following.
unwell unquestionably come further formerly again as exactly the same nearly very often inside case you
shield this hike.
I'm no longer certain the place you are getting your info, but good topic.
I must spend a while studying much more or working out more.
Thank you for magnificent information I was searching for this
info for my mission.
DV
Web3 Information Platform Kaito!
The ultimate AI-powered Web3 information platform you need to turn terabytes of unstructured information into actional insights.
Get 150 USDT bonus for all users who use Desktop Version 2 weeks!
DEMO FOR WINDOWS
memek phising memek xnxx
WOW just what I was looking for. Came here by
searching for Zetel reinigen Wuustwezel
Simply desire to say your article is as astounding.
The clarity for your submit is just great
and that i can think you're an expert in this subject.
Well together with your permission allow me to seize
your feed to keep updated with impending post. Thanks a million and please continue the enjoyable work.
Great post! I’ve been exploring different adult sites lately, and https://lowes-survey.co/ ] really
stands out. The HD video quality, regular updates, and
wide range of categories—from amateur to fetish—make it one of
the best free porn sites online. I appreciate how easy it is
to navigate and find exactly what I’m in the mood for. Looking forward to more recommendations like this
Hi there! This is my first comment here
so I just wanted to give a quick shout out and say I genuinely enjoy
reading your articles. Can you recommend any other blogs/websites/forums that cover
the same topics? Thanks a lot!
abusescamdark webcasino spamngentot
Does your blog have a contact page? I'm having problems locating it but, I'd
like to shoot you an email. I've got some recommendations for your blog you might be interested in hearing.
Either way, great blog and I look forward to seeing
it develop over time.
I enjoy what you guys are up too. This type of clever
work and exposure! Keep up the great works guys I've you guys to my blogroll.
You actually make it seem so easy with your presentation but I find this matter to be actually something which I think I would never understand.
It seems too complicated and extremely broad for me.
I'm looking forward for your next post, I'll try to get the hang of it!
suspicioustante sangecasino spamdangerous sitedark web
dangerous sitegay pornsitus pornoabusegay porn
Hi superb blog! Does running a blog like this require a large
amount of work? I have absolutely no expertise in coding but I had been hoping to start
my own blog soon. Anyhow, if you have any suggestions
or techniques for new blog owners please share. I know this is off subject
nevertheless I just needed to ask. Thanks!
Magnificent website. Plenty of useful info here. I am sending it to a few pals
ans also sharing in delicious. And of course,
thank you for your sweat!
Howdy would you mind letting me know which web host you're utilizing?
I've loaded your blog in 3 completely different internet browsers and I must
say this blog loads a lot quicker then most. Can you recommend
a good hosting provider at a reasonable price?
Thank you, I appreciate it!
I constantly spent my half an hour to read this blog's articles daily along with a mug of coffee.
WC
Remarkable! Its actually amazing article, I have got much clear idea concerning
from this piece of writing.
Just desire to say your article is as astonishing. The clearness to your
publish is simply great and that i could assume you are knowledgeable on this
subject. Fine with your permission allow me to clutch your
RSS feed to keep up to date with coming near
near post. Thank you 1,000,000 and please carry on the gratifying work.
Write more, thats all I have to say. Literally, it seems as though you
relied on the video to make your point. You obviously know what youre talking about, why
throw away your intelligence on just posting videos to your site when you could be giving
us something informative to read?
belka-digital
We are a group of volunteers and opening a new scheme in our community.
Your website provided us with valuable info to work on. You have done an impressive job and our whole community will be grateful to you.
This is a topic that is close to my heart... Thank you!
Exactly where are your contact details though?
Stream live Cricket and Football events online.
Stay updated with upcoming matches, highlights, and schedules.
Join the excitement with E2BET today!
Have you ever thought about writing an ebook or guest authoring on other blogs?
I have a blog based on the same ideas you discuss and would really like to have you share
some stories/information. I know my readers would value your work.
If you are even remotely interested, feel free
to send me an e-mail. https://gizbogamez.buzz/
Have you ever thought about writing an ebook or guest authoring on other blogs?
I have a blog based on the same ideas you discuss and would really like to have you
share some stories/information. I know my readers would value your work.
If you are even remotely interested, feel free to send me an e-mail.
GO
KM
I've learn several excellent stuff here. Certainly worth bookmarking for revisiting.
I wonder how a lot attempt you put to create this kind of great informative website.
QC
MD
Helpful info. Lucky me I discovered your website by chance, and I'm shocked why this twist of fate did not
took place earlier! I bookmarked it.
FV
Усильте позиции сайта быстро и эффективно!
Закажите прогон Хрумером и ГСА по супернизкой цене —
гарантия роста трафика и улучшения SEO-показателей вашего ресурса.
Только проверенные базы и индивидуальный подход
к каждому проекту.
Увеличьте посещаемость и прибыль прямо
сейчас! больще ифрмации можно получить
здесь ===> ЗДЕСЬ
Hey just wanted to give you a quick heads up. The words in your content seem to be running off the
screen in Firefox. I'm not sure if this is a formatting issue or something
to do with web browser compatibility but I thought I'd post to let you know.
The design and style look great though! Hope you get the problem fixed soon. Cheers
This design is steller! You definitely know how to keep
a reader entertained. Between your wit and your videos, I was almost moved to
start my own blog (well, almost...HaHa!) Wonderful job.
I really loved what you had to say, and more than that, how you presented it.
Too cool!
I really like it when folks get together and share ideas.
Great blog, stick with it! https://vovan-gameecho.top/
Howdy! I know this is somewhat off topic but I was wondering which blog platform are you using for this website?
I'm getting fed up of Wordpress because I've had problems with hackers and
I'm looking at alternatives for another platform.
I would be awesome if you could point me in the direction of a
good platform.
Good answer back in return of this difficulty with real arguments and telling
the whole thing regarding that.
Wow, this article is good, my sister is analyzing these things, therefore I am going to tell her.
Усильте позиции сайта быстро и эффективно!
Закажите прогон Хрумером и ГСА по супернизкой цене — гарантия роста трафика и улучшения SEO-показателей вашего ресурса.
Только проверенные базы и индивидуальный подход к каждому проекту.
Увеличьте посещаемость и прибыль
прямо сейчас! больще ифрмации можно получить здесь ===> ЗДЕСЬ
Aw, this was an exceptionally nice post. Taking a few minutes
and actual effort to make a top notch article…
but what can I say… I hesitate a lot and don't seem to get anything done.
ZL
Very good blog post. I absolutely appreciate this website.
Thanks!
Excellent blog here! Also your web site lots up very fast!
What host are you the usage of? Can I get your affiliate hyperlink for your host?
I desire my site loaded up as fast as yours lol.
AV
??? is open 24/7 to support you warmly whenever you need it most.
Every weekend i used to go to see this website, because i want enjoyment, since this this website conations
genuinely good funny data too.
Hello to every one, it's really a pleasant for me to visit this web site, it includes precious Information.
This excellent website truly has all of the information I needed about this subject and didn't know who to ask.
HX
Hello, its pleasant paragraph concerning media print, we all know
media is a great source of data.
I've been surfing online more than three hours today, yet I
never found any interesting article like yours. It's pretty worth enough for me.
Personally, if all web owners and bloggers made good content
as you did, the internet will be a lot more useful than ever before.
Genuinely no matter if someone doesn't be aware of afterward its up to other visitors that
they will help, so here it happens.
CR
LS
Hi my loved one! I want to say that this article is
awesome, great written and include almost all vital infos.
I'd like to see more posts like this .
QR
This is a very good tip especially to those fresh to
the blogosphere. Brief but very accurate information… Thanks for
sharing this one. A must read post!
Very great post. I simply stumbled upon your blog and wanted to say that I've truly loved surfing
around your weblog posts. In any case I will be subscribing to your rss feed and I am hoping you write once more very
soon!
???????? ?? ?? ??? ? ???? ??????.
Generally I don't read post on blogs, however I wish to say that this write-up very
compelled me to take a look at and do it! Your writing taste has been amazed me.
Thank you, quite nice article.
CH
SP
VI
IZ
DY
GY
Very shortly this website will be famous amid all blogging viewers, due
to it's fastidious content
Hmm it appears like your site ate my first comment (it was super long) so I
guess I'll just sum it up what I had written and say, I'm thoroughly enjoying your blog.
I too am an aspiring blog writer but I'm still new to the whole thing.
Do you have any tips for beginner blog writers?
I'd genuinely appreciate it.
GQ
Great post! I appreciated going through this.
It's so insightful to see content on Naruto. Speaking
of Naruto, I was just looking for a new Naruto Vinyl the other day.
It reminds me of how much fun it is to collecting Naruto Way of the Ninja Cards.
Are you into Naruto Diamond Painting? They're really relaxing.
And for true fans, the Naruto Nine Tails Contact Lenses are amazing for cosplay!
I was also wondering the Naruto Sushi Menu. Always enjoy
a good Naruto themed meal.
For those who love deep lore, reading Naruto Chapter
637 is a great idea. Or if you're into custom content,
design your own Naruto character using an AI Naruto Generator could be exciting.
The discussion about Blind Wave Naruto was particularly interesting.
And speaking of gaming, Naruto Ultimate Ninja Storm IPA are
always sought after.
Keep up the great work! Can't wait for your upcoming
post on Naruto. Maybe you'll cover Naruto Vs Bleach KBH next!
UE
HR
OB
EH
Greate pieces. Keep writing such kind of information on your blog.
Im really impressed by your site.
Hi there, You've performed an excellent job. I will certainly digg it and individually
recommend to my friends. I am confident they'll be benefited from this web site.
?????? ??? ???? ?????.
HW
AN
GM
OI
PD
TG
AU
Great post! I really enjoyed reading this.
It's so insightful to see content about Naruto.
Talking about Naruto, I was just looking for a new Naruto Akatsuki Snuggie the other day.
It reminds me of how much fun it is to collecting Naruto cards list.
Have you ever tried Naruto Paint by Numbers? They're super relaxing.
And for dedicated fans, the Contact Lenses Naruto are amazing for cosplay!
It made me think about the Naruto Sushi Bar. I always love a good Naruto themed meal.
If you're into deep lore, reading Naruto Chapter 637 is a
must. Or if you're into custom content, turn my picture into a naruto character using an AI Naruto Generator
could be exciting.
The discussion about Blind Wave Naruto was especially thought-provoking.
And speaking of gaming, Gamecube Naruto Clash
of Ninja 2 Cheats are always useful.
Keep up the great work! Can't wait for your upcoming post on Naruto.
Maybe you'll cover Reborn into Naruto World with Tenseigan next!
OZ
HD
UP
CP
XG
Hi, this weekend is fastidious in support of me, for the reason that this time i am reading this enormous informative paragraph here at my house.
LI
I loved as much as you'll receive carried out right here.
The sketch is attractive, your authored material stylish.
nonetheless, you command get got an shakiness over that you wish be delivering the following.
unwell unquestionably come further formerly again as exactly the same nearly a lot
often inside case you shield this increase.
KW
NZ
For women seeking something deeper than relaxation,
????????? is the space you’ve been looking for.
JV
IY
LQ
KJ
HL
NW
You actually make it appear so easy together with your presentation however I in finding
this topic to be really something which I feel I might by no means understand.
It sort of feels too complex and very large for
me. I'm taking a look forward for your subsequent publish, I'll
attempt to get the hang of it! https://gizbo-777-jackpot.top/
PC
SY
SD
TW
IM
KS
????? ???? ???? ??? ?? ?
?? ????.
TG
SS
???? ???? ??? ??? ?? ???? ???? ?????.
ZD
QB
WS
AE
PP
DY
I am really enjoying the theme/design of your site.
Do you ever run into any internet browser compatibility issues?
A handful of my blog readers have complained about my website
not working correctly in Explorer but looks great in Chrome.
Do you have any tips to help fix this issue?
RN
From the lighting to the music, from the warmth of the room to the therapist’s soft-spoken voice, everything at ??????? was designed to
create a sanctuary of peace that lingered in my soul long after I
left.
XR
?????? ??? ???? ?? ???? ???.
EG
GY
LF
KA
QC
YZ
RT
GS
QH
OU
DT
RV
QC
BN
VV
Vovan Casino — не просто казино, а настоящий клуб
удачи. Здесь всё работает на результат: от удобной навигации до моментального вывода средств.
Воспользуйся возможностью — актуальное зеркало Vovan casino — и открой для себя всё, что может предложить качественное казино.
Игровой арсенал Vovan Casino поражает:
от легендарных слотов до карточных баталий с живыми
дилерами. Каждый запуск автомата — шанс на крупный выигрыш.
Регулярные акции, розыгрыши и VIP-программы
Мобильная версия работает на всех устройствах
Обращайся в любое время — тебе
всегда помогут
Если ты ценишь надёжность, комфорт и выигрышные возможности
— Vovan Casino станет идеальным выбором https://roslodka.ru/
WT
Hello, Neat post. There is an issue along with your website in web
explorer, might test this? IE nonetheless is the market leader and a large portion of people will omit
your excellent writing due to this problem.
Awesome post! I really enjoyed reading this. It's always
insightful to see content on Naruto. Talking about Naruto, I was
just looking for a new Naruto Z Xv the other
day. It reminds me of the experience of collecting Naruto Way of the Ninja Cards.
Have you ever tried Naruto Paint by Numbers?
They're super relaxing. And for true fans, the Pain Contact
Lenses Naruto are amazing for cosplay!
I was also wondering the Kani Naruto Roll. I always love a good shinobi-inspired
meal.
If you're into deep lore, checking out Naruto Chapter 407 Read Online is a
great idea. Or if you're into custom content, pilot naruto using an Naruto
AI Voice could be exciting.
The discussion about Blindwave Naruto was especially thought-provoking.
And speaking of gaming, Naruto Rise of a Ninja ROM are still sought after.
Love your content! Can't wait for your upcoming post on Naruto.
Maybe you'll cover Naruto I Traveled with a Max Level Account
next!
VJ
BJ
Hi there! Do you know if they make any plugins to safeguard
against hackers? I'm kinda paranoid about losing everything I've worked hard on. Any tips?
NZ
UN
IC
VF
SY
Its like you read my mind! You appear to know a lot about this, like you wrote the book in it or something.
I think that you could do with a few pics to drive the message home a little bit, but other than that,
this is magnificent blog. A fantastic read. I will definitely
be back.
OU
JK
This text is worth everyone's attention. When can I find out more?
XM
I am regular visitor, how are you everybody? This piece of writing posted at this web site
is in fact pleasant.
BR
Hey There. I found your blog using msn. This is an extremely
well written article. I'll be sure to bookmark
it and return to read more of your useful info. Thanks for the
post. I will certainly comeback.
E2Bet
Blog Comment: If you’re a cricket fan in Pakistan, E2Bet is the platform for you.
They cover all major tournaments with detailed betting options.
My go-to website for cricket betting!
HV
PI
KA
EJ
NL
El video ha generado una ola de comentarios y reacciones sorprendidas en redes sociales.
TD
FG
BW
EC
QU
EK
VY
UG
GS
You can definitely see your enthusiasm in the work you write.
The world hopes for more passionate writers such as you who are not afraid to say how they believe.
Always go after your heart.
MD
QG
XV
FW
AD
NH
BR
??? ????? ?? ??? ?? ?????????, ??? ??? ? ?? ?? ????.
MB
TI
LT
???? ???? ?? ?? ??? ? ?? ?????.
YE
Hi would you mind sharing which blog platform you're
using? I'm planning to start my own blog soon but I'm having a hard time choosing between BlogEngine/Wordpress/B2evolution and Drupal.
The reason I ask is because your design and style seems
different then most blogs and I'm looking for something unique.
P.S Apologies for getting off-topic but I had
to ask!
PR
AW
IQ
BD
RD
CU
TU
UW
HK
QX
NK
OE
FP
PO
CJ
JU
Доброго времени суток, форумчане!
Сегодня я решил затронуть важную тему
— гид по Испании: что посмотреть и как добраться.
Давно интересуюсь этой страной
и собрал несколько важных советов и наблюдений, которыми хотел бы рассказать с вами.
Уверен, что эта информация будет интересна тем, кто готовит своё путешествие или просто хочет узнать
больше об Испании.
Испания — это страна ярких контрастов и
изысканной культуры, поэтому первым советом будет обратить внимание сочетанию городов и природы.
Необходимо не упустить возможности посетить [b]Барселону[/b] с её
особенной архитектурой Гауди
и средиземноморским шармом, а также [b]Гранаду[/b] с
знаменитым дворцом Альгамбра.
Не стоит забывать и о гастрономии: тапас и сангрия обеспечат полноценное
культурное погружение. Нередко путешественники заблуждаются,
ограничиваясь лишь столицей Мадридом, но Испания даёт намного более богатый
опыт, включая уютных деревень до популярных пляжей Коста-Брава.
В заключение, хочется отметить, что поездка по
Испании может быть крайне насыщенной и разнообразной,
если хорошо продумать маршрут и обратить внимание деталям.
А как вы полагаете? Что можете сказать по этому поводу?
Будет интересно услышать ваше мнение и прочитать ваши истории путешествий по
этой замечательной стране.!
hotelsspain.ru
IX
GM
VD
ZX
TD
XS
I walked into ???? out of curiosity and walked out delighted.
LK
GR
Hi, I would like to subscribe for this webpage to take most up-to-date updates,
thus where can i do it please help out.
IO
TQ
KZ
Even during tough days, ????????? helps me bounce back.
I do not know whether it's just me or if everyone else experiencing issues with your site.
It appears as though some of the text on your content are running off the
screen. Can someone else please provide feedback and let me know if this is happening to them too?
This could be a issue with my internet browser because I've had this happen before.
Kudos
EP
GS
AR
I never realized how tired I was until I experienced the healing at ?????????.
UV
AG
GD
HJ
GR
UD
WP
FH
Heya i am for the primary time here. I came across this board and I find It really useful & it helped me out much.
I am hoping to offer something again and aid others
like you helped me.
YE
US
???? ??? ????? ???
? ???, ???????? ?? ???? ?? ?????.
WC
YV
NS
YY
BA
ZZ
LI
JW
NF
QP
?? ??? ?? ??? ??, ???? ??? ?????.
?? ??????.
JD
Every visit to ????????? is a gift
I give to myself, and it always feels worth it.
Its like you learn my mind! You appear to know so much approximately this, like you wrote the guide in it or something.
I feel that you just can do with some percent to drive the message house a bit, however other than that,
that is great blog. A great read. I'll certainly
be back.
DZ
The massage at ????? gently eased even my emotional
fatigue. I left feeling much lighter.
I love your blog.. very nice colors & theme.
Did you make this website yourself or did you hire someone to do it for
you? Plz answer back as I'm looking to create my own blog and would like to know where u got
this from. kudos
Hi there! I know this is kinda off topic however
I'd figured I'd ask. Would you be interested in trading links or maybe guest writing a
blog article or vice-versa? My site addresses a lot of the same subjects as yours and I believe we could greatly benefit from each other.
If you happen to be interested feel free to send me an email.
I look forward to hearing from you! Fantastic blog by the way!
FW
RB
IC
The professionalism at ??? truly impressed me.
GM
Excellent way of explaining, and nice post to take facts
concerning my presentation focus, which i am going to convey in school. jobteck.com/companies/russiany-diplomix/
Excellent way of explaining, and nice post to take facts concerning my presentation focus,
which i am going to convey in school. jobteck.com/companies/russiany-diplomix/
Excellent way of explaining, and nice post to take facts concerning my presentation focus,
which i am going to convey in school.
Everything is very open with a precise description of the issues.
It was truly informative. Your site is very helpful. Thank you for sharing!
JB
My brother bookmarked this site for me and I have been going through
it for the past couple hours. This is really going to
aid me and my friends for our class project. By the way,
I enjoy the way you write.
RL
CV
KQ
UB
JO
You won’t find better service than at ?????????.
Hey there! This is kind of off topic but I need
some help from an established blog. Is it difficult to set up your own blog?
I'm not very techincal but I can figure things out pretty quick.
I'm thinking about making my own but I'm not sure where to start.
Do you have any ideas or suggestions? Many thanks
HB
CL
My brother recommended I might like this blog. He was entirely right.
This post truly made my day. You can not imagine just how
much time I had spent for this information! Thanks!
JK
Cuevana 3 es una plataforma gratis para ver
pel?culas y series online con audio espa?ol latino o subt?tulos.
No requiere registro y ofrece contenido en HD.
???? ?? ??? ??? ???, ?????????? ???
??? ???? ? ????.
?? ???? ???? ‘?’? ???
?????????? ?? ?? ????.
???? ???, ???, ??? ? ???? ????,
???, ??????, ??? ? ???
?? ????? ??? ?????.
???? ???? ??? ? ?? ???
??? ???? ???????.
Wonderful blog! I found it while surfing around on Yahoo News.
Do you have any suggestions on how to get listed
in Yahoo News? I've been trying for a while but I never seem to get there!
Many thanks
CZ
??? ?? ??? ??? ?????????????.
NA
My experience at ???? was relaxing, fun, and unforgettable.
VL
Хотите вывести ваш сайт на первые
позиции поисковых систем Яндекс и Google?
Мы предлагаем качественный линкбилдинг
— эффективное решение
для увеличения органического трафика и
роста конверсий!
Почему именно мы?
- Опытная команда специалистов, работающая исключительно белыми методами SEO-продвижения.
- Только качественные и тематические доноры ссылок, гарантирующие стабильный
рост позиций.
- Подробный отчет о проделанной работе и прозрачные условия сотрудничества.
Чем полезен линкбилдинг?
- Улучшение видимости сайта в поисковых системах.
- Рост количества целевых посетителей.
- Увеличение продаж и прибыли вашей компании.
Заинтересовались? Пишите нам в личные сообщения — подробно обсудим ваши цели и предложим
индивидуальное решение для успешного продвижения
вашего бизнеса онлайн!
Цена договорная, начнем сотрудничество прямо
сейчас вот на адрес ===>>> ЗДЕСЬ Пишите обгаварим все ньансы!!!
There's certainly a great deal to find out
about this topic. I love all the points you have made.
HC
FQ
After a long day full of tension, the detailed women-only massage at ????? helped restore
my energy.
This website was... how do I say it? Relevant!! Finally I have found something which helped
me. Many thanks!
FB
NP
Everything was smooth and clean during my visit to ?????.
??????????? ???? ??? ?? ??? ??
??? ?? ????.
?? ?? ?? ??? '? ??'??? ??? ???????? ?? ??? ?? ?? ?? ? ??
??? ????.
It’s rare to find a place that nurtures both body
and heart, but ????????? did exactly that.
The moment you enter ???, you’ll feel the stress leave your body.
??? ????? ???? ? ??? ??, ?? ?? ???????????.
?? ?????? ???? ??? ??? ??? ??
??? ??? ???????.
I am extremely impressed along with your writing abilities
and also with the structure in your blog. Is that this a paid theme or did you customize it your self?
Either way keep up the excellent quality writing, it's uncommon to look a nice weblog like this one nowadays.. https://sport.sevastopol.su/pgs/igray_v_ramenbet___bustro__chestno__azartno.html
??? ??, ?? ???, ?? ?? ??? ?? ? ??? ?????????? ???
?? ? ??? ? ?? ??????.
??? ????? ???? ?????? ????.
???? ?? ?? ???? ????, ?????? ???????? ?? ?????.
What's up, constantly i used to check blog posts here in the early hours in the morning, because i enjoy to learn more and more.
Hey there! I just wanted to ask if you ever have any
trouble with hackers? My last blog (wordpress) was hacked and I ended up losing a few months
of hard work due to no data backup. Do you have
any methods to prevent hackers? https://vovangames-lucky.top/
It was a rare moment where I could focus entirely on myself.
????????? brought much-needed balance back to my life.
Every woman deserves an experience like ?????.
You are so interesting! I do not think I
have read something like this before. So nice to discover someone with some
unique thoughts on this subject. Seriously.. thank you for starting this up.
This web site is one thing that's needed on the web, someone with a bit of originality!
??? didn’t just relax me — it restored me.
NF
WV
RN
KQ
VK
NL
IZ
PG
RF
TH
RL
CG
YV
WA
ED
LJ
AW
AM
XJ
OE
YA
LQ
LD
IT
PJ
WG
FX
BM
GW
BQ
TV
??? ?? ?? ????, ????????? ?? ? ???? ??? ?????.
VG
BE
MH
BL
JD
IO
DA
KV
EK
KF
QD
PE
BK
LK
PD
YX
CL
QK
PK
ZY
OP
RD
ZG
MA
LM
JL
RI
FJ
OM
YJ
ME
HB
TP
VG
Stream live Cricket and Football events online.
Stay updated with upcoming matches, highlights, and schedules.
Join the excitement with E2BET today!
YU
EG
HX
??? ???? ??? ??? ??? ?
?? ??????. ?????????? ?? ?? ??? ????.
FG
LG
I’ll definitely be returning to ????? again.
KW
?? ? ?? ??, ???? ??? ?? ????.
?? ??????.
SM
HE
VW
DN
PG
HO
FW
ZF
YM
XB
PX
GQ
MD
PG
ZC
BZ
TM
US
QT
EO
XM
NG
CB
GM
PE
RP
UO
I couldn’t stop smiling after ???????.
NO
FH
RU
GX
ZB
LC
I have read some just right stuff here. Definitely price bookmarking
for revisiting. I wonder how a lot attempt you set to make such a wonderful informative website.
JQ
NQ
QX
Excellent article. Keep writing such kind of information on your site.
Im really impressed by it.
Hello there, You've performed a great job. I will certainly digg
it and in my opinion suggest to my friends.
I'm confident they'll be benefited from this site.
WK
LJ
RC
FY
BN
The care at ????? went beyond my expectations.
?? ?????? ???? ??? ??? ???
?? ??? ??? ???????.
Whenever I feel weighed down, I think of ?????.
I didn’t know women-only massage could be this comforting.
SJ
JR
WY
QI
KX
JL
ZE
GG
JR
DG
PV
EC
WM
TZ
TX
Whenever exhaustion hits you, ??? is your personal sanctuary
from the chaos of daily life.
VQ
QJ
DQ
ID
RB
UV
TB
HW
MX
GM
EJ
QZ
??? gave me the mental break I desperately needed.
QZ
Very nice post. I just stumbled upon your weblog and wanted to mention that I
have truly loved browsing your weblog posts.
After all I'll be subscribing for your rss feed
and I am hoping you write again very soon!
RE
EC
OS
KR
Remarkable things here. I am very glad to look your article.
Thank you a lot and I'm looking ahead to contact you.
Will you kindly drop me a mail?
Every woman deserves an experience like ?????.
DA
YJ
BH
QT
Hi colleagues, its fantastic paragraph on the topic of tutoringand fully explained, keep it up all the time.
RC
AU
II
MW
PM
AI
What's up, the whole thing is going sound here and ofcourse
every one is sharing facts, that's really excellent, keep up writing.
OH
EH
EH
ZC
This Wix SEO service really helped my site climb up the Google rankings.
BU
MI
HS
BT
??? ?? ??? ?? ???? ???? ??? ??? ??????.
ZB
XD
Women deserve a place like ???, where privacy and professionalism meet in perfect harmony.
?? ???? ??? ??? ????.
?????.
PV
Both my tired muscles and heavy heart were eased by the women-only massage at ?????.
I'm gone to tell my little brother, that he
should also pay a visit this web site on regular basis to get updated from most recent reports.
QE
Magnificent goods from you, man. I have understand your
stuff previous to and you are just too magnificent.
I actually like what you've acquired here, certainly
like what you are stating and the way in which you say it. You make it enjoyable and
you still take care of to keep it smart. I can not wait to read far more from you.
This is really a terrific site.
Hi, for all time i used to check website posts here early in the morning, as
i enjoy to gain knowledge of more and more.
There is limited specific research on interactions
between prednisolone acetate ophthalmic drops and
Cordyceps sinensis mushroom extract.
24?? ?? ?? ?? ???? ??? ??? ???
??? ???? ?????. ?? ??????.
?? ? ?? ?? ?? ?????, ???????
??? ????? ?????.
Wow, that's what I was exploring for, what a stuff!
present here at this blog, thanks admin of this site.
I am really enjoying the theme/design of your site.
Do you ever run into any internet browser compatibility issues?
A few of my blog readers have complained about
my site not operating correctly in Explorer but looks great in Firefox.
Do you have any ideas to help fix this issue?
I recommended ????? to my friend because it was so good.
????? isn’t just a massage shop—it’s a true healing space.
The title of women-only massage fits it perfectly.
Great information. Lucky me I discovered your blog by chance (stumbleupon).
I have bookmarked it for later!
buy propecia pills
Хотите вывести ваш сайт на первые позиции поисковых систем Яндекс и Google?
Мы предлагаем качественный
линкбилдинг — эффективное решение для
увеличения органического трафика и роста конверсий!
Почему именно мы?
- Опытная команда специалистов,
работающая исключительно белыми методами SEO-продвижения.
- Только качественные и тематические доноры ссылок, гарантирующие стабильный рост позиций.
- Подробный отчет о проделанной работе и прозрачные условия сотрудничества.
Чем полезен линкбилдинг?
- Улучшение видимости сайта в
поисковых системах.
- Рост количества целевых посетителей.
- Увеличение продаж и прибыли вашей компании.
Заинтересовались? Пишите нам в личные сообщения — подробно
обсудим ваши цели и предложим индивидуальное решение для
успешного продвижения вашего
бизнеса онлайн!
Цена договорная, начнем сотрудничество
прямо сейчас вот на адрес ===>>> ЗДЕСЬ Пишите обгаварим все ньансы!!!
Hello it's me, I am also visiting this website on a regular basis, this web page is
really good and the users are actually sharing nice
thoughts.
Whats up are using Wordpress for your site platform?
I'm new to the blog world but I'm trying to get started
and set up my own. Do you require any html coding knowledge to make your own blog?
Any help would be really appreciated!
I have read a few excellent stuff here. Definitely value
bookmarking for revisiting. I wonder how so much attempt you
put to create one of these great informative site.
It's in point of fact a great and helpful piece of info.
I'm glad that you just shared this useful information with us.
Please stay us informed like this. Thank you for sharing.
No words were needed—the gentle presence of ????????? said everything my heart needed to hear.
The care at ????? went beyond my expectations.
Thanks a lot for sharing this with all of us you really
know what you're talking approximately! Bookmarked. Please additionally consult
with my web site =). We may have a link change agreement among us
This is the kind of care you rarely find — ???? ??? was
amazing.
Running 24 hours a day, ??? is always nearby for those unpredictable,
stressful moments.
Howdy! Do you know if they make any plugins to help with Search Engine Optimization?
I'm trying to get my blog to rank for some targeted keywords but I'm not seeing very good
gains. If you know of any please share. Thanks!
I just like the valuable info you provide for your articles.
I will bookmark your weblog and take a look at once more here regularly.
I'm slightly sure I'll be informed many new stuff right here!
Good luck for the following!
?? ??? ??? ???? ??? ?? ?????.
???????? ??? ??? ? ? ????.
The staff at ??? were warm, skilled, and comforting.
I will right away seize your rss as I can not in finding your e-mail subscription link or newsletter service.
Do you have any? Kindly let me recognise in order that I may subscribe.
Thanks. https://vovangames-lucky.top/
I will right away seize your rss as I can not in finding your e-mail subscription link or newsletter service.
Do you have any? Kindly let me recognise in order that I may subscribe.
Thanks. https://vovangames-lucky.top/
I will right away seize your rss as I can not in finding your e-mail subscription link or newsletter service.
Do you have any? Kindly let me recognise in order that I may
subscribe. Thanks.
Thanks for the marvelous posting! I definitely enjoyed reading it, you can be a great author.I
will ensure that I bookmark your blog and definitely will come back from now on. I want to encourage you continue your great
work, have a nice morning!
It’s not just a massage — it’s healing. Thank you, ???.
????????? ? ???, ?????????? ???? ?? ??? ???? ???? ??? ?????.
IQ
I felt instantly relaxed the moment ??????? began.
Article writing is also a excitement, if you know then you can write if not it is complicated to write.
Very good post. I definitely appreciate this website.
Stick with it!
Hello, Neat post. There is an issue along with your web site in web explorer, may check this?
IE still is the marketplace leader and a large component to other people will leave out your
wonderful writing because of this problem.
Let your body unwind and your soul reset at ???.
This website was... how do you say it? Relevant!!
Finally I've found something that helped me. Thank you!
At ???????, healing didn’t
just happen on the surface—it reached something deeper, something
tender I didn’t even know needed attention.
Hey There. I discovered your weblog using msn. That is an extremely neatly written article.
I will be sure to bookmark it and return to
learn extra of your useful information. Thank you for the post.
I will definitely return.
The atmosphere at ??? was peaceful and welcoming.
??? ??? ??? ? ??? ?????.
???????? ??? ?????.
I found a peaceful sanctuary through ?????????.
Thanks , I have recently been searching for information approximately this subject for a long time and
yours is the best I have came upon till now.
But, what concerning the bottom line? Are you sure
about the source?
The massage at ????? gently eased even my emotional fatigue.
I left feeling much lighter.
Peculiar article, just what I was looking for.
This info is worth everyone's attention. Where can I find
out more?
XP
naturally like your website however you have to test the spelling on quite a
few of your posts. Several of them are rife with spelling issues and I in finding it very troublesome to tell the truth on the other hand I'll definitely come back again.
Hi! I could have sworn I've visited this web site before but after
looking at a few of the articles I realized
it's new to me. Anyways, I'm definitely delighted I came across it and I'll be bookmarking it and checking back often!
What's up, the whole thing is going perfectly
here and ofcourse every one is sharing facts, that's really
excellent, keep up writing.
Hello! I know this is kind of off topic but I was wondering if you knew where I could locate a captcha plugin for my comment form?
I'm using the same blog platform as yours and I'm having difficulty finding one?
Thanks a lot!
I finally made time for myself and ????? delivered perfectly.
Hi, I would like to subscribe for this webpage to take latest updates,
therefore where can i do it please help out.
I am sure this paragraph has touched all the internet viewers, its really really pleasant article on building up new website.
I am not sure where you are getting your info, but great topic.
I needs to spend some time learning much more or understanding more.
Thanks for wonderful information I was looking for this information for my mission.
This design is wicked! You obviously know how to keep a reader entertained.
Between your wit and your videos, I was almost moved to start my own blog
(well, almost...HaHa!) Great job. I really loved what you had to say,
and more than that, how you presented it. Too cool!
??? ?? ?? ??? ???!
??????? ???????? ?? ??
?? ???????.
Good day! I know this is kinda off topic nevertheless I'd figured I'd ask.
Would you be interested in exchanging links or maybe
guest authoring a blog article or vice-versa? My website addresses a lot of the same subjects as yours and I think we could greatly benefit from each other.
If you're interested feel free to send me an email.
I look forward to hearing from you! Awesome
blog by the way!
Hello! I've been reading your web site for a long
time now and finally got the courage to go ahead and give you a shout out from
Porter Texas! Just wanted to mention keep up the excellent job!
Generally I do not read article on blogs, but I wish to say that this write-up very forced me to check out
and do it! Your writing taste has been surprised me.
Thanks, quite great article.
Vovan Casino — казино, которое умеет удивлять.
Тут слоты крутятся быстрее, чем такси в час пик.
Проверить просто: Vovan casino промокод — и ты уже
в игре!
Здесь скука не живёт. А бонусы и фриспины —
это как дополнительный повод поднять настроение.
Фриспины на старте — подарок для новичков
Игровые баталии с драйвом
Вывод средств быстрее, чем моргнуть
Vovan Casino — азарт с улыбкой. https://vovan-slots-free777.fun/
Vovan Casino — казино, которое умеет удивлять.
Тут слоты крутятся быстрее, чем такси в час пик.
Проверить просто: Vovan casino промокод
— и ты уже в игре!
Здесь скука не живёт. А бонусы и фриспины — это
как дополнительный повод поднять настроение.
Фриспины на старте — подарок для
новичков
Игровые баталии с драйвом
Вывод средств быстрее, чем моргнуть
Vovan Casino — азарт с улыбкой. https://vovan-slots-free777.fun/
Vovan Casino — казино, которое умеет удивлять.
Тут слоты крутятся быстрее, чем такси в час пик.
Проверить просто: Vovan casino промокод — и
ты уже в игре!
Здесь скука не живёт. А бонусы и
фриспины — это как дополнительный повод
поднять настроение.
Фриспины на старте — подарок для новичков
Игровые баталии с драйвом
Вывод средств быстрее, чем моргнуть
Vovan Casino — азарт с улыбкой.
I always used to read piece of writing in news papers but now
as I am a user of net therefore from noww I am using net for articles
or reviews, thanks to web.
Howdy! I know this is kind of off topic but I
was wondering which blog platform are you using for this site?
I'm getting fed up of Wordpress because I've had problems
with hackers and I'm looking at alternatives for
another platform. I would be fantastic if you could point me
in the direction of a good platform.
I'm extremely inspired along with your writing abilities and also with the format on your blog.
Is that this a paid topic or did you modify it yourself? Anyway
stay up the nice high quality writing, it is uncommon to look a nice blog like this one these days..
??????? ??, ?? ?? ???????.
Hey there! I'm at work surfing around your blog from my new
iphone 3gs! Just wanted to say I love reading through your blog and look forward to all your posts!
Keep up the excellent work!
Nice blog! Is your theme custom made or did you download
it from somewhere? A design like yours with a few simple tweeks would really make my blog jump out.
Please let me know where you got your design. Bless you
An outstanding share! I've just forwarded this onto a coworker who was doing a little homework
on this. And he actually ordered me breakfast simply because I discovered it
for him... lol. So allow me to reword this.... Thanks for the meal!!
But yeah, thanx for spending the time to talk about this topic here on your web site.
?? ???? ??? ?? ?? ?? ?? ????.
?????????.
Thanks for a marvelous posting! I actually enjoyed reading it,
you may be a great author.I will be sure to bookmark your blog and definitely will come back down the road.
I want to encourage you continue your great writing,
have a nice morning!
Howdy this is somewhat of off topic but I was wanting to know
if blogs use WYSIWYG editors or if you have to manually code
with HTML. I'm starting a blog soon but have no coding skills so I wanted to get advice from someone with experience.
Any help would be enormously appreciated!
I have been surfing online more than 4 hours today, yet I never found any interesting
article like yours. It's pretty worth enough for me.
In my opinion, if all web owners and bloggers made
good content as you did, the web will be a lot more useful than ever before.
Vovan Casino — просто удобно. Здесь нет сложных правил,
только честный азарт. Начни прямо сейчас — Вован безопасность.
Слоты, рулетка, покер и лайв-дилеры.
Дизайн простой, а выплаты честные и быстрые.
Старт игры максимально простой
Бонусы без подводных камней
Помощь быстро и по делу
Vovan Casino — минимум лишнего, максимум азарта. https://vovan-spin-official88.top/
Vovan Casino — просто удобно. Здесь нет сложных правил, только честный азарт.
Начни прямо сейчас — Вован безопасность.
Слоты, рулетка, покер и лайв-дилеры.
Дизайн простой, а выплаты честные и быстрые.
Старт игры максимально простой
Бонусы без подводных камней
Помощь быстро и по делу
Vovan Casino — минимум лишнего, максимум азарта.
We absolutely love your blog and find the majority of your post's to be exactly what I'm looking for.
Does one offer guest writers to write content for you personally?
I wouldn't mind composing a post or elaborating on a few of the subjects you
write in relation to here. Again, awesome weblog!
XG
ZA
I am sure this piece of writing has touched all the internet people, its really really fastidious article on building up new weblog.
I was suggested this web site through my cousin. I am not sure whether this
put up is written via him as nobody else recognise such special about my difficulty.
You are wonderful! Thanks!
I visited multiple web pages however the audio feature for audio songs existing at this
website is genuinely marvelous.
What a data of un-ambiguity and preserveness of valuable
experience regarding unexpected emotions.
Just want to say your article is as astounding. The clearness to your submit is just nice and i could
assume you're knowledgeable on this subject. Fine along with your permission allow me to snatch your RSS feed to
stay up to date with imminent post. Thanks 1,000,000 and please continue
the rewarding work.
GH
If some one needs expert view concerning blogging and site-building afterward i recommend him/her to go to see this webpage, Keep
up the good job. https://nursingguru.in/employer/embodyyourdivinity/
If some one needs expert view concerning blogging and site-building afterward i recommend him/her
to go to see this webpage, Keep up the good job. https://nursingguru.in/employer/embodyyourdivinity/
I for all time emailed this website post page to all my contacts, as if like to
read it next my friends will too.
I'm not sure the place you're getting your info, but good topic.
I must spend some time learning much more or working out
more. Thank you for excellent info I was looking for this information for
my mission.
Empowering Amateur Radio Enthusiasts, Echolink
Florida connects you to the best amateur radio services.
Discover our conference server located in Colorado Springs, Colorado, powered by
AT&T First Net Fiber Network.
Very nice article, exactly what I wanted to find.
Definitely imagine that which you stated. Your
favourite justification seemed to be on the internet the easiest
thing to have in mind of. I say to you, I definitely get irked while people consider
issues that they just don't recognise about. You controlled to hit the
nail upon the top and outlined out the whole thing with no need side effect ,
people can take a signal. Will likely be back to get more.
Thank you
I need to to thank you for this excellent read!! I absolutely loved
every little bit of it. I've got you saved as a favorite to check out new stuff you post…
Hello mates, good paragraph and pleasant urging commented here, I
am genuinely enjoying by these.
Откройте для себя Unlim Casino — место, где игровые возможности соединяются с комфортом.
Здесь игроки могут получать удовольствие от огромного ассортимента
игр, включая игровые автоматы,
рулетку, а также участвовать в турнирах и выигрывать щедрые бонусы.
казино онлайн Анлим Для каждого найдется что-то интересное, мы предложим
вам все для максимального игрового опыта.
Наше казино предоставляет не
только высококачественный сервис,
но и множество способов выигрыша.
Присоединяйтесь к сотням победителей, которые уже наслаждаются наших игр и турниров.
Вы сможете выигрывать большие деньги благодаря регулярным бонусам и уникальным предложениям.
Что выделяет нас среди других казино?
Мгновенная регистрация — всего несколько шагов, и вы готовы начать играть.
Великолепные бонусы для новых игроков — стартуйте с
большим шансом на успех.
Частые турниры и акции — для
тех, кто хочет повысить шансы на выигрыш и получать дополнительные призы.
Поддержка 24/7 — всегда готовы
помочь в решении любых вопросов.
Полная совместимость — играйте в любимые игры в любое время и в любом месте.
Пора начать выигрывать! Присоединяйтесь к Unlim Casino и получите массу
эмоций и большие выигрыши прямо сейчас. https://unlimclub-battle.top/
?????????????????????????AI?????????????
Link exchange is nothing else however it is only placing the other person's webpage link on your page at appropriate place and
other person will also do same in support of you.
Thanks for sharing your thoughts on explained. Regards
Luxury1288
IP
What's Going down i am new to this, I stumbled upon this I've
found It positively useful and it has aided me out loads.
I hope to contribute & assist different users like
its helped me. Great job.
Appreciating the commitment you put into your blog and detailed information you present.
It's good to come across a blog every once in a while that isn't the same unwanted rehashed material.
Fantastic read! I've saved your site and I'm including
your RSS feeds to my Google account.
What a material of un-ambiguity and preserveness of precious know-how about unpredicted
feelings.
Hey there! Someone in my Myspace group shared this
site with us so I came to look it over. I'm definitely loving the information. I'm bookmarking and will be tweeting this to my followers!
Terrific blog and superb design and style.
Heya i am for the primary time here. I came across this board and I to find It
really useful & it helped me out much. I'm
hoping to present one thing again and aid others
like you helped me.
Wow, wonderful blog structure! How long have you been running a
blog for? you make blogging look easy. The entire look of your website is excellent, as well
as the content material!
Vovan Casino — площадка, где престиж сочетается с азартом.
Здесь каждая игра — это стиль и эмоции.
Почувствуйте атмосферу премиального гемблинга — Vovan способы оплаты.
Живое казино с профессиональными дилерами.
Каждый элемент платформы
создан для вашего комфорта.
Индивидуальные предложения для постоянных игроков
Финансовый сервис уровня private banking
Поддержка 24/7 в стиле консьерж-сервиса
Vovan Casino — казино, которое соответствует вашему уровню. https://vovan-casino-bonus54x.top/
Attractive component of content. I simply stumbled upon your blog and in accession capital to say that I get in fact loved account your blog posts.
Anyway I will be subscribing on your feeds and even I success you get
right of entry to constantly fast.
Everything is very open with a really clear explanation of
the issues. It was definitely informative. Your site is
useful. Thanks for sharing!
Great blog! Do you have any recommendations for aspiring writers?
I'm planning to start my own site soon but I'm a little lost on everything.
Would you suggest starting with a free platform
like Wordpress or go for a paid option? There are
so many choices out there that I'm completely confused ..
Any suggestions? Cheers!
Yes! Finally someone writes about gizbo casino. https://gizbo-777-jackpot.top/
I think this is among the so much important information for me.
And i'm satisfied reading your article. However want to observation on some general things, The website taste is great, the articles is in reality great : D.
Excellent activity, cheers
Write more, thats all I have to say. Literally, it seems as though you relied on the video to make your point.
You obviously know what youre talking about, why waste your intelligence on just
posting videos to your site when you could be giving us something informative to read?
XD
Hmm it looks like your website ate my first comment (it was extremely
long) so I guess I'll just sum it up what I wrote
and say, I'm thoroughly enjoying your blog. I as
well am an aspiring blog writer but I'm still new
to everything. Do you have any tips for novice blog writers?
I'd certainly appreciate it.
Mikigaming ?? Situs Slot Indonesia Gampang Maxwin Tahun Ini ??????
Its such as you learn my thoughts! You appear to grasp so much about this, such as you wrote the book in it or something.
I believe that you simply could do with some % to drive the message home a
little bit, but instead of that, this is great blog. An excellent read.
I will certainly be back.
Good way of describing, and pleasant paragraph to take facts concerning my presentation subject matter, which
i am going to convey in institution of higher education.
MIKIGAMING
I visited multiple blogs but the audio feature for audio songs existing at this web site is really superb.
What's Happening i am new to this, I stumbled
upon this I've found It positively helpful and it has helped me out loads.
I am hoping to contribute & assist other users like its aided me.
Great job.
Appreciating the hard work you put into your blog and in depth information you provide.
It's great to come across a blog every once in a while that isn't the same unwanted rehashed information. Fantastic read!
I've bookmarked your site and I'm adding your RSS feeds to my Google account.
Great blog you have here but I was curious if you knew of any message boards
that cover the same topics talked about here? I'd really like
to be a part of online community where I can get advice from other knowledgeable individuals that share the same interest.
If you have any recommendations, please let me know.
Kudos!
Hi all, here every one is sharing these kinds of knowledge,
thus it's pleasant to read this website, and I used to pay a visit this web site every day.
We're a group of volunteers and starting a new scheme in our community.
Your website offered us with valuable info to work on. You have done a formidable job and our entire community
will be thankful to you.
Site-specific performance art, site-particular visual artwork and interventions are commissioned for the annual Infecting
the town Festival in Cape Town, South Africa.
Save for a really small spot close to Karasjok, Norway, which is in zone 2, nowhere within the
Arctic a part of Scandinavia will get below zone 3.
The Faroe Islands, at 62-63°N are in zone 8, as are the outer Lofoten Islands at 68°N.
Troms?(, a coastal metropolis in Norway at 70°N, is in zone 7, and
even Longyearbyen, the northernmost true
metropolis on this planet at 78°N, is still in zone 4.
All these coastal places have one factor in widespread, though,
that are cool, damp summers, with temperatures hardly ever exceeding 20 °C (sixty eight °F) (or 15 °C (59 °F) in Longyearbyen).
I've the identical question (9) Report abuse Answer
HansV MVP MVP Replied on March 11, 2011 Report abuseTo decide
easy methods to print your image in high resolution (300 DPI), take the inches of your image and multiply both the width and peak by 300.
Meaning as a way to create a eight x 8 print on a 300 DPI printer,
you need 2400 x 2400 pixels. This story was initially revealed in Thursday’s print
edition of the Daily Post.
Hi there, just became aware of your blog through Google,
and found that it is truly informative. I am going to watch out for brussels.
I'll appreciate if you continue this in future. Numerous people will be benefited from your writing.
Cheers!
I was more than happy to seek out this site.I wanted to thank you for this nice read!!
I definitely having fun with each little bit of it and I
have you bookmarked to check out new stuff you post.
Anyway, in my language, there usually are not a lot good source like this.
Hello! I recently came across this fantastic article on casino
entertainment and couldn't resist the chance to share it.
If you’re someone who’s curious to learn more about the world
of online casinos, this article is absolutely.
I’ve always been interested in online gaming, and after reading this,
I learned so much about how online casinos work.
This post does a great job of explaining everything from game strategies.
If you’re new to the whole scene, or even if you’ve been playing for years,
this article is an essential read. I highly recommend it for anyone who needs to get
more familiar with online gambling options.
Not only, the article covers some great advice about finding a
reliable online casino, which I think is extremely important.
So many people overlook this aspect, but this post clearly shows you the best ways to ensure you’re playing at a legit
site.
What I liked most was the section on how bonuses work in casinos,
which I think is crucial when choosing a site to play
on. The insights here are priceless for anyone looking to take advantage of
bonus offers.
Furthermore, the strategies about managing your bankroll
were very useful. The advice is clear and actionable, making it easy for players to take control of their gambling habits and avoid
pitfalls.
The advantages and disadvantages of online gambling were also thoroughly discussed.
If you’re thinking about trying your luck at an online casino, this article is a great starting point to understand both the
excitement and the risks involved.
If you’re into poker, you’ll find tons of valuable tips here.
They really covers all the popular games in detail, giving you
the tools you need to boost your skill level. Whether you’re into competitive games like poker or just enjoy a casual round of slots, this
article has something for everyone.
I also appreciated the discussion about payment options.
It’s crucial to know that you’re gambling on a site that’s safe and secure.
This article really helps you make sure your personal information is in good hands
when you bet online.
If you’re wondering where to start, I would recommend reading this
post. It’s clear, informative, and packed with valuable insights.
Without a doubt, one of the best articles I’ve come across in a while on this topic.
So, I strongly suggest checking it out and seeing for yourself.
You won’t regret it! Trust me, you’ll walk away feeling like a
more informed player in the online casino world.
Whether you're a beginner, this post is an excellent resource.
It helps you avoid common mistakes and teaches you how to
have a fun and safe gambling experience. Definitely worth checking out!
I appreciate how well-researched and thorough this article is.
I’ll definitely be coming back to it whenever I need
advice on casino games.
Has anyone else read it yet? What do you think?
Feel free to share!
Very descriptive blog, I liked that bit.
Will there be a part 2?
Pretty nice post. I just stumbled upon your
weblog and wanted to say that I've really enjoyed surfing around your blog posts.
In any case I'll be subscribing to your rss
feed and I hope you write again soon!
ed pills online
We are a bunch of volunteers and opening a new scheme in our community.
Your site offered us with useful info to work on. You have performed an impressive activity
and our entire community will likely be grateful to you.
Wow, this piece of writing is good, my younger sister is
analyzing such things, so I am going to convey her.
Normally I do not read article on blogs, but I
wish to say that this write-up very forced me to take a look at
and do it! Your writing style has been amazed me.
Thank you, quite nice article.
Have you ever considered about adding a little bit more than just your articles?
I mean, what you say is important and all. Nevertheless just imagine if
you added some great images or video clips to give your posts more, "pop"!
Your content is excellent but with images and video clips, this site could definitely be
one of the greatest in its niche. Superb blog!
Wow, incredible blog layout! How long have you been blogging for?
you make blogging look easy. The overall look of your web site is wonderful, let alone the content!
If you want to increase your experience only keep visiting this website and be updated with the most up-to-date news posted here.
MO
Hurrah! After all I got a web site from where I be capable of in fact get
useful data concerning my study and knowledge.
These are genuinely enormous ideas in regarding blogging.
You have touched some fastidious things here. Any way keep up wrinting.
OA
Do you mind if I quote a few of your articles as long as
I provide credit and sources back to your webpage? My blog site is in the exact same
area of interest as yours and my visitors would really
benefit from some of the information you present here.
Please let me know if this alright with you. Cheers!
HW
When some one searches for his necessary thing, thus he/she wishes to be
available that in detail, thus that thing is maintained over here.
A fascinating discussion is worth comment. I believe
that you should write more on this issue, it might not
be a taboo matter but typically folks don't discuss such
topics. To the next! Kind regards!!
Hello Dear, are you in fact visiting this web page daily, if so after that you will absolutely get pleasant
know-how.
Fantastic goods from you, man. I have understand your stuff previous to and you
are just too magnificent. I actually like what you've acquired here,
certainly like what you are saying and the way in which you say it.
You make it entertaining and you still take care of to keep it wise.
I cant wait to read far more from you. This is really a
terrific website.
Very nice article, just what I was looking for. https://gizbo-777-jackpot.buzz/
Pretty great post. I just stumbled upon your blog and wanted to say
that I have truly loved browsing your blog posts.
After all I will be subscribing to your feed and I'm
hoping you write again soon!
ZH
bookmarked!!, I really like your blog!
Gizbo Casino — место, где выигрыши
и хорошее настроение идут парой.
Выиграл? Ещё веселее, так что заходите — Gizbo доступ к играм
— и ловите свой вайб.
Каталог огромен и дружелюбен, а правила — без мелкого шрифта.
Здесь шутят редко, но метко.
Фриспины «просто так»
Деньги приходят, пока смеётесь
Саппорт отвечает по-человечески
Тут выигрывают с улыбкой. https://gizbo-casino911.top/
It's a shame you don't have a donate button! I'd without a doubt donate to this superb blog!
I guess for now i'll settle for bookmarking and adding your RSS feed to my
Google account. I look forward to fresh updates and will talk about this blog with
my Facebook group. Chat soon!
Gizbo Casino — арена для сильных. Каждый спин — игровой момент, а ваше
имя может попасть в топ уже
сегодня — Gizbo казино приложение — вступайте в матч.
Спец-ивенты с увеличенными банками создают темп, который держит
в тонусе. Кэшбек — как сейв
на дистанции.
Сезонные чемпионаты
Мгновенный вывод призов
Ответы без офсайда
Пора выходить в стартовом составе. https://gizbo-play777.buzz/
This info is worth everyone's attention. How can I find out more?
Thank you for the auspicious writeup. It actually was a leisure account it.
Look advanced to far added agreeable from you! However,
how can we keep in touch?
Incredible story there. What happened after? Take care!
No matter if some one searches for his required thing, thus
he/she wants to be available that in detail, therefore that thing is maintained over here. https://gizbo-777-spin.lol/
No matter if some one searches for his required thing, thus he/she
wants to be available that in detail, therefore that thing is maintained over here.
Wow, this article is pleasant, my younger sister is analyzing such things, thus I am
going to inform her.
I used to be suggested this website via my cousin. I am no longer certain whether this publish
is written by way of him as nobody else realize such unique approximately my problem.
You're incredible! Thanks!
Hi there to all, how is everything, I think every one is getting more from this
site, and your views are nice in support of new viewers.
Hi! I could have sworn I've been to this website before but after browsing through some of the articles I realized it's new to me.
Anyways, I'm definitely delighted I found it
and I'll be book-marking it and checking back regularly!
Hello there! This post could not be written much better!
Lookig at this ppst reminds me of my previous roommate!
He continually kept preaching about this. I'll forward this post
to him. Fairly certain he's going to have a good read. Thanks for sharing!
Gizbo Casino — неоновый узел азарта, где ставки мерцают в такт неоновых вывесок.
Вход открыт — казино для опытных игроков — и неон
загорается для вас.
Каждая игра — новый виток сингулярности, бонусы — импульс.
Никакой ржавчины процессов.
Вывод «по оптике»
Ноль лагов на маршруте
Саппорт — кибер-консьерж
Gizbo — ваш неоновый апгрейд. https://gizbocasino-360.top/
Gizbo Casino — неоновый узел азарта, где ставки мерцают
в такт неоновых вывесок.
Вход открыт — казино для опытных игроков — и неон загорается для вас.
Каждая игра — новый виток сингулярности, бонусы — импульс.
Никакой ржавчины процессов.
Вывод «по оптике»
Ноль лагов на маршруте
Саппорт — кибер-консьерж
Gizbo — ваш неоновый апгрейд.
Gizbo Casino — портал для смелых искателей удачи.
Здесь каждый турнир — экспедиция, а ваш проводник
уже ждёт: Гизбо быстрые выплаты — берём
курс на призы.
Игры — как древние артефакты, где
побеждает внимательность.
Квесты — как метки на карте к большому
выигрышу.
Состязания с эпическими призами
Награды без проволочек
Связь 24/7
Кто ищет — тот находит. https://gizbo-slot222.top/
ZV
I am now not positive the place you're getting your info,
but good topic. I needs to spend a while studying much more or understanding more.
Thank you for great info I was on the lookout for this information for my mission.
Вау! Eazy Energy https://eazyenergy.ru действительно воспринимается как надежный помощник в движении к себе лучшему.
Это гораздо больше, чем энергетический напиток, а стиль жизни в банке.
Когда делаешь первый глоток — будто погружаешься в атмосферу
роскоши: глубокий вкус бельгийского
шоколада встречается с насыщенной
кофейной нотой. Такое чувство, что прикасаешься к секрету восточного лакомства —
но в низкокалорийном формате.
И самое приятное — идеальный баланс!
Вкус насыщенный, но не приторный,
оставляет приятное послевкусие
и при этом поднимает тонус без лишней тряски.
Кофеин (30 мг на 100 мл) + таурин (25 мг на 100 мл) действуют
плавно, поэтому чувствуешь фокус,
а не перевозбуждение.
А для тех, кто заботится о фигуре, есть отличный
бонус — часть линейки БЕЗ сахара.
Это значит, что можно наслаждаться вкусом без лишних
калорий. банка энергии —
которая заряжает позитивом, наполняет энергией и даёт комфорт.
Eazy Energy — это про то, чтобы наслаждаться моментами, быть энергичным и
думать о здоровье.
Честно говоря, разливное пиво от Курского
пивоваренного завода Cesky Lev https://cheskylev.com/franshiza по-настоящему удивляют.
Не ожидал, что региональный производитель
будет конкурировать с известными брендами.
Во-первых, разнообразие впечатляет:
классическое пиво, освежающие сидровые напитки, пивные коктейли, альтернативы без
алкоголя, закуски к напиткам.
Каждый может найти то, что ему по душе.
Во-вторых, понятно, что сделано из хорошего сырья.
Они используют оригинальные технологии,
поэтому вкус яркий и насыщенный.
Меня впечатлило, что напитки не просто
утоляют жажду. Cesky Lev умеет создавать
атмосферу. Это удовольствие,
которое остаётся надолго.
В-третьих, стоимость доступная. Здесь нет переплаты за бренд,
только реальный вкус.
И в итоге мы имеем честный, вкусный и натуральный продукт.
Cesky Lev — это больше, чем напиток!
I don't even know how I stopped up here, however I believed
this publish was once good. I do not recognize who you're however certainly you're going to a well-known blogger when you aren't already.
Cheers!
When I originally commented I clicked the "Notify me when new comments are added" checkbox and now each time a comment is added I
get several e-mails with the same comment. Is there any
way you can remove people from that service? Thank you!
FD
Wonderful goods from you, man. I've understand your stuff previous to and you're just too wonderful.
I really like what you've acquired here, really like what you are saying and the way in which you say it.
You make it entertaining and you still take care of to keep it wise.
I can't wait to read far more from you. This is really a
great site.
Vovan Casino — элегантное пространство для азартных побед.
Здесь каждая ставка становится шагом к успеху.
Почувствуйте атмосферу премиального гемблинга —
казино с моментальными выводами.
Только отборные игры от мировых провайдеров.
Все детали продуманы.
Индивидуальные предложения
для постоянных игроков
Конфиденциальные и быстрые выплаты
Поддержка 24/7 в стиле консьерж-сервиса
Vovan Casino — ваш клуб для стильной
игры. https://vovan-casino-bonus54x.top/
Gizbo Casino — просто удобно. Без сложных сценариев:
нажимаете «старт» — всё.
Доступ в один клик — казино гизба —
и лобби открыто.
Каталог аккуратный и понятный, бонусы
— по делу. Комфорт — вот три кита этого сервиса.
Старт без бюрократии
Никаких скрытых шагов
Ответы по сути
Gizbo — минимум лишнего, максимум результата. https://gizbocasino-game88.top/
Gizbo Casino — просто удобно. Без сложных сценариев: нажимаете
«старт» — всё. Доступ в один клик — казино гизба — и лобби открыто.
Каталог аккуратный и понятный, бонусы — по делу.
Комфорт — вот три кита этого сервиса.
Старт без бюрократии
Никаких скрытых шагов
Ответы по сути
Gizbo — минимум лишнего, максимум
результата.
SE
BD
Howdy! Do you know if they make any plugins to protect against hackers?
I'm kinda paranoid about losing everything I've worked hard on. Any suggestions?
Gizbo Casino — инновационное онлайн-казино, где игра ощущается как премиальный сервис.
Оптимизация заметна с первого клика, а начать
проще простого — сайт Gizbo казино —
и вы уже в лобби.
Выбор покрывает все жанры и механики,
причём видео и анимации идут плавно.
Стабильность — на уровне, который ценят опытные
игроки.
Мгновенные депозиты и
быстрые выводы
Поддержка карт, кошельков и криптовалют
Ответы «в одно касание»
Тут всё работает, как задумано. https://gizbo-casino721.top/
Gizbo Casino — инновационное онлайн-казино, где игра ощущается как
премиальный сервис. Оптимизация заметна с первого клика, а
начать проще простого — сайт Gizbo казино — и вы уже
в лобби.
Выбор покрывает все жанры и механики,
причём видео и анимации идут плавно.
Стабильность — на уровне, который ценят опытные игроки.
Мгновенные депозиты и быстрые выводы
Поддержка карт, кошельков и криптовалют
Ответы «в одно касание»
Тут всё работает, как задумано.
Gizbo Casino — площадка для взыскательных игроков, где каждый экран говорит о классе.
Живые дилеры и отборные слоты создают атмосферу статуса, а ваш личный доступ — Gizbo официальный сайт
игровые — становится приглашением
в лаунж уровня люкс.
Выплаты проходят без шероховатостей, а интерфейс напоминает лобби бутик-отеля.
Привилегии подстраиваются под стратегию вашей игры.
Индивидуальные бонусы и лимитированные акции
Скоростные и конфиденциальные транзакции
Консьерж-саппорт 24/7
Gizbo — территория изысканного азарта. https://gizbocasino-play550.top/
Gizbo Casino — площадка для взыскательных игроков,
где каждый экран говорит о классе.
Живые дилеры и отборные слоты создают атмосферу статуса, а ваш личный доступ — Gizbo официальный сайт игровые — становится
приглашением в лаунж уровня люкс.
Выплаты проходят без шероховатостей, а интерфейс
напоминает лобби бутик-отеля.
Привилегии подстраиваются под стратегию вашей игры.
Индивидуальные бонусы и лимитированные акции
Скоростные и конфиденциальные
транзакции
Консьерж-саппорт 24/7
Gizbo — территория изысканного азарта.
Great delivery. Sound arguments. Keep up the amazing work.
NN
Thanks to my father who told me concerning this blog, this website is genuinely awesome.
Hello great blog! Does running a blog like this require a great deal of work?
I've no expertise in computer programming but I had been hoping
to start my own blog in the near future.
Anyhow, should you have any suggestions or tips for new blog owners please share.
I understand this is off topic nevertheless I simply
had to ask. Kudos!
EQ
EI
each time i used to read smaller content which as well clear their motive, and that
is also happening with this article which I am reading at this place.
QZ
Hello there, just became aware of your blog through Google, and found that it is truly informative.
I am gonna watch out for brussels. I will be grateful if you continue this in future.
A lot of people will be benefited from your writing.
Cheers!
Greetings, I do think your site could be having web browser compatibility issues.
Whenever I take a look at your web site in Safari, it
looks fine however when opening in IE, it's got some overlapping issues.
I merely wanted to provide you with a quick heads up!
Other than that, wonderful blog!
A fascinating discussion is definitely worth comment.
I do think that you ought to publish more about this subject matter, it may not
be a taboo matter but usually people do not
discuss these subjects. To the next! Many thanks!!
Mikigaming Situs Slot Gacor Online Indonesia Terbaik #1 Yang
Menyediakan Server Lokal Premium Asli Yang Dijamin Anti
Rungkad.
YM
Wow, awesome blog layout! How long have you been blogging for?
you make blogging look easy. The overall look of your site is great,
as well as the content!
????? ?? ?? ???? ??? ???? ????
?? ?? ???! ?? ??? ?? ???? ????,
?? ?, ?? ??, ?? ????
????
Thanks for finally talking about >Создание шаблона / .:
. Документация Joomla! CMS <Loved it!
AJ
+905322952380 fetoden dolayi ulkeyi terk etti
+905516067299 fetoden dolayi ulkeyi terk etti
Get expert guidance for Canada PR, study abroad, and visa assistance from licensed immigration consultants in Vadodara.
Dhrron Consultancy simplifies your immigration journey.
Hey there! Do you know if they make any plugins to protect against hackers?
I'm kinda paranoid about losing everything I've worked hard on. Any suggestions?
What's Taking place i am new to this, I
stumbled upon this I have found It absolutely useful and
it has aided me out loads. I am hoping to contribute & assist other users like
its aided me. Great job.
We are a group of volunteers and opening a new scheme in our community.
Your site offered us with valuable info to work on. You have done an impressive process
and our entire community might be grateful to you.
Excellent post. I certainly appreciate this website.
Stick with it!
I like the helpful info you provide in your articles.
I'll bookmark your weblog and check again here regularly. I am quite certain I will learn many
new stuff right here! Good luck for the next!
This is a really good tip particularly to those new to the blogosphere.
Brief but very accurate information… Thank you for sharing this one.
A must read post!
MU
Amazing blog! Do you have any suggestions for aspiring writers?
I'm hoping to start my own blog soon but I'm a little lost
on everything. Would you recommend starting with a free platform like Wordpress or go for a paid option? There are so many
choices out there that I'm totally confused
.. Any recommendations? Bless you!
Hello there! This is my 1st comment here so I just wanted to give a
quick shout out and say I really enjoy reading through your articles.
Can you suggest any other blogs/websites/forums
that deal with the same subjects? Thank you!
It is not possible to become uncircumcised, as circumcision is a surgical
procedure that removes the foreskin from the
penis.
GN
CZ
I must thank you for the efforts you've put in writing this blog.
I really hope to check out the same high-grade blog posts from
you in the future as well. In truth, your creative writing abilities has
encouraged me to get my very own blog now ;)
When I initially commented I seem to have clicked the -Notify me when new comments are added- checkbox and from now
on whenever a comment is added I recieve four emails with the same comment.
Is there an easy method you are able to remove me from that service?
Thanks!
Cek Live RTP BEJOGAMING terupdate dan akurat.
Dapatkan informasi RTP slot gacor hari ini untuk meningkatkan peluang kemenangan Anda di BEJOGAMING.
What's up, I read your blog like every week. Your writing style is awesome,
keep up the good work!
I visited several websites except the audio quality for
audio songs present at this web page is truly fabulous.
Hi it's me, I am also visiting this site regularly, this web
page is genuinely good and the people are actually sharing
good thoughts.
What a information of un-ambiguity and preserveness of valuable
know-how about unexpected feelings.
I'm pretty pleased to uncover this web site.
I want to to thank you for your time due to this wonderful
read!! I definitely loved every part of it
and I have you book marked to see new stuff in your website.
Excellent post. I was checking continuously this weblog and I'm inspired!
Extremely useful information specially the remaining part :
) I care for such info a lot. I used to be looking for this
particular info for a very lengthy time. Thanks and best of luck.
WO
If some one wishes to be updated with most up-to-date technologies then he
must be pay a visit this site and be up to date daily.
CG
BW
AH
It's very trouble-free to find out any matter on web as compared to
books, as I found this piece of writing at this site.
Hello, after reading this awesome piece of writing i am also cheerful to share my knowledge here with colleagues.
Excellent write-up. I absolutely love this website. Keep it up!
Wow that was odd. I just wrote an extremely long comment but after I clicked
submit my comment didn't show up. Grrrr... well I'm not writing all
that over again. Regardless, just wanted to say fantastic blog!
Temukan link alternatif resmi BEJOGAMING untuk akses tanpa blokir.
Dapatkan link alternatif terbaru dan terpercaya untuk bermain di
BEJOGAMING.
Good day! This is my first comment here so I just wanted to give a quick shout out and tell you I
genuinely enjoy reading your posts. Can you suggest any other blogs/websites/forums that cover
the same topics? Appreciate it!
What's up to all, how is all, I think every
one is getting more from this web site, and your views are fastidious in favor of new viewers.
CJ
Temukan hasil lotto Genting terupdate dan akurat. Dapatkan informasi pengeluaran lotto,
prediksi angka jitu, dan tips meningkatkan peluang menang di LOTTO
GENTING.
UR
I'm truly enjoying the design and layout of your site.
It's a very easy on the eyes which makes it much more enjoyable for me
to come here and visit more often. Did you hire out a designer to create
your theme? Fantastic work!
Hi friends, how is everything, and what you would like to say concerning this post,
in my view its genuinely awesome in support
of me.
QX
I am really loving the theme/design of your weblog.
Do you ever run into any browser compatibility issues?
A couple of my blog audience have complained about my site not working correctly in Explorer but
looks great in Safari. Do you have any suggestions to help fix this problem?
SQ
Hi, its good paragraph concerning media print, we all be familiar with media is a fantastic source of data.
????? ?????????? ??? ????????? ?? ???????? ????????.
???? ??????? ???? ??? ?????
??? ???????? ????? ??? ?????? ???? ?? ????? ?????? ???? ?????
????????. ?? ?? ??? ???? ??????? ???????? ?? ??? ????.
???? ??? ?? ??????? ????? ?????? ?? ????? ??????!
LE
I have been exploring for a little bit for any high quality
articles or blog posts in this sort of space . Exploring in Yahoo I finally stumbled upon this web site.
Reading this information So i'm glad to
show that I've an incredibly good uncanny feeling I found out
just what I needed. I so much indisputably will make certain to do not
omit this website and provides it a look on a constant basis.
HL
RU
ZE
Thank you for the auspicious writeup. It in fact was a amusement account it.
Look advanced to far added agreeable from you! By the way, how could we communicate?
I've been surfing online more than 3 hours as of late, yet I by no means discovered any attention-grabbing article like yours.
It is pretty value sufficient for me. In my view, if all
web owners and bloggers made just right content as you probably did, the net will be much
more useful than ever before.
I'm impressed, I must say. Rarely do I encounter a blog that's both educative and amusing,
and without a doubt, you've hit the nail on the head.
The problem is something not enough people are speaking intelligently about.
Now i'm very happy I came across this during my hunt for something regarding this.
XT
Have you ever considered writing an e-book or guest authoring on other websites?
I have a blog based upon on the same subjects you discuss
and would really like to have you share some stories/information. I know my readers would
enjoy your work. If you're even remotely interested, feel free to shoot me
an e-mail.
WF
First of all I would like to say excellent blog!
I had a quick question in which I'd like to ask if you do not mind.
I was interested to find out how you center yourself and clear your thoughts prior to writing.
I have had trouble clearing my mind in getting my thoughts out there.
I do enjoy writing however it just seems like the first 10 to 15 minutes are wasted just trying to
figure out how to begin. Any ideas or tips? Kudos!
There’s something deeply touching about matching jewelry for moms aand daughters.
I came across a collection on Onecklacee and fell in love with the sentiment behind it.
Hey would you mind letting me know which webhost you're utilizing?
I've loaded your blog in 3 completely different web browsers
and I must say this blog loads a lot faster then most.
Can you suggest a good hosting provider at a fair price?
Thank you, I appreciate it!
We are a group of volunteers and starting a
new scheme in our community. Your site provided us with
valuable info to work on. You have done an impressive job and our whole community will be grateful to you.
Смартфоны Xiaomi — это сочетание доступной цены, продуманного дизайна и современных технологий.
Устройства этого бренда заслужили признание покупателей благодаря высокому качеству сборки, мощным
характеристикам и стабильной работе.
В Санкт-Петербурге можно купить смартфон Xiaomi по
цене от 13 990 рублей с гарантией и быстрой доставкой.
Ассортимент включает как популярные модели линейки Redmi, так и продвинутые устройства Poco и
Mi. Каждый телефон отличается хорошей производительностью, ёмким аккумулятором, отличной камерой
и стильным внешним видом.
Для многих моделей доступны версии с поддержкой 5G, NFC и функцией быстрой зарядки.
Интернет-магазин предлагает удобные условия покупки:
подробные описания характеристик,
реальные фото, возможность сравнить модели и оформить заказ онлайн https://centrsvyazi.ru/catalog/phones/xiaomi .
Все смартфоны оригинальные, имеют
гарантию сроком на 12 месяцев и сопровождаются сервисной поддержкой.
Покупателям доступны различные способы оплаты, включая кредит и рассрочку, а также программа trade-in, позволяющая выгодно обменять
старый телефон на новый. Регулярные акции и сезонные скидки дают возможность приобрести смартфон Xiaomi по максимально выгодной цене.
Доставка осуществляется по Санкт-Петербургу и всей России.
Это быстрый и удобный способ получить новый смартфон, не выходя из
дома. Благодаря оптимальному
соотношению цены и функциональности, смартфоны Xiaomi
остаются одним из лучших вариантов на рынке мобильных
устройств.
Заказать пионы с доставкой на
дом в Москве легко и удобно. Эти изысканные цветы прекрасно подходят
для любого повода — будь то день рождения,
свадьба или просто желание порадовать близкого человека.
Букеты создаются профессиональными флористами с заботой о свежести и эстетике каждого цветка.
Доставка осуществляется быстро,
что позволяет получать радость от подарка
в кратчайшие сроки. Пионы остаются символом
красоты и нежности, а онлайн-заказ цветов позволяет выбрать готовую композицию или оформить индивидуальный букет с учётом личных предпочтений.
Кроме того, покупатели могут воспользоваться бонусами и подарками к каждому заказу, делая процесс ещё более приятным.
Онлайн-доставка пионов https://million-buketov.ru/piony — это удобный способ подарить эмоции, подчеркнуть важность события и создать особенную атмосферу без лишних хлопот.
QQ
QR
You ought to be a part of a contest for one of the greatest sites on the web.
I'm going to highly recommend this website!
LT
Hello, Neat post. There's an issue with your web site in web explorer, could check this?
IE nonetheless is the marketplace chief and a good component
to people will miss your magnificent writing because of this problem.
Heya i'm for the first time here. I came across this board and I in finding It truly useful & it helped me out much.
I am hoping to offer something back and aid others
such as you helped me.
Hello i am kavin, its my first occasion to commenting anywhere, when i read this paragraph i
thought i could also create comment due to this good post.
BB
IC
Новые порносайты предлагают инновационный контент для развлечений для взрослых.
Откройте для себя надежные свежие сайты для современного опыта.
Its like you read my mind! You appear to know a lot about this, like you wrote the book in it or something.
I think that you could do with some pics to drive the message home a bit, but instead of that, this is great blog.
A fantastic read. I will certainly be back.
Very good post. I will be dealing with many of these issues as well..
SZ
EG
OE
GZ
GZ
https://x.com/iwin68itcom
https://youtube.com/@iwin68itcom/about
https://pinterest.com/iwin68itcom
https://tumblr.com/iwin68itcom
https://twitch.tv/iwin68itcom/about
https://github.com/iwin68itcom
https://linkedin.com/feed/update/urn:li:activity:7393181330563420160/
https://vimeo.com/iwin68itcom
https://behance.net/iwin68itcom
https://reddit.com/user/iwin68itcom/
https://blogger.com/profile/07798070424027919985
https://sites.google.com/view/iwin68itcom/
https://500px.com/p/iwin68itcom
https://disqus.com/by/iwin68itcom/about/
https://instapaper.com/p/iwin68itcom
https://deviantart.com/iwin68itcom
https://qiita.com/iwin68itcom
https://gravatar.com/iwin68itcom
https://issuu.com/iwin68itcom
https://profile.hatena.ne.jp/iwin68itcom/
https://gitlab.com/iwin68itcom
https://renderosity.com/users/id:1793030
https://stocktwits.com/iwin68itcom
https://bitchute.com/channel/jq9Y9BYapIXc
https://callupcontact.com/b/businessprofile/iwin68itcom/9863928
https://tabelog.com/rvwr/iwin68itcom/prof/
https://walkscore.com/people/313564150045/iwin68
https://devpost.com/iwin68itcom
https://anyflip.com/homepage/bgrvv
https://pbase.com/iwin68itcom
https://myanimelist.net/profile/iwin68itcom
https://bio.site/iwin68itcom
https://pxhere.com/en/photographer-me/4813826
https://magic.ly/iwin68itcom/Iwin68
https://song.link/iwin68itcom
https://myminifactory.com/users/iwin68itcom
https://intensedebate.com/people/iwin68itcom1
https://jaga.link/iwin68itcom
https://vocal.media/authors/iwin68itcom
https://files.fm/iwin68itcom/info
https://link.space/@iwin68itcom
https://sketchfab.com/iwin68itcom
https://montessorijobsuk.co.uk/author/iwin68itcom/
https://biolinku.co/iwin68itcom
https://tawk.to/iwin68itcom
https://about.me/iwin68itcom
https://iwin68itcom.webflow.io/
https://substance3d.adobe.com/community-assets/profile/org.adobe.user:735C22E269103BFD0A495C1C@AdobeID
https://qoolink.co/iwin68itcom
https://hackmd.io/@iwin68itcom/Iwin68
https://boulder-sternum-9af.notion.site/Iwin68-2a6807c940778044a850e1ce1c4803aa
https://odesli.co/iwin68itcom
https://wakelet.com/@iwin68itcom
https://leetcode.com/u/iwin68itcom/
https://plurk.com/iwin68itcom
https://jali.me/iwin68itcom
https://rapidapi.com/user/iwin68itcom
https://wefunder.com/iwin68itcom
https://community.fabric.microsoft.com/t5/user/viewprofilepage/user-id/1398645
https://jakle.sakura.ne.jp/pukiwiki/?iwin68itcom
https://bioqoo.com/iwin68itcom
https://hub.docker.com/u/iwin68itcom
gojourney.xsrv.jp/index.php?iwin68itcom
https://pad.koeln.ccc.de/s/2Q2092Ksp
https://jali.pro/iwin68itcom
https://coub.com/iwin68itcom
https://bandlab.com/iwin68itcom
https://haikudeck.com/presentations/iwin68itcom
https://potofu.me/iwin68itcom
https://skypixel.com/users/djiuser-qp1bqlrx8nds
https://wallhaven.cc/user/iwin68itcom
https://allmyfaves.com/iwin68itcom
https://otofun.net/members/iwin68itcom.896726/#about
https://tap.bio/@iwin68itcom
https://bookmeter.com/users/1640179
https://efunda.com/members/people/show_people.cfm?Usr=iwin68itcom
https://slmath.org/people/88234
https://nhattao.com/members/user6861939.6861939/
https://ofuse.me/iwin68itcom
https://rareconnect.org/en/user/iwin68itcom
https://creator.nightcafe.studio/u/iwin68itcom
https://kanban.xsitepool.tu-freiberg.de/s/rkxm8GC6J-l
stes.tyc.edu.tw/xoops/modules/profile/userinfo.php?uid=3784307
https://app.talkshoe.com/user/iwin68itcom
https://plaza.rakuten.co.jp/iwin68itcom/diary/202511100000/
https://community.m5stack.com/user/iwin68itcom
https://hackmd.okfn.de/s/rJkw7CaJbl
https://hub.vroid.com/en/users/121330201
https://participa.terrassa.cat/profiles/iwin68itcom/activity
https://b.io/iwin68itcom
https://profiles.xero.com/people/iwin68itcom
https://muckrack.com/iwin68-itcom/bio
https://community.cloudera.com/t5/user/viewprofilepage/user-id/135819
https://openstreetmap.org/user/iwin68itcom
https://draft.blogger.com/profile/07798070424027919985
https://telegra.ph/iwin68itcom-11-09
https://californiafilm.ning.com/profile/Iwin68
https://events.opensuse.org/users/687541
https://gitea.com/iwin68itcom
aunetads.com/view/item-2803080-iwin68itcom.html
https://dreevoo.com/profile_info.php?pid=896588
https://decidim.derechoaljuego.digital/profiles/iwin68itcom/activity
https://secondstreet.ru/profile/iwin68itcom/
https://band.us/band/100548861/post/1
https://gifyu.com/iwin68itcom
https://code.antopie.org/iwin68itcom
https://gitlab.vuhdo.io/iwin68itcom
https://slidehtml5.com/homepage/ndku#About
fort-raevskiy.ru/community/profile/iwin68itcom/
https://roomstyler.com/users/iwin68itcom
https://mapleprimes.com/users/iwin68itcom
https://divephotoguide.com/user/iwin68itcom
https://producthunt.com/@iwin68itcom
https://justpaste.it/u/iwin68itcom
https://pumpyoursound.com/u/user/1547321
https://marketplace.trinidadweddings.com/author/iwin68itcom/
https://udrpsearch.com/user/iwin68itcom
https://niftygateway.com/@iwin68itcom/
https://spinninrecords.com/profile/iwin68itcom/supported-tracks/
https://speedrun.com/users/iwin68itcom
https://fundable.com/iwin68-game
https://motion-gallery.net/users/861325
https://scrapbox.io/iwin68itcom/Iwin68
https://postheaven.net/iwin68itcom/iwin68
https://noti.st/iwin68itcom
https://royalroad.com/profile/847596
https://bitsdujour.com/profiles/uDq3Kb
https://aicrowd.com/participants/iwin68itcom
https://multichain.com/qa/user/iwin68itcom
https://able2know.org/user/iwin68itcom/
https://hieuvetraitim.com/members/iwin68itcom.120721/
https://blackhatprotools.info/member.php?258049-iwin68itcom
https://gettogether.community/profile/400627/
https://topsitenet.com/profile/iwin68itcom/1497149/
https://checkli.com/iwin68itcom
https://invelos.com/UserProfile.aspx?alias=iwin68itcom
https://unityroom.com/users/iwin68itcom
https://babelcube.com/user/iwin68-game
https://video-bookmark.com/bookmark/6940595/iwin68/
https://hoaxbuster.com/redacteur/iwin68itcom
https://justpaste.me/IIN2
https://equinenow.com/farm/iwin68-1277044.htm
https://abclinuxu.cz/lide/iwin68itcom
https://lifeinsys.com/user/iwin68itcom
fanart-central.net/user/iwin68itcom/profile
https://findaspring.org/members/iwin68itcom/
https://huzzaz.com/collection/iwin68-21
https://uiverse.io/profile/iwin68itcom
https://blender.community/iwin68itcom/
https://notebook.ai/documents/2057559
https://xosothantai.com/members/iwin68itcom.579390/
https://maxforlive.com/profile/user/iwin68itcom?tab=about
https://anibookmark.com/user/iwin68itcom.html
biblesupport.com/user/777069-iwin68itcom/
https://longbets.org/user/iwin68itcom/
https://apptuts.bio/iwin68-222851
https://rotorbuilds.com/profile/180522/
https://my.clickthecity.com/iwin68itcom/post/78328
https://iszene.com/user-314194.html
https://akniga.org/profile/1314299-iwin68/
https://backabuddy.co.za/campaign/iwin68~2
https://rwaq.org/users/iwin68itcom
https://dotafire.com/profile/iwin68itcom-212539
usnetads.com/view/item-133846301-Iwin68.html
https://heavyironjobs.com/profiles/7444404-iwin68
https://transfur.com/Users/iwin68itcom
https://snippet.host/eentva
https://igli.me/iwin68itcom
https://doselect.com/@104bfa1fc5c691e2ce00283f5
https://matkafasi.com/user/iwin68itcom
https://apsense.com/user/iwin68itcom
https://undrtone.com/iwin68itcom
https://aiplanet.com/profile/iwin68itcom
https://aprenderfotografia.online/usuarios/iwin68itcom/profile/
https://claimajob.com/profiles/7444472-iwin68
https://wvhired.com/profiles/7444477-iwin68
https://6giay.vn/members/iwin68itcom.84382/#about
https://decidem.primariatm.ro/profiles/iwin68itcom/activity
https://demo.wowonder.com/iwin68itcom
https://jobs.suncommunitynews.com/profiles/7444489-iwin68
https://biolinky.co/iwin-68-itcom
https://myanimeshelf.com/profile/iwin68itcom
https://jobs.landscapeindustrycareers.org/profiles/7444498-iwin68
https://pads.zapf.in/s/fLKf-Vkue
https://protospielsouth.com/user/94117
https://sythe.org/members/iwin68itcom.1965465/
https://malikmobile.com/iwin68itcom
https://jetphotos.com/photographer/687469
https://fliphtml5.com/homepage/iwin68itcom/iwin68/
https://community.m5stack.com/user/iwin68itcom
https://jobs.westerncity.com/profiles/7444530-iwin68
https://jobs.njota.org/profiles/7444533-iwin68
https://nintendo-master.com/profil/iwin68itcom
https://safechat.com/u/iwin68itcom
https://phijkchu.com/a/iwin68itcom/video-channels
https://savelist.co/profile/users/iwin68itcom
https://tooter.in/iwin68itcom
https://tizmos.com/iwin68itcom/
https://skool.com/@iwin-game-8135
https://eo-college.org/members/iwin68itcom/
https://hanson.net/users/iwin68itcom
https://schoolido.lu/user/iwin68itcom/
https://theafricavoice.com/profile/iwin68itcom
https://routinehub.co/user/iwin68itcom
https://liulo.fm/iwin68itcom
https://its-my.link/@iwin68itcom
https://divisionmidway.org/jobs/author/iwin68itcom/
https://gitlab.aicrowd.com/iwin68itcom
https://gitee.com/iwin68itcom
https://fortunetelleroracle.com/profile/iwin68itcom
https://openrec.tv/user/iwin68itcom/about
https://shippingexplorer.net/en/user/iwin68itcom/216141
https://golosknig.com/profile/iwin68itcom
https://spiderum.com/nguoi-dung/iwin68itcom
https://fabble.cc/iwin68itcom
https://lingvolive.com/pt-br/profile/e990ba85-f98f-4eac-bd9f-6eca6c0027d3/translations
https://maanation.com/iwin68itcom
https://formulamasa.com/elearning/members/iwin68itcom/
https://yourquote.in/iwin68-game-d19cd/quotes
https://linksta.cc/@iwin68itcom
https://krachelart.com/UserProfile/tabid/43/userId/1318713/Default.aspx
https://yumpu.com/user/iwin68itcom
https://oyaschool.com/users/iwin68itcom/
https://annuncigratuititalia.it/author/iwin68itcom/
https://luvly.co/users/iwin68itcom
https://catapulta.me/users/iwin68itcom
https://ketcau.com/member/105381-iwin68itcom
https://bitspower.com/support/user/iwin68itcom
https://gravesales.com/author/iwin68itcom/
https://dongnairaovat.com/members/iwin68itcom.56455.html
https://acomics.ru/-iwin68itcom
https://rant.li/iwin68itcom/iwin68
https://fanclove.jp/profile/jpJLjexkBa
https://app.hellothematic.com/creator/profile/1079679
https://facer.io/u/iwin68itcom
https://pc.poradna.net/users/1076861293-iwin68itcom
https://espritgames.com/members/49150374/
https://web.ggather.com/iwin68itcom
https://3dwarehouse.sketchup.com/user/iwin68itcom
https://careers.gita.org/profiles/7446193-iwin68
https://source.coderefinery.org/iwin68itcom
https://videogamemods.com/members/iwin68itcom/
https://booklog.jp/users/iwin68itcom/profile
https://medibang.com/author/27454274/
https://onlinevetjobs.com/author/iwin68itcom/
https://hackaday.io/iwin68itcom
canetads.com/view/item-4277029-Iwin68.html
https://vevioz.com/iwin68itcom
https://iglinks.io/hinoue127-1cx
https://passes.com/iwin68itcom
https://dialog.eslov.se/profiles/iwin68itcom/activity?locale=en
https://slideserve.com/iwin68itcom
https://linkmix.co/46515968
https://help.orrs.de/user/iwin68itcom
https://us.enrollbusiness.com/BusinessProfile/7632472/Iwin68
https://haveagood.holiday/users/465467
https://pixabay.com/es/users/53182493/
https://halaltrip.com/user/profile/281256/iwin68itcom/
https://laundrynation.com/community/profile/iwin68itcom/
https://feyenoord.supporters.nl/profiel/114899/iwin68itcom
https://profile.sampo.ru/iwin68itcom
https://dapp.orvium.io/profile/iwin68-game
https://fantasyplanet.cz/diskuzni-fora/users/iwin68itcom/
https://kumu.io/iwin68itcom/iwin68itcom
https://sciencebee.com.bd/qna/user/iwin68itcom
https://bandori.party/user/350441/iwin68itcom/
https://spigotmc.org/members/iwin68itcom.2413213/
https://wibki.com/iwin68itcom
https://freeimage.host/iwin68itcom
https://brownbook.net/business/54474724/iwin68
https://kktix.com/user/7868039
https://vnbadminton.com/members/iwin68itcom.112500/
https://gram.social/iwin68itcom
https://commoncause.optiontradingspeak.com/index.php/community/profile/iwin68itcom/
https://ie.enrollbusiness.com/BusinessProfile/7632472/Iwin68
https://shootinfo.com/author/iwin68itcom/?pt=ads
https://facekindle.com/iwin68itcom
https://aipictors.com/users/9e4f9ab1-6e8c-a036-f67f-5f299514f491
https://partecipa.poliste.com/profiles/iwin68itcom/activity
https://aseeralkotb.com/en/profiles/iwin68itcom
ofbiz.116.s1.nabble.com/Iwin68-Link-Game-Iwin68-Club-i-Th-ng-Uy-Tin-2025-td4945874.html
https://divinguniverse.com/user/iwin68itcom
https://criminalelement.com/members/iwin68itcom/profile/
https://iwin68itcom.stck.me/profile
https://brain-market.com/u/iwin68itcom
https://muabanhaiduong.com/members/iwin68itcom.63468/#about
https://demo.userproplugin.com/profile/iwin68itcom/
https://goodreads.com/user/show/195303983-iwin68
https://writexo.com/share/6cbe2d1caefe
https://freeicons.io/profile/852492
https://es.stylevore.com/user/iwin68itcom
https://sciencemission.com/profile/iwin68itcom
https://zeroone.art/profile/iwin68itcom
https://experiment.com/users/iwin68itcom
https://pixelfed.uno/iwin68itcom
delphi.larsbo.org/user/iwin68itcom
https://eternagame.org/players/577051
https://portfolium.com/iwin68itcom
https://songback.com/profile/89050/about
https://connect.gt/user/iwin68itcom
https://mygamedb.com/profile/iwin68itcom
https://manga-no.com/@iwin68itcom/profile
https://11secondclub.com/users/profile/1675909
https://ja.cofacts.tw/user/iwin68itcom
https://sarah30.com/users/iwin68itcom
https://beteiligung.stadtlindau.de/profile/iwin68itcom/
https://filesharingtalk.com/members/625290-iwin68itcom
https://vozer.net/members/iwin68itcom.67383/
https://plotterusati.it/user/iwin68itcom
https://myget.org/users/iwin68itcom
https://investagrams.com/Profile/iwin68itcom
https://protocol.ooo/ja/users/iwin68-8d3d837a-f660-46d8-874d-261075b646b7
https://jobs.windomnews.com/profiles/7446443-iwin68
https://raovat.nhadat.vn/members/iwin68itcom-255982.html
https://ixawiki.com/index.php?iwin68itcom
https://homepage.ninja/iwin68itcom
https://upcarta.com/profile/iwin68itcom
https://mez.ink/iwin68itcom
https://website.informer.com/iwin68.it.com
https://2000fun.com/home-space-uid-4846533-do-profile.html
https://swaay.com/u/hinoue127/about/
https://lola.vn/dien-dan/chia-se-kinh-nghiem/moi-ngay-mot-y-tuong/iwin68--link-game-iwin68-club-doi-thuong-uy-tin-2025.htm
https://jii.li/iwin68itcom
https://beamng.com/members/iwin68itcom.742234/
https://mateball.com/iwin68itcom
https://tianmu.org.tw/userinfo.php?uid=90488
https://conecta.bio/iwin68itcom
https://swag.live/user/6911f0269fe49b92db2a41f3?lang=en
https://weddingvendors.com/directory/profile/26405/
https://readtoto.com/u/3150639-iwin68itcom
https://fitlynk.com/iwin68itcom
https://kemono.im/iwin68itcom/iwin68
https://thepartyservicesweb.com/board/board_topic/3929364/7404081.htm
https://sunemall.com/board/board_topic/8431232/7404008.htm
https://tai-ji.net/board/board_topic/4160148/7404013.htm
https://artist.link/iwin68itcom
https://reverbnation.com/artist/iwin68itcom
https://velog.io/@iwin68itcom/about
https://reactormag.com/members/iwin68itcom/
https://youbiz.com/profile/iwin68itcom/
https://tealfeed.com/iwin68itcom
https://egl.circlly.com/users/iwin68itcom
https://aoezone.net/members/iwin68itcom.166047/#about
https://smartprogress.do/user/759400/
https://cdn.muvizu.com/Profile/iwin68itcom/Latest
https://quicknote.io/db021e40-be22-11f0-ad5d-058c7d9208c2/
https://papercall.io/speakers/iwin68itcom
https://zenwriting.net/iwin68itcom/iwin68
https://inkbunny.net/iwin68itcom
https://poipiku.com/12678638/
https://robertsspaceindustries.com/en/citizens/iwin68itcom
https://violet.vn/user/show/id/15194554
https://aminoapps.com/c/essay/page/blog/iwin68-link-game-iwin68-club-doi-thuong-uy-tin-2025/6P3X_5aPTzu63B8pVrxYGMqqwWegnxLRPjM
https://mymeetbook.com/iwin68itcom
https://desksnear.me/users/iwin68itcom
https://lustyweb.live/members/iwin68itcom.96926/#about
https://diigo.com/profile/iwin68itcom
https://diccut.com/iwin68itcom
https://gockhuat.net/member.php?u=401630
https://app.readthedocs.org/profiles/iwin68itcom/
https://managementpedia.com/members/iwin68itcom.1113305/#about
https://raovatquynhon.com/thiet-bi-dien-tu-4/iwin68-link-game-iwin68-club-doi-thuong-uy-tin-2025-7453
truck-business.cz/profile/iwin68itcom/info.html
https://pad.funkwhale.audio/s/BCT5Yz00J
https://community.cisco.com/t5/user/viewprofilepage/user-id/1939984
https://biomolecula.ru/authors/103387
https://iwin68itcom.therestaurant.jp/posts/58080376
jobhop.co.uk/profile/iwin68itcom
ukadslist.com/view/item-9869388-Iwin68.html
https://motionentrance.edu.np/profile/iwin68itcom/
https://rossoneriblog.com/author/iwin68itcom/
https://sketchersunited.org/users/289263
https://cgmood.com/iwin68itcom
https://iwin68itcom.amebaownd.com/posts/58080328
https://kuhustle.com/@iwin68itcom
https://aetherlink.app/users/7393606403212214272
https://mecabricks.com/en/user/iwin68itcom
https://sociomix.com/u/iwin68itcom/
https://playlist.link/iwin68itcom
https://mylink.page/iwin68itcom
https://pods.link/iwin68itcom
https://iwin68itcom.localinfo.jp/posts/58080390
https://beteiligung.amt-huettener-berge.de/profile/iwin68itcom/
innetads.com/view/item-3393349-Iwin68.html
https://decidim.barcelona/profiles/iwin68itcom/activity
https://foroatletismo.com/foro/members/iwin68itcom.html
https://idol.st/user/98433/iwin68itcom/
https://anunt-imob.ro/user/profile/830881
https://digiex.net/members/iwin68itcom.131943/
https://cofacts.tw/user/iwin68itcom
https://allmylinks.com/iwin68itcom
muzikspace.com/profiledetails.aspx?profileid=109888
https://circleme.com/iwin68itcom
https://iwin68itcom.storeinfo.jp/posts/58080400
https://mrclarksdesigns.builderspot.com/board/board_topic/690695/7404403.htm
https://s.id/iwin68itcom
https://medibulletin.com/author/iwin68itcom/
https://iwin68itcom.theblog.me/posts/58080431
https://siasat.pk/members/iwin68itcom.258244/#about
https://destaquebrasil.com/saopaulo/author/iwin68itcom/
https://kyourc.com/iwin68itcom
https://crypto.jobs/talent/profile/iwin68-2
https://civitai.com/user/iwin68itcom
https://pictureinbottle.com/r/iwin68itcom
https://grepmed.com/iwin68itcom
https://congdongx.com/thanh-vien/iwin68itcom.36475/#about
https://championsleage.review/wiki/User:Iwin68itcom
https://scientific-programs.science/wiki/User:Iwin68itcom
https://imoodle.win/wiki/User:Iwin68itcom
https://paidforarticles.in/author/iwin68itcom
https://ybrclub.com/members/iwin68itcom.7454/#about
kelleyjjackson.com/ActivityFeed/MyProfile/tabid/104/UserId/617392/Default.aspx
https://myebook.com/user_profile.php?id=iwin68itcom
https://trade-britanica.trade/wiki/User:Iwin68itcom
https://pattern-wiki.win/wiki/User:Iwin68itcom
newdigital-world.com/members/iwin68itcom.html
https://empregosaude.pt/en/author/iwin68itcom/
https://freedomteamapexmarketinggroup.com/board/board_topic/8118484/7405055.htm
https://mathlog.info/users/kbbQIjYb9vXlFSiqU7fzMXHmUzs1
https://cloud.anylogic.com/profile/user/f4f3b21f-704a-4c30-a28d-74126aaf978a
https://bluegrasstoday.com/directories/dashboard/reviews/iwin68itcom/
https://chichi-pui.com/users/iwin68itcom/
https://careers.coloradopublichealth.org/profiles/7447633-iwin68
https://pad.lescommuns.org/s/jNhl5X7Bz
https://hukukevi.net/user/iwin68itcom
https://lightroom.adobe.com/u/iwin68itcom
https://my.bio/iwin68itcom
https://album.link/iwin68itcom
https://linkin.bio/iwin68itcom
https://3dlancer.net/profile/u1147084
https://linqto.me/about/iwin68itcom
https://makeprojects.com/profile/iwin68itcom
https://muare.vn/shop/iwin68itcom/881781
https://3dtoday.ru/blogs/iwin68itcom
https://japaaan.com/user/52995
https://newdayrp.com/members/iwin68itcom.62674/#about
https://trakteer.id/iwin68itcom
https://utherverse.com/net/profile/view_profile.aspx?MemberID=105079494
https://web-tourist.net/members/iwin68itcom.42528/#about
https://old.bitchute.com/channel/iwin68itcom/
https://tuvan.bestmua.vn/dwqa-question/iwin68-link-game-iwin68-club-doi-thuong-uy-tin-2025
https://fengshuidirectory.com/dashboard/listings/iwin68itcom/
https://confengine.com/user/iwin68itcom
https://rehashclothes.com/iwin68itcom
https://electroswingthing.com/profile/iwin68itcom/
https://menwiki.men/wiki/User:Iwin68itcom
https://paper.wf/iwin68itcom/iwin68
https://vcook.jp/users/53689
https://storenvy.com/iwin68itcom
https://linkr.bio/iwin68itcom/store
https://searchengines.guru/ru/users/2214351
https://giantbomb.com/profile/iwin68itcom/
https://hedge.fachschaft.informatik.uni-kl.de/s/yHxOqQ6uF
https://party.biz/profile/iwin68itcom?tab=541
https://participez.perigueux.fr/profiles/iwin68itcom/activity
https://doc.adminforge.de/s/lXPIzzgJz
https://md.opensourceecology.de/s/-XnIDqE2E
https://md.coredump.ch/s/0zZosghOF
https://clashofcryptos.trade/wiki/User:Iwin68itcom
https://subaru-vlad.ru/forums/users/iwin68itcom
https://nedrago.com/forums/users/iwin68itcom/
https://tkc-games.com/forums/users/hinoue127/
https://quantrinet.com/forum/member.php?u=843609
https://iwin68itcom.mystrikingly.com/
https://es.files.fm/iwin68itcom/info
https://expathealthseoul.com/profile/iwin68itcom/
https://joy.link/iwin68itcom
https://bizidex.com/en/iwin68itcom-advertising-831502
jobboard.piasd.org/author/iwin68itcom/
https://shareyoursocial.com/iwin68itcom
https://library.zortrax.com/members/iwin68itcom/
https://expatguidekorea.com/profile/iwin68itcom/
https://in.enrollbusiness.com/BusinessProfile/7632472/Iwin68
https://pad.geolab.space/s/FwZhTZMEk
https://mail.party.biz/profile/iwin68itcom?tab=541
https://ncnews.co/profile/iwin68itcom
https://md.yeswiki.net/s/75zml0oZj
https://gratisafhalen.be/author/iwin68itcom/
https://md.inno3.fr/s/7ZznKo7S4
https://mangatoto.org/user/3150639/iwin68itcom
https://audiomack.com/iwin68itcom
https://cointr.ee/iwin68itcom
https://md.chaospott.de/s/zT9sbBD67
https://forum.freero.org/space-uid-22609.html
https://bookmarksurl.com/story6158800/iwin68
https://forum.korabli.su/profile/293928432-iwin68itcom/?tab=field_core_pfield_12
https://forum.gettinglost.ca/user/iwin68itcom
https://cloudburstmc.org/members/iwin68itcom.63340/#about
https://producerbox.com/users/iwin68itcom
https://ariiyatickets.com/members/iwin68itcom/
https://manylink.co/@iwin68itcom
https://designspiration.com/iwin68itcom/saves/
https://iniuria.us/forum/member.php?620706-iwin68itcom
https://chaloke.com/forums/users/iwin68itcom/
https://rcuniverse.com/forum/members/iwin68itcom.html
https://qna.habr.com/user/iwin68itcom
https://malt-orden.info/userinfo.php?uid=427274
https://humanlove.stream/wiki/User:Iwin68itcom
https://historydb.date/wiki/User:Iwin68itcom
https://fora.babinet.cz/profile.php?id=98665
https://cameradb.review/wiki/User:Iwin68itcom
https://exchangle.com/iwin68itcom
https://timeoftheworld.date/wiki/User:Iwin68itcom
https://joinentre.com/profile/iwin68itcom
rias.ivanovo.ru/cgi-bin/mwf/user_info.pl?uid=61973
https://play-uno.com/profile.php?user=406470
https://uno-en-ligne.com/profile.php?user=406470
https://king-wifi.win/wiki/User:Iwin68itcom
https://xtremepape.rs/members/iwin68itcom.605813/#about
https://weddingbee.com/members/iwin68itcom/
https://bsky.app/profile/iwin68itcom.bsky.social
https://aiforkids.in/qa/user/iwin68itcom
https://iplogger.org/vn/logger/8QMx5fbrtiI6/
https://gaiaonline.com/profiles/iwin68itcom/50603422/
https://twilog.togetter.com/iwin68itcom
https://stylevore.com/user/iwin68itcom
hot-web-ads.com/post/post-free-ads-op.php
https://milliescentedrocks.com/board/board_topic/2189097/7405168.htm
https://wordsdomatter.com/board/board_topic/5204323/7405171.htm
https://moshpyt.com/user/iwin68itcom
https://coffeesix-store.com/board/board_topic/7560063/7405179.htm
https://blockdit.com/iwin68itcom
https://greencarpetcleaningprescott.com/board/board_topic/7203902/7405174.htm
https://google.com.uy/url?q=https://iwin68.it.com/
https://images.google.com.cu/url?q=https://iwin68.it.com/
https://images.google.com.cu/url?q=https://iwin68.it.com/
https://images.google.com/url?q=https://iwin68.it.com/
https://images.google.com.ec/url?q=https://iwin68.it.com/
https://images.google.ac/url?q=https://iwin68.it.com/
https://images.google.at/url?q=https://iwin68.it.com/
https://images.google.az/url?q=https://iwin68.it.com/
https://images.google.ba/url?q=https://iwin68.it.com/
https://images.google.bg/url?q=https://iwin68.it.com/
https://images.google.bj/url?q=https://iwin68.it.com/
https://images.google.cd/url?q=https://iwin68.it.com/
https://images.google.cf/url?q=https://iwin68.it.com/
https://images.google.co.id/url?q=https://iwin68.it.com/
https://images.google.co.jp/url?q=https://iwin68.it.com/
https://images.google.co.ma/url?q=https://iwin68.it.com/
https://images.google.co.mz/url?q=https://iwin68.it.com/
https://images.google.co.nz/url?q=https://iwin68.it.com/
https://images.google.co.uz/url?q=https://iwin68.it.com/
https://images.google.co.ve/url?q=https://iwin68.it.com/
https://images.google.co.za/url?q=https://iwin68.it.com/
https://images.google.com.af/url?q=https://iwin68.it.com/
https://images.google.com.ag/url?q=https://iwin68.it.com/
https://images.google.com.br/url?source=imgres&ct=img&q=https://iwin68.it.com/
https://images.google.com.ec/url?q=https://iwin68.it.com/
https://images.google.com.fj/url?q=https://iwin68.it.com/
https://images.google.com.gh/url?q=https://iwin68.it.com/
https://images.google.com.mt/url?q=https://iwin68.it.com/
https://meet.google.com/linkredirect?authuser=0&dest=https://iwin68.it.com/
https://images.google.com.py/url?q=https://iwin68.it.com/
https://images.google.com.tj/url?q=https://iwin68.it.com/
https://images.google.com.uy/url?q=https://iwin68.it.com/
https://images.google.de/url?q=https://iwin68.it.com/
https://images.google.dj/url?q=https://iwin68.it.com/
https://images.google.fr/url?source=imgres&ct=ref&q=https://iwin68.it.com/
https://images.google.ge/url?q=https://iwin68.it.com/
https://images.google.hn/url?q=https://iwin68.it.com/
https://images.google.is/url?q=https://iwin68.it.com/
https://images.google.kg/url?q=https://iwin68.it.com/
https://images.google.lk/url?q=https://iwin68.it.com/
https://images.google.lt/url?q=https://iwin68.it.com/
https://images.google.lu/url?q=https://iwin68.it.com/
https://images.google.me/url?q=https://iwin68.it.com/
https://images.google.mg/url?q=https://iwin68.it.com/
https://images.google.mk/url?q=https://iwin68.it.com/
https://images.google.mn/url?q=https://iwin68.it.com/
https://images.google.ms/url?q=https://iwin68.it.com/
https://images.google.ne/url?q=https://iwin68.it.com/
https://images.google.nl/url?q=https://iwin68.it.com/
https://images.google.no/url?q=https://iwin68.it.com/
https://images.google.nu/url?q=https://iwin68.it.com/
https://images.google.pl/url?q=https://iwin68.it.com/
https://images.google.pn/url?q=https://iwin68.it.com/
https://images.google.pt/url?q=https://iwin68.it.com/
https://images.google.rs/url?q=https://iwin68.it.com/
https://images.google.sc/url?q=https://iwin68.it.com/
https://images.google.si/url?q=https://iwin68.it.com/
https://images.google.st/url?q=https://iwin68.it.com/
https://images.google.tm/url?q=https://iwin68.it.com/
https://images.google.ae/url?q=https://iwin68.it.com/
https://image.google.ie/url?q=https://iwin68.it.com/
https://images.google.sk/url?q=https://iwin68.it.com/
https://image.google.cat/url?q=https://iwin68.it.com/
https://image.google.co.bw/url?q=https://iwin68.it.com/
https://image.google.co.zm/url?q=https://iwin68.it.com/
https://image.google.as/url?q=https://iwin68.it.com/
https://images.google.rs/url?q=https://iwin68.it.com/
https://image.google.ba/url?q=https://iwin68.it.com/
https://image.google.com.sa/url?q=https://iwin68.it.com/
https://image.google.jo/url?q=https://iwin68.it.com/
https://image.google.la/url?q=https://iwin68.it.com/
https://image.google.az/url?q=https://iwin68.it.com/
https://image.google.iq/url?q=https://iwin68.it.com/
https://image.google.am/url?q=https://iwin68.it.com/
https://image.google.tm/url?q=https://iwin68.it.com/
https://image.google.al/url?q=https://iwin68.it.com/
https://maps.google.jp/url?q=https://iwin68.it.com/
https://maps.google.com/url?q=https://iwin68.it.com/
https://maps.google.ch/url?q=https://iwin68.it.com/
https://maps.google.at/url?q=https://iwin68.it.com/
https://maps.google.si/url?q=https://iwin68.it.com/
https://maps.google.li/url?q=https://iwin68.it.com/
https://maps.google.cd/url?q=https://iwin68.it.com/
https://maps.google.mw/url?q=https://iwin68.it.com/
https://maps.google.ad/url?q=https://iwin68.it.com/
https://maps.google.as/url?q=https://iwin68.it.com/
https://maps.google.bg/url?q=https://iwin68.it.com/
https://maps.google.bi/url?q=https://iwin68.it.com/
https://maps.google.ca/url?q=https://iwin68.it.com/
https://maps.google.cf/url?q=https://iwin68.it.com/
https://maps.google.cg/url?q=https://iwin68.it.com/
https://maps.google.ci/url?q=https://iwin68.it.com/
https://maps.google.cl/url?q=https://iwin68.it.com/
https://maps.google.co.il/url?q=https://iwin68.it.com/
https://maps.google.co.th/url?q=https://iwin68.it.com/
https://maps.google.co.uk/url?q=https://iwin68.it.com/
https://maps.google.co.zw/url?q=https://iwin68.it.com/
https://maps.google.com.ar/url?q=https://iwin68.it.com/
https://maps.google.com.bz/url?q=https://iwin68.it.com/
https://maps.google.com.ec/url?q=https://iwin68.it.com/
https://maps.google.com.hk/url?q=https://iwin68.it.com/
https://maps.google.com.kw/url?q=https://iwin68.it.com/
https://maps.google.com.lb/url?q=https://iwin68.it.com/
https://maps.google.com.mx/url?q=https://iwin68.it.com/
https://maps.google.com.ni/url?q=https://iwin68.it.com/
https://maps.google.com.py/url?q=https://iwin68.it.com/
https://maps.google.com.sg/url?q=https://iwin68.it.com/
https://maps.google.de/url?q=https://iwin68.it.com/
https://maps.google.dz/url?q=https://iwin68.it.com/
https://maps.google.ee/url?q=https://iwin68.it.com/
https://maps.google.es/url?q=https://iwin68.it.com/
https://maps.google.fi/url?q=https://iwin68.it.com/
https://maps.google.ge/url?q=https://iwin68.it.com/
https://maps.google.gr/url?q=https://iwin68.it.com/
https://maps.google.hu/url?q=https://iwin68.it.com/
https://maps.google.it/url?q=https://iwin68.it.com/
https://maps.google.je/url?q=https://iwin68.it.com/
https://maps.google.jo/url?q=https://iwin68.it.com/
https://maps.google.kz/url?q=https://iwin68.it.com/
https://maps.google.lv/url?q=https://iwin68.it.com/
https://maps.google.mn/url?q=https://iwin68.it.com/
https://maps.google.mv/url?q=https://iwin68.it.com/
https://maps.google.no/url?q=https://iwin68.it.com/
https://maps.google.pn/url?q=https://iwin68.it.com/
https://maps.google.ro/url?q=https://iwin68.it.com/
https://maps.google.ru/url?q=https://iwin68.it.com/
https://maps.google.se/url?q=https://iwin68.it.com/
https://maps.google.sk/url?q=https://iwin68.it.com/
https://maps.google.sn/url?q=https://iwin68.it.com/
https://maps.google.tg/url?q=https://iwin68.it.com/
https://maps.google.dk/url?sa=t&url=https://iwin68.it.com/
https://maps.google.ie/url?sa=t&url=https://iwin68.it.com/
https://google.ie/url?sa=t&url=https://iwin68.it.com/
https://images.google.ie/url?sa=t&url=https://iwin68.it.com/
https://images.google.com.my/url?sa=t&url=https://iwin68.it.com/
https://maps.google.com.my/url?sa=t&url=https://iwin68.it.com/
https://google.com.my/url?sa=t&url=https://iwin68.it.com/
https://maps.google.no/url?sa=t&url=https://iwin68.it.com/
https://google.no/url?sa=t&url=https://iwin68.it.com/
https://images.google.no/url?sa=t&url=https://iwin68.it.com/
https://images.google.bg/url?sa=t&url=https://iwin68.it.com/
https://maps.google.bg/url?sa=t&url=https://iwin68.it.com/
https://images.google.com.hk/url?sa=t&url=https://iwin68.it.com/
https://google.com.hk/url?sa=t&url=https://iwin68.it.com/
https://maps.google.com.hk/url?sa=t&url=https://iwin68.it.com/
https://google.co.za/url?sa=t&url=https://iwin68.it.com/
https://images.google.co.za/url?sa=t&url=https://iwin68.it.com/
https://maps.google.co.za/url?sa=t&url=https://iwin68.it.com/
https://images.google.com.co/url?sa=t&url=https://iwin68.it.com/
https://maps.google.com.co/url?sa=t&url=https://iwin68.it.com/
https://google.com.co/url?sa=t&url=https://iwin68.it.com/
https://google.cl/url?sa=t&url=https://iwin68.it.com/
https://images.google.cl/url?sa=t&url=https://iwin68.it.com/
https://maps.google.cl/url?sa=t&url=https://iwin68.it.com/
https://google.com.sg/url?sa=t&url=https://iwin68.it.com/
https://maps.google.com.sg/url?sa=t&url=https://iwin68.it.com/
https://images.google.com.sg/url?sa=t&url=https://iwin68.it.com/
https://maps.google.com.ph/url?sa=t&url=https://iwin68.it.com/
https://google.com.ph/url?sa=t&url=https://iwin68.it.com/
https://images.google.com.ph/url?sa=t&url=https://iwin68.it.com/
https://google.sk/url?sa=t&url=https://iwin68.it.com/
https://maps.google.sk/url?sa=t&url=https://iwin68.it.com/
https://images.google.sk/url?sa=t&url=https://iwin68.it.com/
https://images.google.com.pe/url?sa=t&url=https://iwin68.it.com/
https://maps.google.com.pe/url?sa=t&url=https://iwin68.it.com/
https://google.com.pe/url?sa=t&url=https://iwin68.it.com/
https://images.google.co.nz/url?sa=t&url=https://iwin68.it.com/
https://google.co.nz/url?sa=t&url=https://iwin68.it.com/
https://maps.google.co.nz/url?sa=t&url=https://iwin68.it.com/
https://images.google.com.sa/url?sa=t&url=https://iwin68.it.com/
https://maps.google.com.sa/url?sa=t&url=https://iwin68.it.com/
https://google.com.sa/url?sa=t&url=https://iwin68.it.com/
https://maps.google.co.il/url?sa=t&url=https://iwin68.it.com/
https://images.google.co.il/url?sa=t&url=https://iwin68.it.com/
https://google.co.il/url?sa=t&url=https://iwin68.it.com/
https://google.co.ve/url?sa=t&url=https://iwin68.it.com/
https://maps.google.co.ve/url?sa=t&url=https://iwin68.it.com/
https://images.google.co.ve/url?sa=t&url=https://iwin68.it.com/
https://maps.google.ae/url?sa=t&url=https://iwin68.it.com/
https://maps.google.com/url?sa=t&url=https://iwin68.it.com/
https://images.google.de/url?sa=t&url=https://iwin68.it.com/
https://images.google.co.uk/url?sa=t&url=https://iwin68.it.com/
https://maps.google.co.uk/url?sa=t&url=https://iwin68.it.com/
https://maps.google.co.jp/url?sa=t&url=https://iwin68.it.com/
https://images.google.co.jp/url?sa=t&url=https://iwin68.it.com/
https://images.google.fr/url?sa=t&url=https://iwin68.it.com/
https://maps.google.fr/url?sa=t&url=https://iwin68.it.com/
https://maps.google.es/url?sa=t&url=https://iwin68.it.com/
https://images.google.es/url?sa=t&url=https://iwin68.it.com/
https://images.google.it/url?sa=t&url=https://iwin68.it.com/
https://maps.google.it/url?sa=t&url=https://iwin68.it.com/
https://images.google.com.br/url?sa=t&url=https://iwin68.it.com/
https://maps.google.com.br/url?sa=t&url=https://iwin68.it.com/
https://maps.google.ca/url?sa=t&url=https://iwin68.it.com/
https://images.google.ca/url?sa=t&url=https://iwin68.it.com/
https://maps.google.nl/url?sa=t&url=https://iwin68.it.com/
https://images.google.nl/url?sa=t&url=https://iwin68.it.com/
https://maps.google.co.in/url?sa=t&url=https://iwin68.it.com/
https://images.google.co.in/url?sa=t&url=https://iwin68.it.com/
https://maps.google.ru/url?sa=t&url=https://iwin68.it.com/
https://images.google.ru/url?sa=t&url=https://iwin68.it.com/
https://maps.google.pl/url?sa=t&url=https://iwin68.it.com/
https://images.google.pl/url?sa=t&url=https://iwin68.it.com/
https://maps.google.com.au/url?sa=t&url=https://iwin68.it.com/
https://images.google.com.au/url?sa=t&url=https://iwin68.it.com/
https://images.google.com.tw/url?sa=t&url=https://iwin68.it.com/
https://maps.google.com.tw/url?sa=t&url=https://iwin68.it.com/
https://maps.google.co.id/url?sa=t&url=https://iwin68.it.com/
https://images.google.co.id/url?sa=t&url=https://iwin68.it.com/
https://images.google.com/url?sa=t&url=https://iwin68.it.com/
https://images.google.ch/url?sa=t&url=https://iwin68.it.com/
https://maps.google.ch/url?sa=t&url=https://iwin68.it.com/
https://images.google.at/url?sa=t&url=https://iwin68.it.com/
https://maps.google.at/url?sa=t&url=https://iwin68.it.com/
https://images.google.cz/url?sa=t&url=https://iwin68.it.com/
https://maps.google.cz/url?sa=t&url=https://iwin68.it.com/
https://images.google.co.th/url?sa=t&url=https://iwin68.it.com/
https://maps.google.co.th/url?sa=t&url=https://iwin68.it.com/
https://images.google.com.ua/url?sa=t&url=https://iwin68.it.com/
https://maps.google.com.ua/url?sa=t&url=https://iwin68.it.com/
https://maps.google.com.tr/url?sa=t&url=https://iwin68.it.com/
https://images.google.com.tr/url?sa=t&url=https://iwin68.it.com/
https://maps.google.com.mx/url?sa=t&url=https://iwin68.it.com/
https://images.google.com.mx/url?sa=t&url=https://iwin68.it.com/
https://images.google.dk/url?sa=t&url=https://iwin68.it.com/
https://maps.google.hu/url?sa=t&url=https://iwin68.it.com/
https://images.google.hu/url?sa=t&url=https://iwin68.it.com/
https://images.google.fi/url?sa=t&url=https://iwin68.it.com/
https://maps.google.fi/url?sa=t&url=https://iwin68.it.com/
https://images.google.com.vn/url?sa=t&url=https://iwin68.it.com/
https://maps.google.pt/url?sa=t&url=https://iwin68.it.com/
https://images.google.pt/url?sa=t&url=https://iwin68.it.com/
https://maps.google.ro/url?sa=t&url=https://iwin68.it.com/
https://images.google.ro/url?sa=t&url=https://iwin68.it.com/
https://images.google.gr/url?sa=t&url=https://iwin68.it.com/
https://maps.google.gr/url?sa=t&url=https://iwin68.it.com/
https://images.google.ae/url?sa=t&url=https://iwin68.it.com/
https://images.google.com.pk/url?sa=t&url=https://iwin68.it.com/
https://maps.google.com.eg/url?sa=t&url=https://iwin68.it.com/
https://images.google.com.eg/url?sa=t&url=https://iwin68.it.com/
https://maps.google.lt/url?sa=t&url=https://iwin68.it.com/
https://images.google.hr/url?sa=t&url=https://iwin68.it.com/
https://maps.google.hr/url?sa=t&url=https://iwin68.it.com/
https://maps.google.ee/url?sa=t&url=https://iwin68.it.com/
https://images.google.ee/url?sa=t&url=https://iwin68.it.com/
https://maps.google.si/url?sa=t&url=https://iwin68.it.com/
https://images.google.si/url?sa=t&url=https://iwin68.it.com/
https://images.google.com.ec/url?sa=t&url=https://iwin68.it.com/
https://maps.google.lv/url?sa=t&url=https://iwin68.it.com/
https://images.google.lv/url?sa=t&url=https://iwin68.it.com/
https://maps.google.ba/url?sa=t&url=https://iwin68.it.com/
https://images.google.com.ng/url?sa=t&url=https://iwin68.it.com/
https://images.google.com.uy/url?sa=t&url=https://iwin68.it.com/
https://images.google.com.bd/url?sa=t&url=https://iwin68.it.com/
GF
Appreciate the recommendation. Will try it out.
SI
Hi there, I read your blog daily. Your humoristic style is awesome, keep up the good work!
If some one desires to be updated with hottest technologies afterward he must be pay
a visit this web page and be up to date everyday.
Great article.
Hello, I wish for to subscribe for this weblog to take latest updates,
therefore where can i do it please assist.
I just couldn't go away your website before suggesting that I really
enjoyed the usual information an individual provide to your
guests? Is gonna be again frequently to check out new posts
Hi there, just became aware of your blog through Google, and found that
it is truly informative. I am gonna watch out for brussels.
I will be grateful if you continue this in future.
Lots of people will be benefited from your writing.
Cheers!
ZX
WY
NR
HO
PS
Woah! I'm really loving the template/theme of this site.
It's simple, yet effective. A lot of times it's challenging
to get that "perfect balance" between user friendliness and visual appearance.
I must say that you've done a excellent job with this.
Also, the blog loads extremely quick for me on Firefox.
Excellent Blog!
I simply could not go away your web site prior to suggesting that I extremely loved the usual information an individual provide to your guests?
Is going to be again steadily to check up on new posts
My brother recommended I may like this blog. He was once entirely
right. This submit truly made my day. You can not believe just how a lot time I had spent for this info!
Thanks!
OE
ZF
JV
Thank you for the auspicious writeup. It in reality used to be a leisure account it.
Look complex to far delivered agreeable from you!
By the way, how could we keep up a correspondence?
Superb blog! Do you have any hints for aspiring writers?
I'm planning to start my own website soon but I'm a little lost
on everything. Would you suggest starting with a
free platform like Wordpress or go for a paid option? There are so many choices out there
that I'm completely confused .. Any tips? Bless you!
Good way of explaining, and fastidious article to get data concerning my presentation topic, which i am
going to convey in institution of higher education.
YJ
Cek Live RTP BEJOGAMING terupdate dan akurat. Dapatkan informasi RTP
slot gacor hari ini untuk meningkatkan peluang kemenangan Anda di BEJOGAMING.
Daftar sekarang di BEJOGAMING dan dapatkan bonus new member 50% untuk Slot Online, Live Casino,
dan Sportbook. Situs game online terpercaya dengan pembayaran kemenangan 100%.
Nonton siaran langsung pertandingan olahraga favoritmu di BEJOGAMING TV.
Streaming gratis sepak bola, basket, tenis, dan lainnya.
Jangan lewatkan aksinya!
Good article. I'm going through a few of these issues as well..
FE
Temukan hasil lotto Genting terupdate dan akurat. Dapatkan informasi pengeluaran lotto, prediksi angka jitu,
dan tips meningkatkan peluang menang di LOTTO
GENTING.
Thanks for another informative website. Where else could I get that type of information written in such an ideal way?
I've a undertaking that I'm just now working on, and I've been at the
look out for such information.
whoah this weblog is magnificent i love reading your articles.
Stay up the good work! You already know, lots of individuals are searching round
for this info, you can help them greatly.
OQ
VF
DJ
PU
SA
SA
SA
FD
CM
It is perfect time to make some plans for the future and
it's time to be happy. I've read this post and if I could I want to suggest you few interesting things or tips.
Maybe you can write next articles referring to this article.
I desire to read more things about it!
I got this website from my friend who shared with me concerning
this web page and at the moment this time I am visiting this web page and reading very
informative articles or reviews at this place.
You really make it appear really easy together with your presentation however I find this matter to be actually something that I feel I'd never understand.
It sort of feels too complicated and extremely
large for me. I'm taking a look ahead to your next put up,
I will attempt to get the dangle of it!
I couldn't resist commenting. Perfectly written!
I am sure this post has touched all the internet people, its really really fastidious article on building up new blog.
I was able to find good info from your articles.
This paragraph provides clear idea designed for the new people of blogging, that really how to do blogging and site-building.
These are truly enormous ideas in regarding blogging. You have
touched some nice points here. Any way keep up wrinting.
You actually make it seem so easy with your presentation but I find
this topic to be actually something that I think I would never understand.
It seems too complex and very broad for me. I am looking forward for your next post, I'll try to get the hang of it!
You actually make it seem so easy together with your presentation however I in finding this matter to be actually something which I believe I'd never
understand. It sort of feels too complex and very wide for me.
I am taking a look ahead in your next post, I will attempt to
get the dangle of it!
Hey There. I found your blog using msn. This is a really well written article.
I will make sure to bookmark it and return to read more of your useful info.
Thanks for the post. I'll definitely comeback.
I have read so many articles or reviews regarding the blogger
lovers however this paragraph is truly a fastidious piece of writing, keep it up.
PD
This post gives clear idea in favor of the new visitors of blogging, that
truly how to do blogging.
Write more, thats all I have to say. Literally, it
seems as though you relied on the video to make your point.
You definitely know what youre talking about, why waste
your intelligence on just posting videos to your weblog when you could be giving us something informative
to read?
Expliciete video’s lokaliseren door betrouwbare adult
platforms online te verkennen. Ontdek betrouwbare porno hubs voor een private ervaring.
Hi there, I want to subscribe for this web site to obtain most up-to-date updates, so where can i do it please help.